 Sign in
Robot error alert in SMS
Alerts in case of unexpected events are very important in robotics. SMS alerts are often used when urgent action is needed. In this lecture you will learn how to send text message (SMS) alerts to mobile phones. You will learn about SMS messages sent by GSM modems, Android smart phones and IP SMS systems. IP SMS systems send SMS messages over the Internet and are used when large number of messages need to be sent, or when high performance is needed.
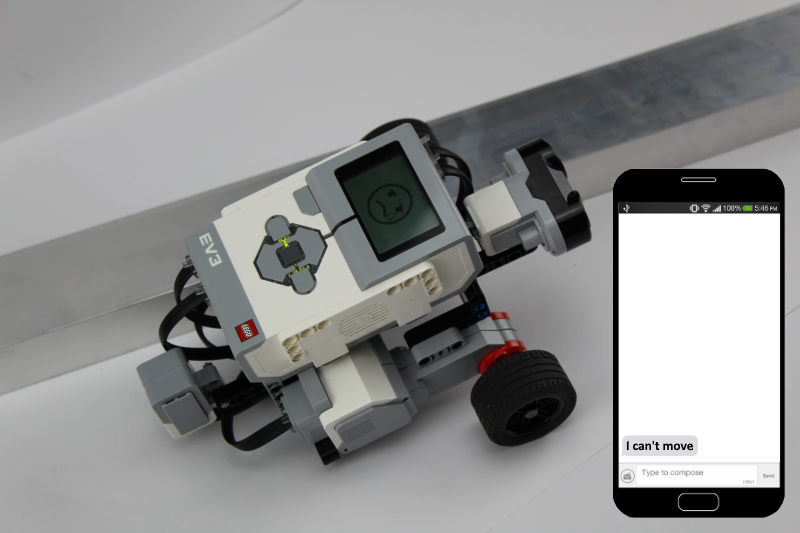
Figure 1 - Sending an error message through an SMPP SMS gateway
Requirements
- Ozeki Sniffer: http://www.ozeki.hu/index.php?owpn=6204
- Ozeki 10 installed: http://www.ozeki.hu/index.php?owpn=6066
- Lego connection installed: http://www.ozeki.hu/index.php?owpn=6067
- Ozeki NG SMS Gateway installed: http://www.ozeki.hu/index.php?owpn=1017
- Snap basics: http://www.ozeki.hu/index.php?owpn=6180
Explain what SMS, SMPP and HTTP means!
SMS - Short Message Service, which provides
sending and receiving text messages for devices containing a SIM card slot.
For example mobile phones or SMS gateways.
SMPP - Short Message Peer-to-Peer,
is a protocol that allows the transmission of a significant volume of text messages.
Typically SMS messages going through an SMPP server.
HTTP - HyperText Transfer Protocol
that defines how messages formatted and transmitted
and the actions of web servers and browsers.
Create an SMPP user and connect it to Ozeki 10
The first thing that you have to do is to create an SMPP user in Ozeki NG SMS Gateway that can manage the messages you sent to your robot or you received from it. If you created a user in the previous lecture, you can skip this step and can use its user details in this one. For that just open Ozeki NG SMS Gateway by navigating to http://127.0.0.1:9501/ and log in with your user details you entered during the installation. Click on Users and Applications and select the Add User option. Choose the SMPP user from the list and click on the Install link like Figure 3 shows you. The last step of the creation is to type the name and the password for the account you wish to create.
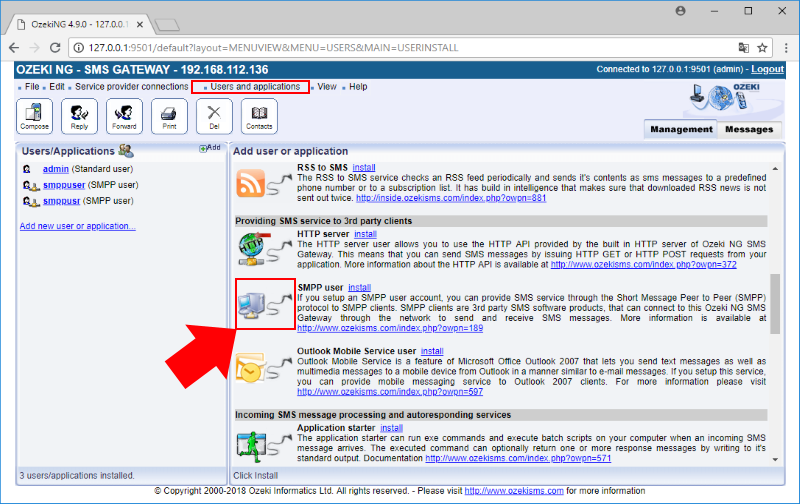
Figure 3 - Connecting SMPP user to Ozeki NG SMS Gateway
The next thing that you need to create in Ozeki NG SMS Gateway is the HTTP Server Connection that provides you the technology to alert you using SMS if the robot fails. To skip this step, you can use the details of the previously created connection. If you did not created yet, you just have to click on Service provider connection and choose Add service provider connection. From the list of connections, select the HTTP Server Connection by clicking on Install link like on Figure 4.
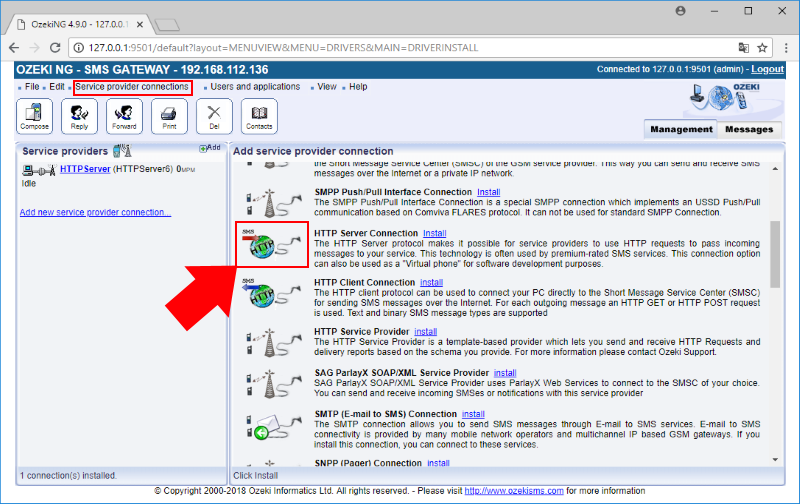
Figure 4 - Create a HTTP connection in Ozeki NG SMS Gateway
In this step you are going to connect the SMPP user to the SMPP connection that will be created in Ozeki 10. The way you should do this is completely the same as it was in the previuos lecture. After you logged in to Ozeki 10 and opened the Control Panel from the desktop, click on the blue Create new Connection button and select the Messaging option as you can see it on Figure 5.

Figure 5 - Connection methods in Ozeki 10
After you entered into the Messaging option by clicking on its icon, you have to choose the SMS connection type as you did in the previous lecture. From the available SMS connections you should choose the SMPP client (Figure 6), because that way you will be able to connect your SMPP user from Ozeki NG SMS Gateway to Ozeki 10 by using this connection.
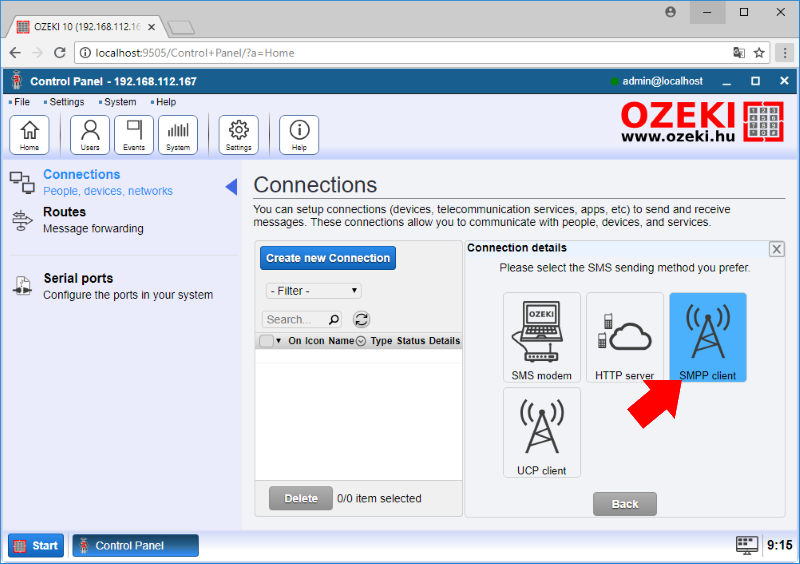
Figure 6 - SMS connections in Ozeki 10
The last part is going to show you how to set up the SMPP client connection. You can modify the default name of the connection by typing it in the Name textbox. To connect to server you need to enter the IP address of your computer, which you can find on the top left corner in the Control Panel. Type it into the Host textbox and select the 9500 as default port. Finally, you need to type the username and password of the SMPP user account you created before.
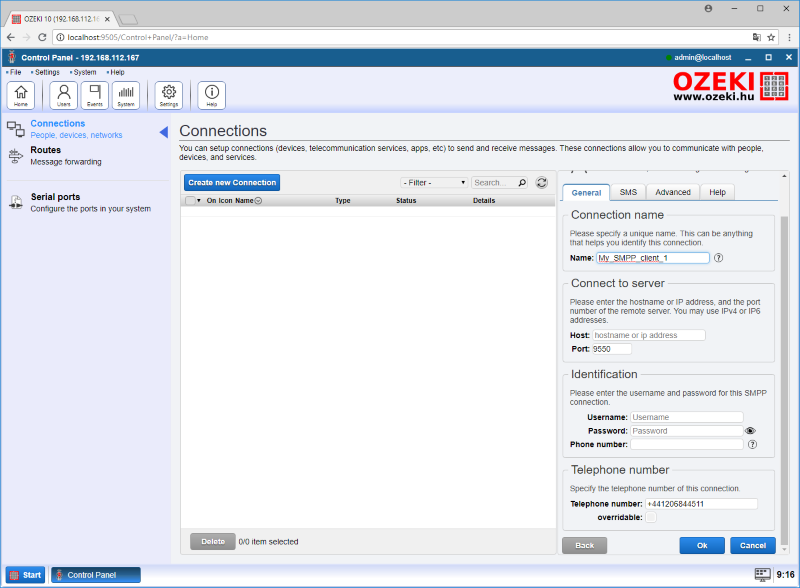
Figure 7 - Connection details of the SMPP connection
Route an SMPP connection to Snap
After you created all the accounts and connections the last thing that you need to do before you can start programming is to create a route between your SMPP connection and SNAP application. For that just select the Routes menu in Control Panel and click on Create new Route. Here you only need to select the two ends of the route which in this case will be the SMPP connection from which the messages came and the Snap where the messages will be sent. Choose them like in Figure 8.
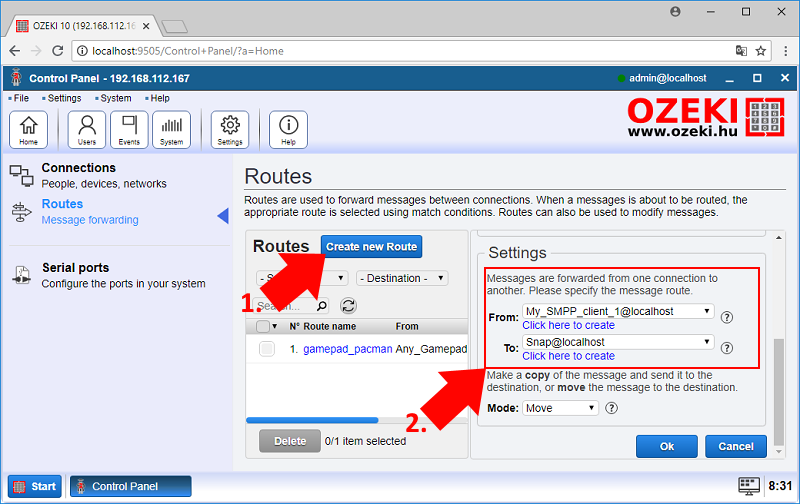
Figure 8 - Create new route
Write code to store the incoming SMS command!
After you set all the connection and user account that needed to send and receive SMS commands, you can now open SNAP, to write the program. So, first, drag the 'When green flag clicked' entry point, and then, you need to subscribe to the SMPP connection, so add the 'Subscribe' block, and select the SMPP connection (Figure 9). Next place the 'Get next message', that will catch the incoming message from the connection. After that, create the variable 'message', and with the 'Set 'message' to message value (string)' store the incoming command in that variable.
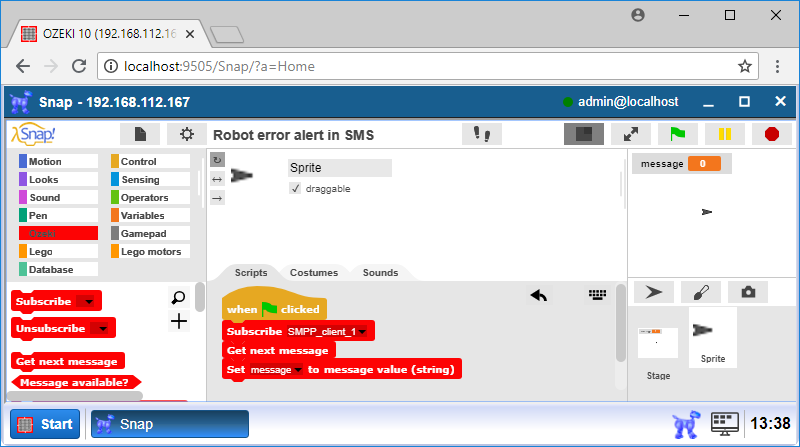
Figure 9 -
Upgrade code to compare the incoming command with 'go'!
So, now you get the message from the connection, and the next thing is you need to do, that if this message is the starting command, 'go'. For, you have to add an 'if' block, and as you can see in Figure 10, drag the 'matches' block from the Ozeki menu in the head of it. In that 'matches' block, to the left hand side, select the 'message' variable, to the right hand side type the word 'go'.
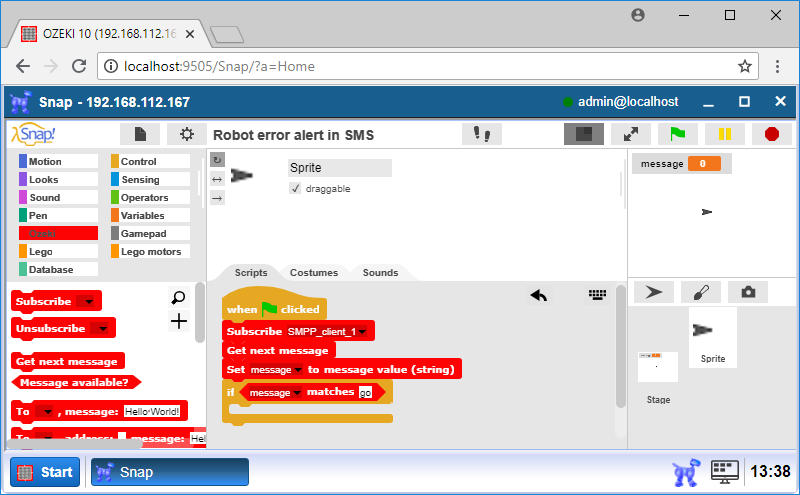
Figure 10 -
Expand code to start the robot and wait until it is only 1 cm away from the wall!
If the command that the program received is 'go', start the robot with the 'Start motor A+B at 20%' block, which will start the A and B motors of the robot with 20% of power. Next, the robot should move until it reaches the wall. So, for that drag the 'Wait until' block (Figure 11), and first fill it with the '<' operator. To the left hand side of that add the 'Distance in cm' block, and select the ultrasonic sensor. To the other side type 1, so the control will move towards to the next block, if the ultrasonic sensor has got any object less than one centimeters in front of it.
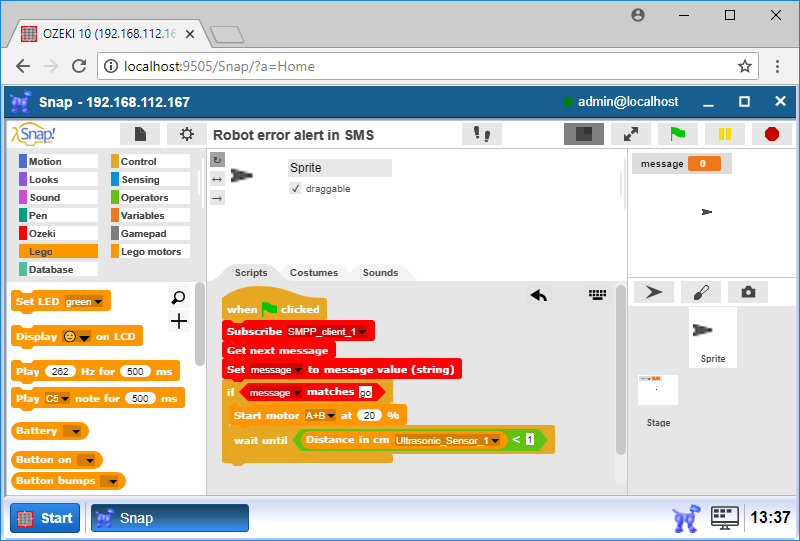
Figure 11 -
Upgrade code to send the error alert in SMS!
If the robot reaches the wall it means it can't move forward anymore. So, it needs to send the alert in SMS. For that, you need to send the message to the SMPP connection with the address where you want to send. So, like in Figure 12 add the 'To, address: message' block, and first, select the SMPP connection. Next, type the telephone number, where you want the send the message, and lastly type the message itself. The last block, that you have to add is the 'Stop motor A+B' block, that will stop the connected A and B motors of the robot.
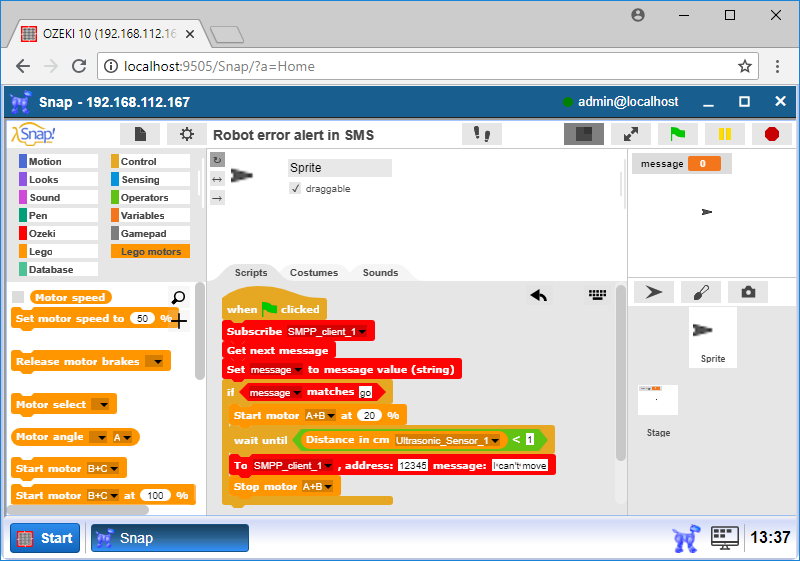
Figure 12 -
Program code
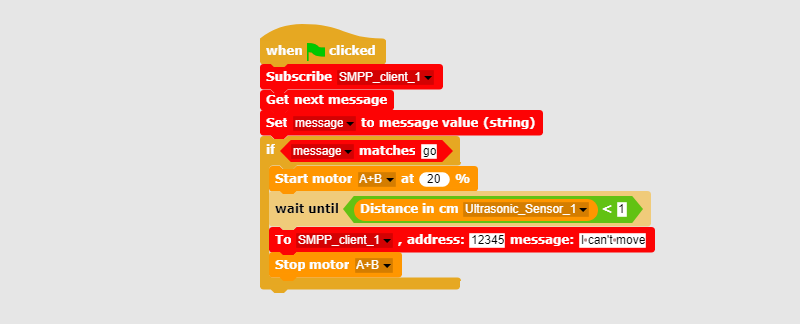
Figure 13 - The program code sends an error SMS if the robot coldn't move anymore
|
|
This program can send SMS in case of robot error The code can detect error in case the wheel couldn't move It is easier to follow the guide if you have the codes in front of you: Download program code to send SMS error alerts |
More information
- How to make an app
- How to make a GPC
- How to make a persistent file
- How to generate and display the QR Code image
- Installing Ozeki 10 on your Android device
- Robot control using SMS
- Robot error alert in SMS
- Build a custom GPC to enhance your Graphical User Interface (GUI)
- Trouble Shooting
- Learn to use browser sensors
- Publish your app and make money
- Bluetooth pairing
- Lego Mindstorms EV3 Bluetooth troubleshooting
- Easily open Ozeki Snap through the GUI
- Open the arm when te object is close
- Basic command set
- Bluetooth pairing on Android phones
- Connect the Lego robot to phone
- Chat with robot through phone
- Chat with robot using phone and PC
- How to create Lego robot build instruction
- Mapping and Navigation