 Sign in
Write messages in Morse code
Morse codes are the most basic form of remote communication. Although this technology is rarely used nowadays, the Morse alphabet is still known by heart by every ship commander and military radio operator. In this lecture you will learn how to build a Morse telegraph from Lego. You will use a button as the sensor, and your Lego brick will display the characters you have entered.
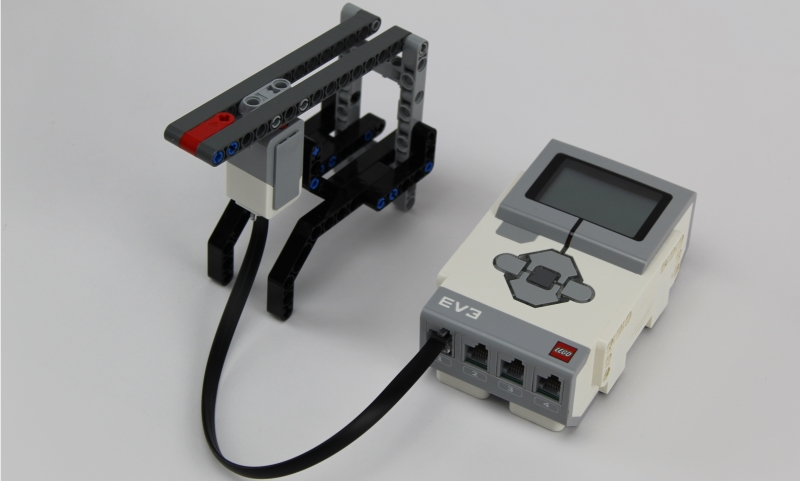
Figure 1 - Ozeki Morse
Requirements
- Ozeki Morse: Morse build instructions
- Ozeki 10 installed: Installed Ozeki 10 Robot OS
- Lego connection installed: Connect the Lego robot to Ozeki 10
- SNAP basics: Basic knowlege of the Snap programming language
- Morse alphabet table: Download it as PNG
Video #1
Video #2
Video #3
Lecture video - How to use Morse code
Describe what the Morse code and the Morse alphabet are!
Morse code - communication system that is based on dots and dashes, which are represented by short and
long signals and with the combination of these signals you can send messages.
Morse alphabet - set of symbols, each one represents a letter in Morse code. You can find the full
Morse alphabet table by scrolling up to the requirements section.
Write the word 'SOS' in Morse code!

Figure 2 - Alphabetical characters from A to Z and numbers form 0 to 9 in Morse code
Create a text from the following Morse code!
--- --.. . -.- ..

Figure 3 - The Morse code represents the word 'Ozeki'
Tell what the Unicode character table is!
The Unicode is a computing industry standard for the consistent encoding of text. The standard provides a unique number for every character from the whole world in order to support the wordwide interchange, processing, and display of the written texts of the diverse languages. The characters represented in a table called Unicode character table. On Figure 4, you can see some characters of the table from element 65 to 90.

Figure 4 - The elements of the Unicode character table from 65 to 90
Create a program to store the Morse alphabet and create an empty list for button presses and store it in a variable!
In this lecture you won't need to create any kind of connection in Ozeki 10, so you can start with the creation of the SNAP program. After adding the usual 'when green flag clicked' entry point, you have to create some variables. First create a 'display' variable that will contain the text the program is going to display on the LCD. At first, set its value to 'empty' by using a 'set' block. Create another variable called 'times', and set an empty list to it. In it, you will store the time durations of the button presses. This is for detecting short and long signals. Then create a 'morse' variable and set a list to it that contains the Morse alphabet. These steps are demonstrated in Figure 5.
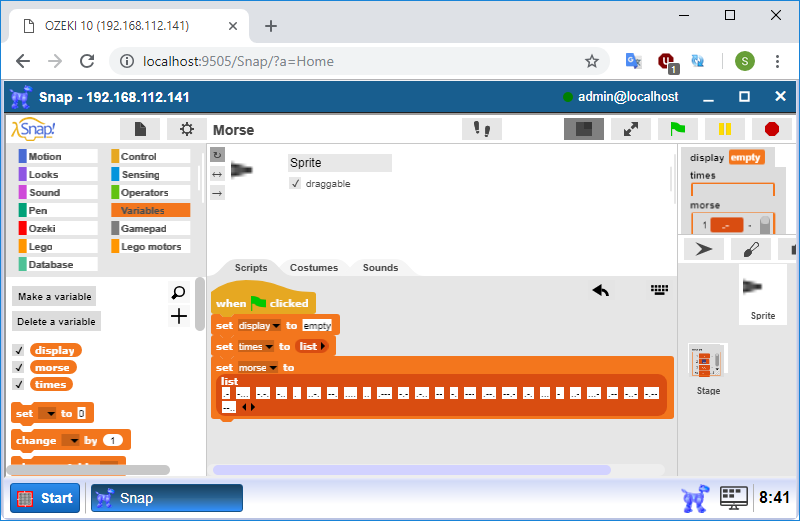
Figure 5 - The required variables
Attach blocks to clean the screen of the Brick and play a C5 note on it to indicate the start!
Before you could detect Morse codes and display their represented characters on the LCD, you have to do some tasks in order to initialize the LCD display. The 'Clean LCD' and the 'Update LCD' blocks ensure that the content of the LCD will be deleted at the beginning of the program execution. Finally drag a 'Play [C5] note for [500] ms' block which will play the C5 note on the speaker up to 500 ms. From the next tasks, you will start coding to detect the Morse signals.
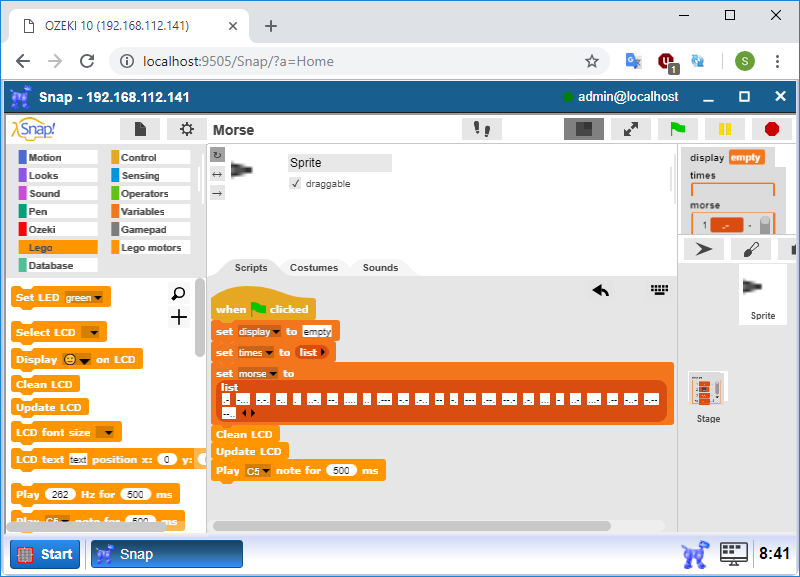
Figure 6 - The blocks clear the LCD and paly a note
Extend the code to wait until the button is pressed or until the elapsed time is more than 0.6 seconds and repeat these in a loop!
The whole code will cyclically run in a 'forever' loop that ensures that the program being able to read multiple Morse codes simultaneously. The first block in the loop should the 'Reset timer' one that resets the built-in timer to zero. The timer is the most important part of the program, because with it you can measure the elapsed time between two button presses in order to measure the length of each signal. So later you can use this to separate the characters (dots and dashes). Finally you need to check if the Touch Sensor has been pressed once or if it has been released for more than 0.6 seconds. The condition in the 'wait until' block checks if the button on the Touch Sensor is pressed or the timer is reached the 600 milliseconds. If one of the conditions is met, the program will stop waiting for inputs and start execute the code that you will start coding in the next task.
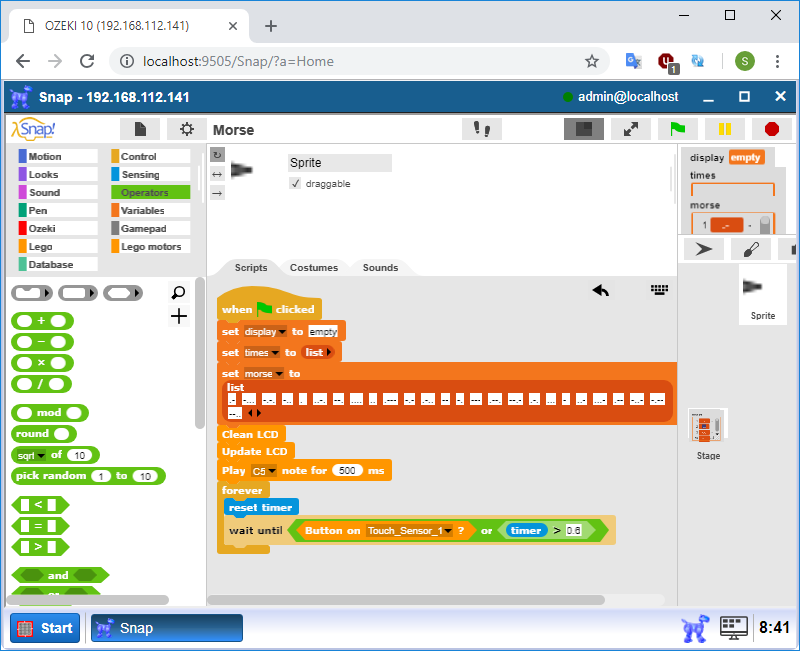
Figure 7 - The program waits until you press the button or 0.6 seconds passed
Improve the program to measure how long the button is pressed and store it into the list!
Next you need to check if the execution moved on because of the button press or the timer reached the critical value. Check it with an 'if else' block. In the if statement drag a '<' operator to check if the timer is reached 0.6 seconds. If not, the program enters into the 'then' branch of the 'if' part. Here first you have to reset the timer with 'Reset timer' because now you don't have to measure the time between the button presses, although you have to measure the duration of the press. Then with another 'wait until' you have to wait until the button is released again. If the button is released, the program moves towards the next block which is an 'add [value] to [list]' block. Drag the built-in 'timer' variable into it because that is the variable that you should add to the list stored in the 'times' variable. So this list stores the duration of each button presses. The content of this list will be deleted after detecting a character from the Morse alphabet. Look at Figure 8 for help.
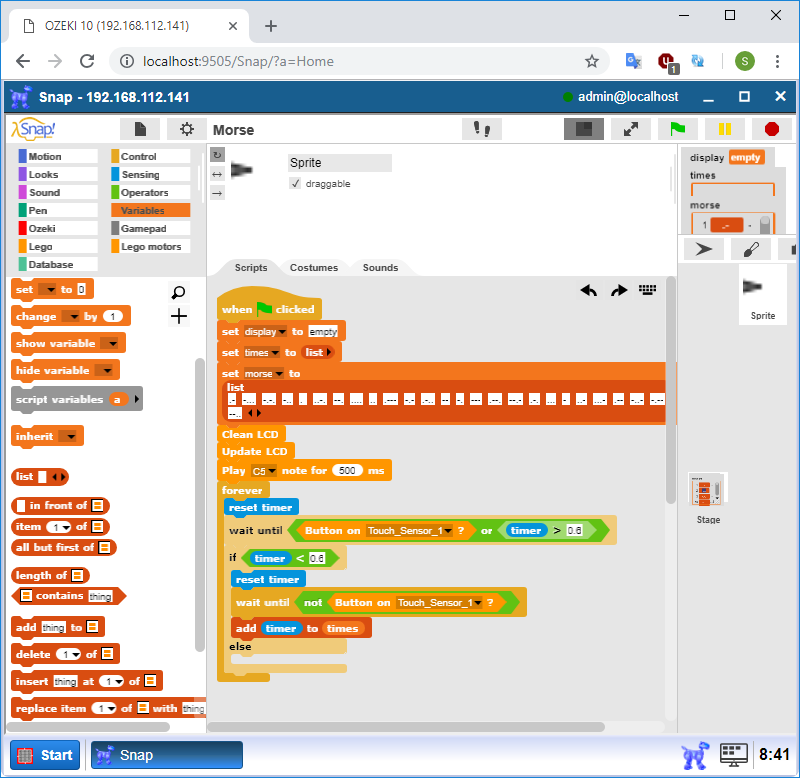
Figure 8 - It waits for the button release and stores the time duration in the list
Create a block called 'customJoin' to concatenate 2 strings. If the value of the first input is 'empty', report only the second one!
This reporter block will be similar to the built-in block called 'join'. So create this new block in the Operators category. In the pop-up window call it as 'customJoin', select the 'Reporter' type then press OK. Create two inputs called 'firstItem' and 'secondItem' by clicking on the plus icon next the block's name. You need to insert an 'if else' block to check what needs to be happen if the value of the first item is 'empty' and what if not. So determine this condition in the block. If the value of the first item is 'empty', you should report only the second item. If not, you should concatenate the first and second item then report the result. For concatenation, call the built-in 'join' function. The Figure 9 below shows how the block should look like.
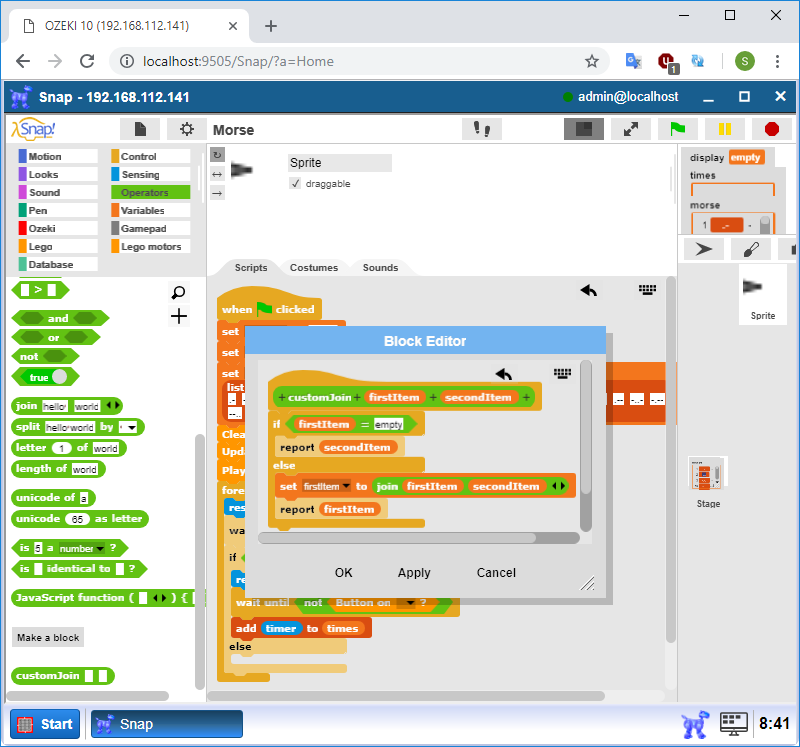
Figure 9 - Creating the 'customJoin' block
Extend the code to build the Morse code from the time duration of button presses! You should use '.' and '-' characters.
Create a variable called 'code' to store the current code you entered using the Touch Sensor. You will use its value for comparing it to the Morse alphabet to get the letter represented by the code. So, if at least 600 milliseconds have elapsed between the presses, the signal will be stored in the 'times' list, and the execution will move to the 'else' brach of the 'if'. So the 'code' variable will store a text which consists of '.' and '-' characters. You should start by emptying this variable using a 'set [variable] to [value]' where the value should be 'empty'. Then you should iterate on the elements of the 'times' list. Do this by using a 'for each [item] of [list]' block found in Variables category. Then you should compare the items' values to 0.2 in an 'if else' block. If the item's value is lower than 0.2, you need to concatenate a '.' char to end of the 'code' variable. If not, you need to concatenate a '-' char to it. So the correct character is joined to the end of the 'code' variable. Finally, delete the content of the list using the 'delete [all] of [times]' block. To sum it up if the button is pressed for less then 0.2 seconds it is detected as a dot. The longer presses are detected as dashes.
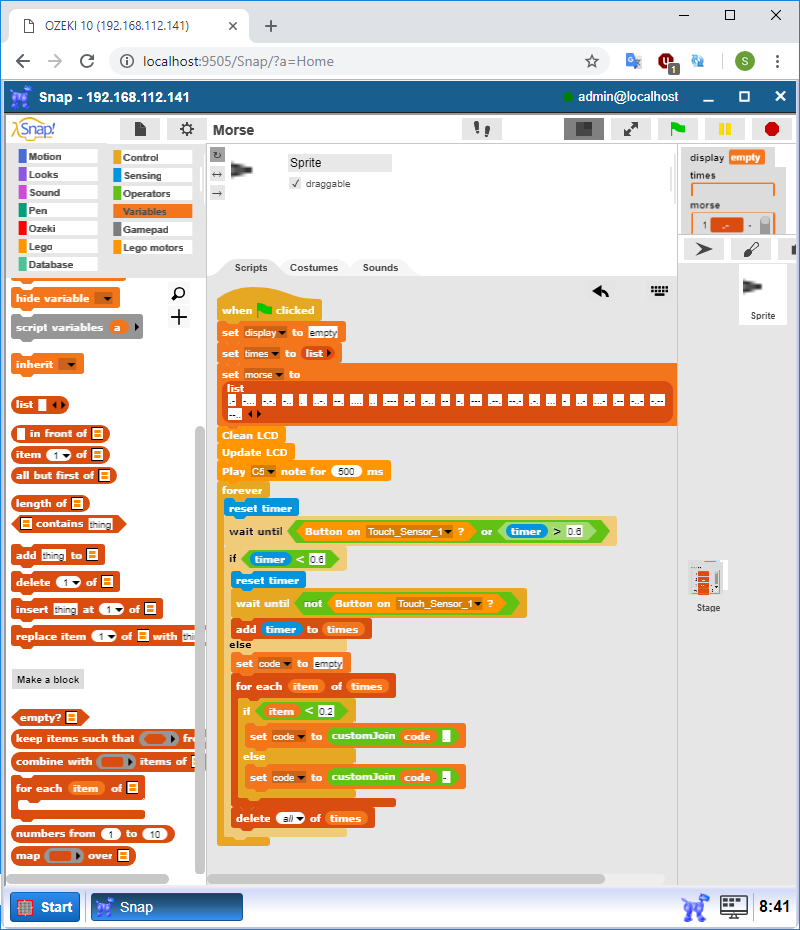
Figure 10 - Adding Morse signal characters to the 'code' variable
Create a block to return the index of the given item in the given list!
You will use this block to return the index of the entered code in the 'morse' list. Let's create this block in the Variables category. In the pop-up window, name the block as 'index of' and select the 'Reporter' option then press OK. In the Block Editor, create an input as 'originalItem'. After that add a text called 'in' then create another input called 'list'. In this block, you need a local variable that can be only used in this block. You can create it using a 'script variables [variables]' block found in Variables category. In it there is a default variable called 'a'. Rename it to 'index'. This will store the index of the given input in the list. So at first, set its value to 1 using the 'set' block. After that there is the 'for each' loop that iterates on all the elements of the given list. Inside it, the 'if' statement checks if the current 'item' is equal to the 'originalItem'. If yes, it will report the index value which will be the right index because of the 'change [value] by [value]' block. It increases the 'index' variable's value by 1 in every iteration of the loop. Finally, if the given item cannot be found in the list, the block returns -1. On Figure 11 you can see the finished block.

Figure 11 - The new block reports back the index of the given item in the list
Assign the right character to the detected Morse code and concatenate it to the value of the 'display' variable!
Your task is to assign the right character to the entered Morse code, and concatenate this character to the 'display' variable that will be displayed on the screen. At first, you have to get the index of the entered Morse code from the 'morse' list using the 'index of' block you created in the previous task. Now you should use a trick. The 65th element of the Unicode character table is 'A', 66th one is 'B', 67th one is 'C' etc. In the 'morse' list, the first element represents letter 'A' (.-), the second one represents letter 'B' (-.-.) etc. So if you add the index of the detected Morse code in 'morse' list to number 64, you will get the represented letter's index from the Unicode character table. Inserting this number to the 'unicode as letter' block, you will get the represented letter in readable from. Finally, you just need to concatenate this letter to text value of the 'display' variable using the 'customJoin' block. Look at Figure 12 for help!
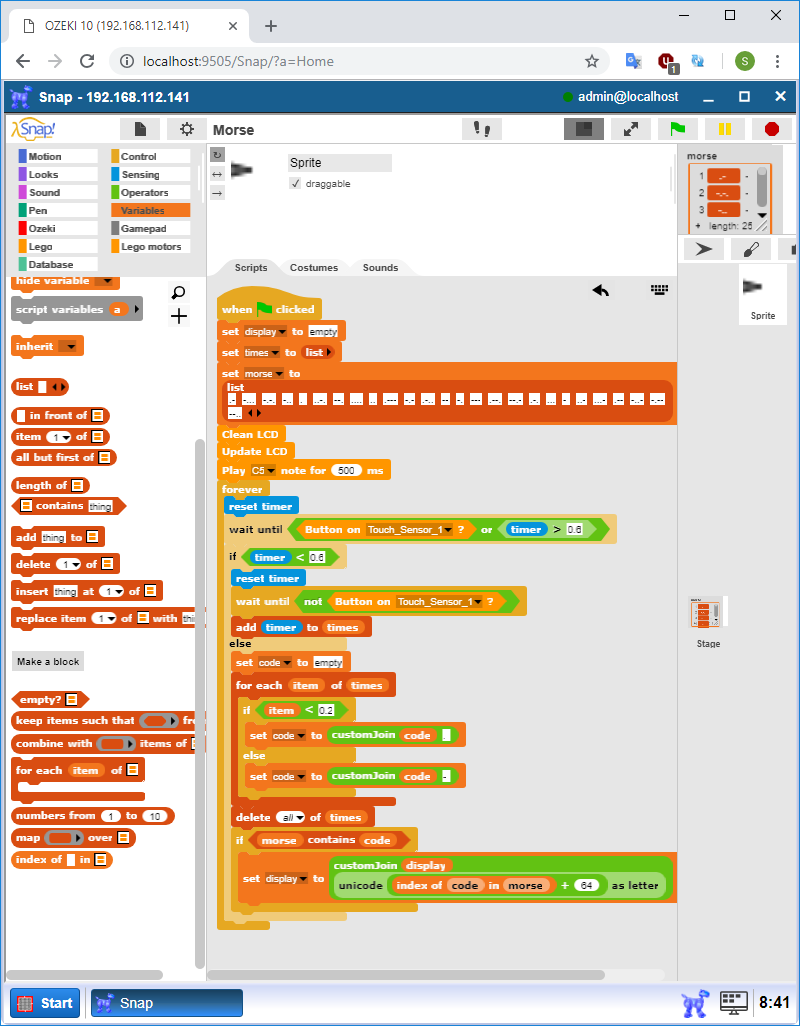
Figure 12 - Assigning the right character to the detected Morse code
Create a block to display text on the LCD screen of the Brick!
You will build a very handful block, because it can display messages on the LCD display of the Brick by aggregating all the required blocks for the task in a simple function. Start by creating a new command block called 'Print'. In the Block Editor, create an input and name it as 'text'. After that you have to add the 'Clean LCD' to clear the screen of the Brick, and the 'LCD font size [large]' block to set the font size to large. Then you need to place a 'LCD text [text] position x: [10] y: [55]' to display the text on the middle of the screen. Finally, you need to insert an 'Update LCD' block to refresh the screen in order to display the change. These blocks can be seen on Figure 13.

Figure 13 - Print block to display text
Print the message to the LCD screen and play a note for 150 ms!
To display the message on the LCD screen, you just have to use the created 'Print' block. So please attach the 'Print' block to the previously placed 'set' block and insert the 'text' variable into its field in order to display the generated text from the entered Morse code. You can also see a 'Play note' block. This is plays a tone for indicating that the entered Morse code is recognized.

Figure 14 - It plays a tone for indicating that the entered Morse code is recognized
Program code

Figure 15 - The complete program code for interpreting Morse signals
|
|
Download the SNAP program to translate Morse signals into text It detects Morse signals and translates it into alphabetical characters. It is easier to follow the guide if you have the codes in front of you: Download the SNAP program code for for interpreting Morse signals |
More information
- Displaying emotions, playing sounds
- Control robot using chat
- Error alert using e-mail
- Robot status updates on a website using FTP
- Robot control using voice commands
- Robot error alert using text to speech
- Robot control using SMS
- Error alert using SMS
- Write messages in Morse code
- Robot error alert using Telephone call (voice)