 Sign in
Drive your robot along a square
This lecture is the introduction to robot control. First you will plan a route (movement along the sides of a square), than you need to drive the cursor along the path using an algorithm. It is essential for all robot developers to be able test their code in a simulated environment. This is a great example for that. The final task of this lecture is to create the same movement pattern for the real life robot.
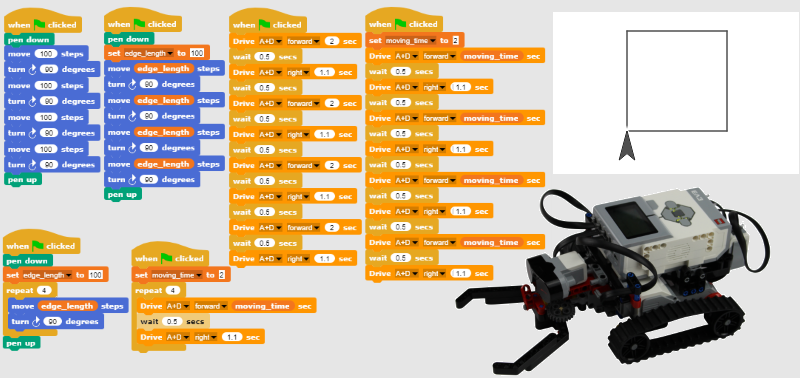
Figure 1 - This is the Dozer robot and 3 simple techniques how to move your robot along a square
Requirements
- Ozeki Dozer: Lego Dozer robot build instructions
- Ozeki 10 installed: Installed Ozeki 10 Robot OS
- Lego connection installed: Connect the Lego robot to Ozeki 10
- SNAP basics: Basic knowlege of the Snap programming language
Describe what a block in SNAP is!
Block - a block in SNAP application represents an instruction to execute (e.g. 'move 100 steps').
Define what a variable is!
Variable - something that holds a value (e.g. x = 10). You can use them instead of constant values. They can store numbers or strings. The value of each variable can be modified.
Describe what a loop is!
Loop - a control structure. It can encapsulate one or more instructions (these are called loop core). The loop repeats the loop core X times (X is a given number) or while a condition is met.
Create an entry point that moves the cursor 10 steps then turns it right!
Open the SNAP built-in application in Ozeki 10. To start programming, you will need to know some information about the blocks. You can attach them to each other. Due to this, they can be executed sequentially. There are some Control blocks which can be encapsulated into other blocks and some which can be attached to other blocks. The first block is the 'when green flag clicked' under the Control category. It will execute all attached blocks, when the green flag button is clicked. The 'pen down' block places the cursor down, so it can draw a line as it moves. To draw a line, put a 'move X steps' block down which instructs the cursor to move X steps forward from its current position. The next block is the 'turn right X degrees' which turns the cursor by X degrees clockwise, where X is a number you should provide as you can see on Figure 2.
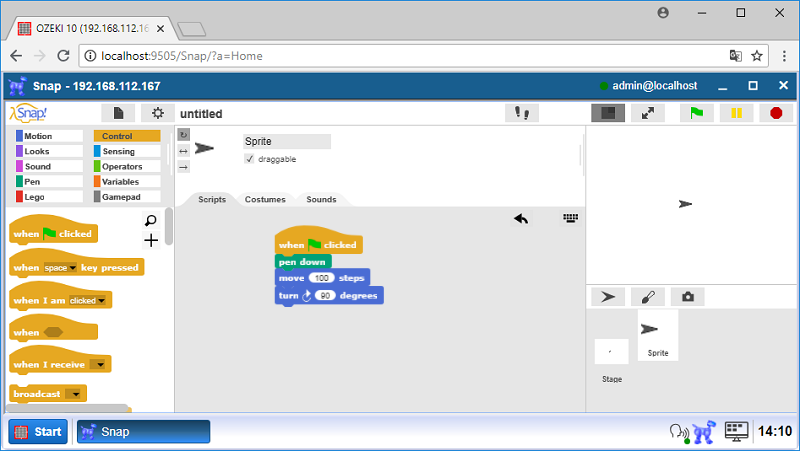
Figure 2 - The basic blocks, so you can draw with the cursor
Upgrade the program to draw a square!
You have used Motion blocks after the pen was put down. The task is to upgrade the program to draw a square on the canvas. The program starts with a 'when green flag clicked' block. The second is a 'pen down' block. The next blocks are Motion blocks: moving and turning instructions which will be executed sequentially. So first it moves the cursor 100 steps forward (and draws a line), then turns it by 90 degrees, moves 100 steps again, turns again and so on. The last block is the 'pen up' block which is the opposite of 'pen down'. Click on the green flag button at the top-right corner of the screen to start the program. At the end of the execution, you will see a square on the canvas. If you split all blocks from each other and click on them one by one, you can see the process (Figure 3).
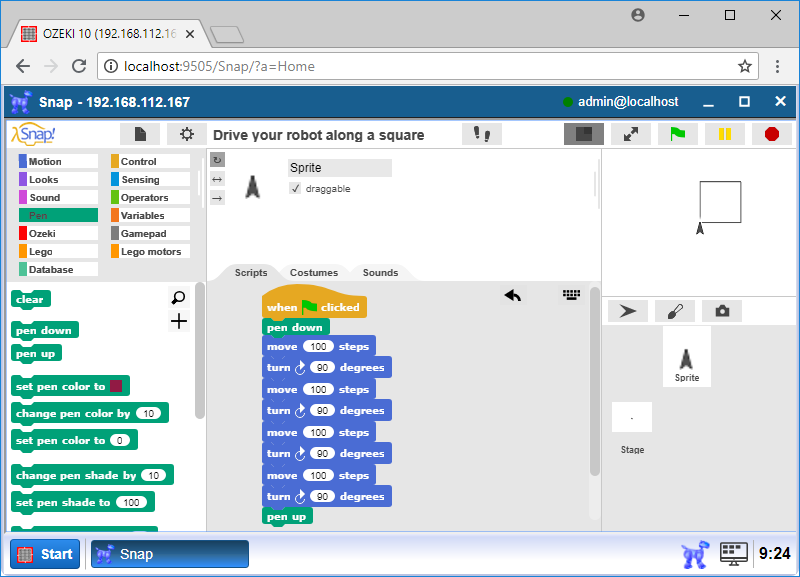
Figure 3 - This program draws a square on the canvas
Create a variable and modify the code to draw a square using it!
There is a block called 'set [variable] to [value]', which you can find in the Variables category as can be seen on Figure 4. This block sets the value of a variable. In this case, you will use it to set the 'edge_length' variable's value to 100. Usually it is important to set an initial value to a variable before you use it in another block(s). You can see its current value on the canvas. To add a variable, select the Variables category then click on the 'Make a variable' button. Type a name for the new variable and click on 'OK' to create it. Now you are able to use this variable in blocks because a variable can be placed everywhere where constant values can be. The 'edge_length' variable is used to set the edge length of a square, so place this variable into the 'move X steps' blocks. Since you have more 'move X steps' blocks with the same constant value, it is strongly recommended to use a variable instead of the constant values, because if you want to change the steps number, you just have to change the variable's value once, instead of changing the values in all move blocks.
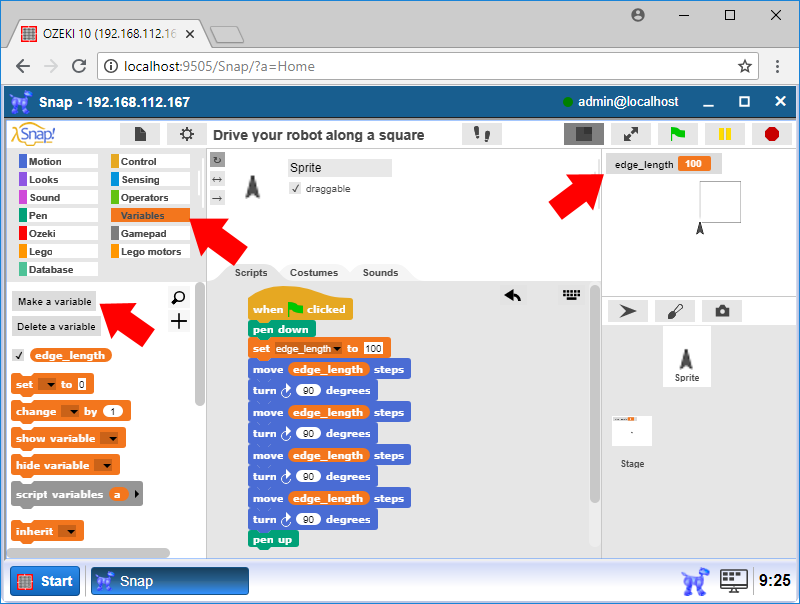
Figure 4 - Use a variable to define the square side
Use a loop to simplify the previous program!
Let's look at Figure 5! You can see a program that has fewer blocks than the previous one. But there is a new block called 'repeat [times]' which is a Control block and you can encapsulate another blocks in it. Into its 'times' field, you should enter a number to provide how many times the encapsulated blocks have to be executed. This type of blocks are called as loops. If the value of the 'times' field is 4, it will execute the move and turn instructions four times and draws a square. In this task, you learned how to simplify the program that executes the same instructions using a loop.
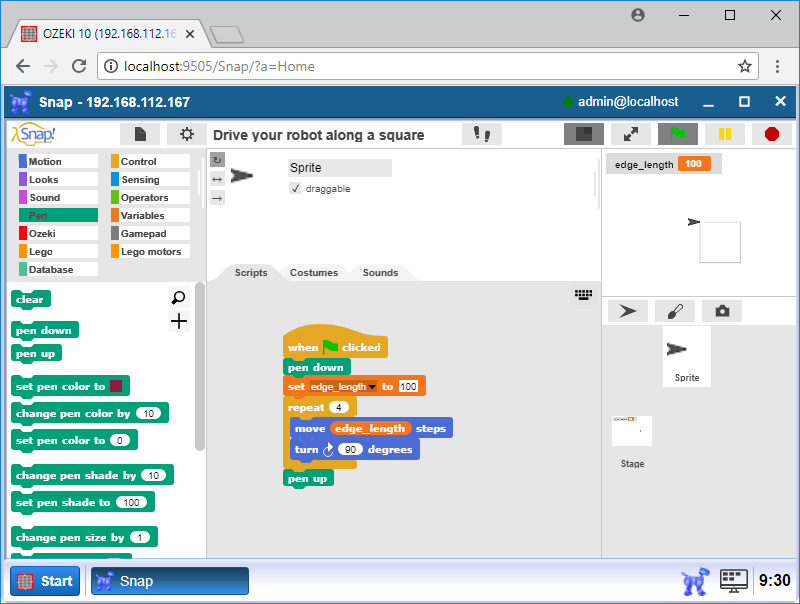
Figure 5 - The same program, which solves the problem with a loop
Create a program to control the Dozer instead of the cursor!
You will do nearly the same thing as before: move the robot along a square instead of the cursor. You need to use Lego blocks instead of Motion blocks, which are used to control a Lego robots. The Dozer has two motors in A and D ports that you should rotate to move the Dozer. You can see these motor controller blocks on the left side of Figure 6. Let's start with 'Drive [motor] [direction] [secs] secs' which rotates the motors you selected to the set direction for the given seconds. The 'wait X secs' Control block pauses the execution for X seconds then continues it by executing the next block. The program starts by rotating the motors A and D forward for 2 seconds. After that, you have to use the 'wait' block found in Control category because without them the robot can be stuck. Then rotate the motors A and D again to turn the Dozer right, which means that motor A rotates clockwise and motor D rotates counterclockwise. Then place a 'wait' block again. At the end of the execution your Dozer should be in the same location when it was at the begining of the execution.
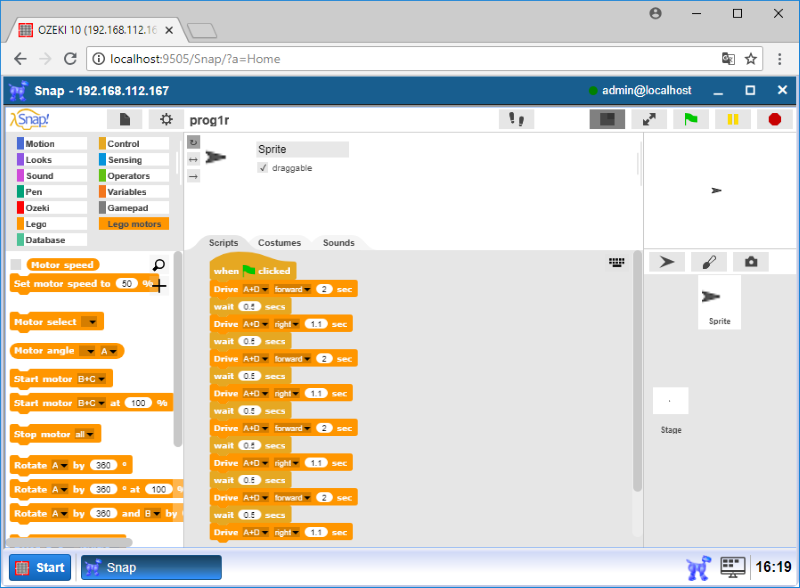
Figure 6 - Moving the Dozer along a square
Upgrade the code to determine the moving time using a variable!
You should upgrade the program you made in the previous task to determine the moving time using a variable. To do this, please make a variable called 'moving_time' and set its value to 2 by using the 'set [variable] to [value]' block from Control category. Instead of writing constant 2 into the 'secs' field of the 'Drive A+D forward [secs] secs' blocks, just place the 'moving_time' variable into them as can be seen on Figure 7. The rest of the program is the same as the previous one. Click on the green flag to execure it! Try to modify the moving time and see how big will be the moving square of your robot. It is easier to modify a variable's value than the value of many other 'Drive' blocks, right?
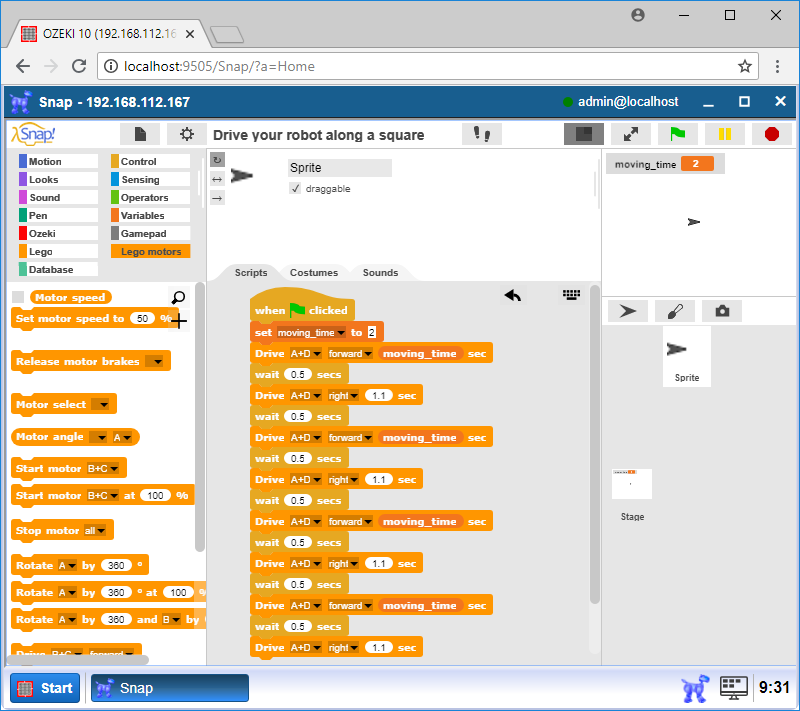
Figure 7 - Moving the Dozer along a square using a variable
Upgrade the code to go forward and turn right using a loop!
In this task, you need to upgrade the previous program by using a loop to drive your robot forward and turn it right. This program will be much shorter than the previous one, because a repeat loop will be used. So the 'repeat [times]' block should repeat the blocks that are responsible for moving the robot forward and turning it right. Just snap the blocks as you can see them on Figure 8 then execute the program by clicking on the green flag button of the top-right corner! This program does the same as the previous one, only much shorter and more transparent.
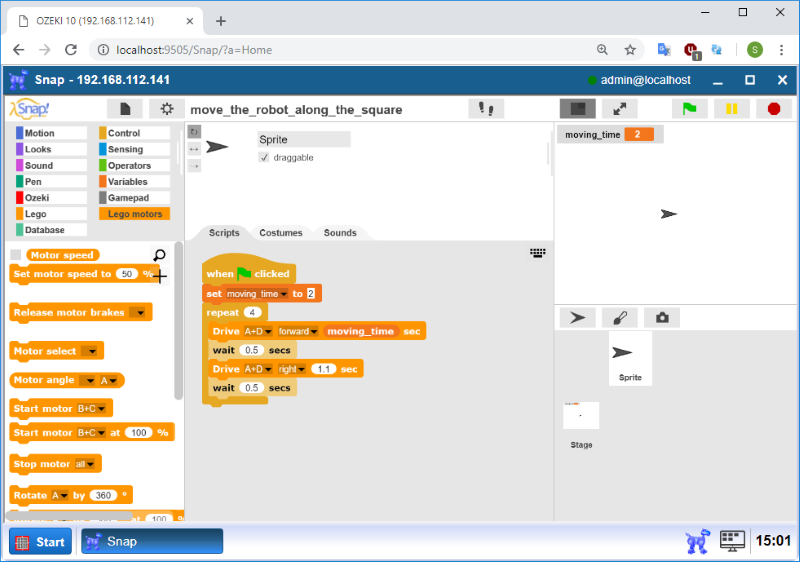
Figure 8 - Moving the Dozer along a square using a loop
Program codes
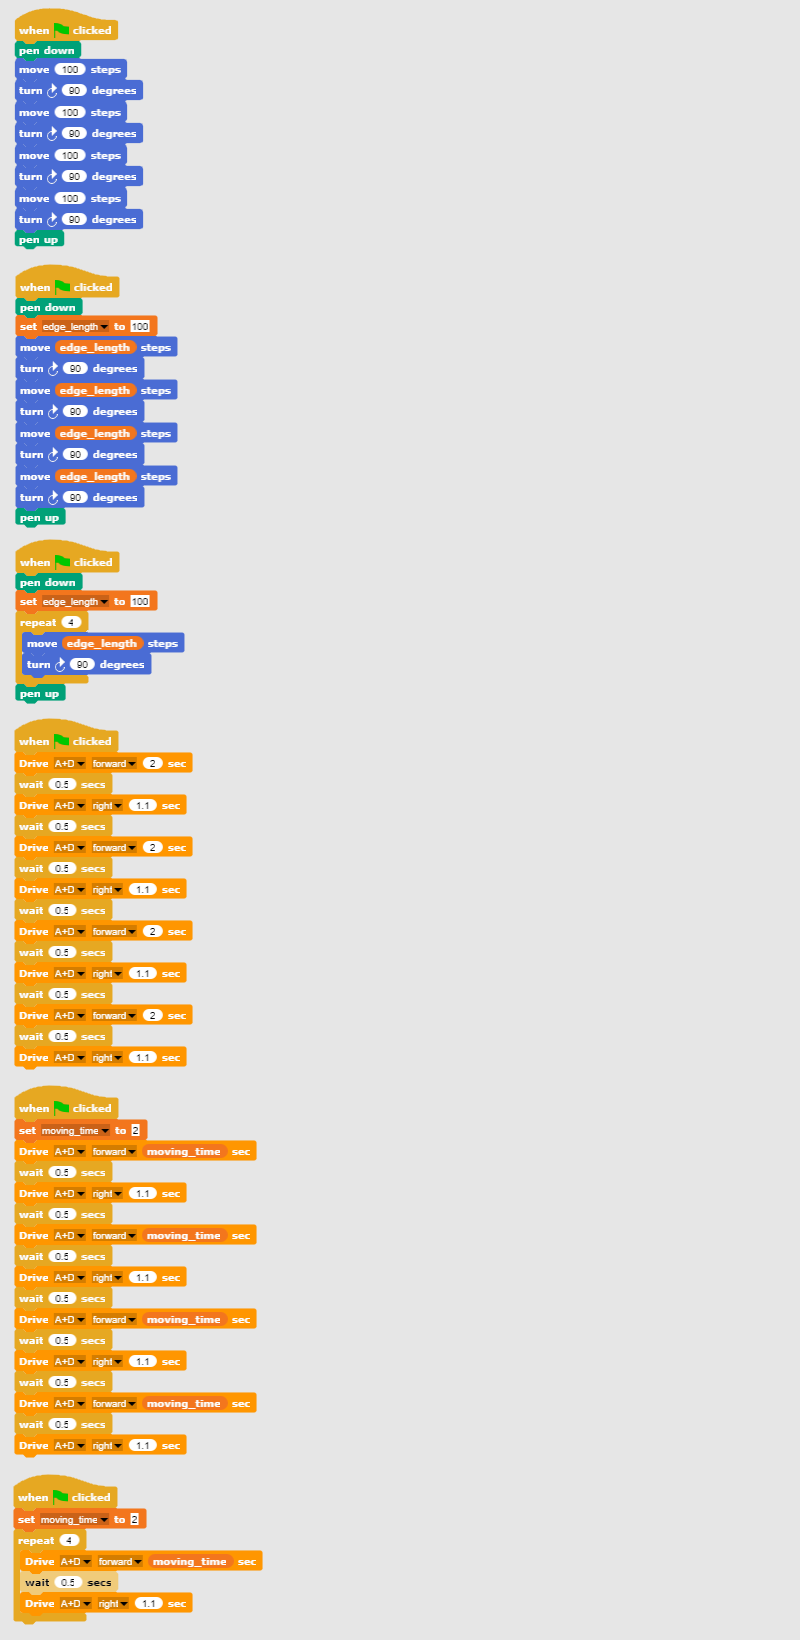
Figure 9 - Program codes that can move the robot along a square
|
|
Download the programs The programs are capable to move your robot (or cursor) along a square. It is easier to do the steps if you have the program in front of you: Download the program codes |
More information
- Drive your robot along a square
- Learn to use keyboard events
- Move your Lego robot from the keyboard
- Learn to use the gamepad
- Use a gamepad to control your Lego robot
- Use sensor input in robot control
- Learn to use states in robot control (Build the safe)
- Robot state control and feedback, using the IR remote controller
- Synchronized motion
- Robot control based on visual input