 Sign in
Learn to use the gamepad
In this lecture you will learn to use a gamepad in the SNAP robot programming environment. You will learn how to setup and connect a bluetooth or USB gamepad to your system. You will also learn how to convert information received from the gamepad axes and button inputs into messages, that can be used in your code. After completing this lecture, you will be able to draw on the canvas using the gamepad.
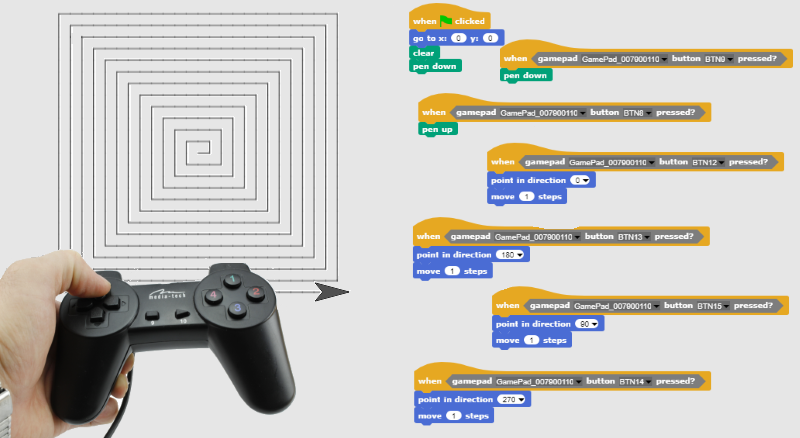
Figure 1 - Draw with your gamepad arrows
Requirements
- Ozeki 10 installed: Installed Ozeki 10 Robot OS
- SNAP basics: Basic knowlege of the Snap programming language
- Gamepad connected to your PC
Describe what the Gamepad is used for!
Gamepad - it is an input device, which can be connected to PCs or game consoles with cable or wirelessly. Usually, it has more than 12 buttons. It is a great device for playing video games.
Connect the gamepad to Ozeki 10 and configure it!
In this lecture, a simple gamepad is used. To use it in Ozeki Snap, you have to connect it to Ozeki 10 in a similar way like the Lego Brick. At first connect the gamepad to your computer. Open your browser, navigate to http://localhost:9505 then login to Ozeki 10 and open Control Panel from the Desktop. Click on the Create new Connection button. On the right-side Connection details panel, select the Sensor option then select the Browser sensor icon, finally choose the Gamepad as you can see on Figure 2. Please type a name for the connection and click 'Ok' to create it.
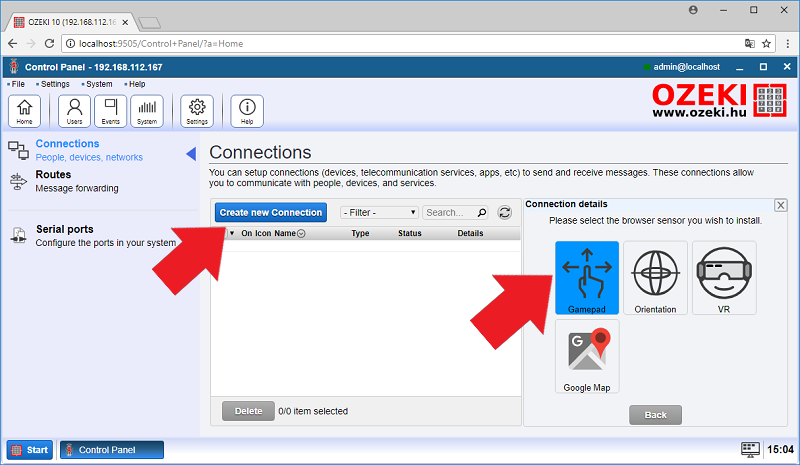
Figure 2 - Installing the Gamepad connection
You will see the gamepad connection in the connection list (Figure 3). It has two connections added: your gamepad connection, which is a 'container' connection that has one or more 'physical' gamepad connections next to it. Test your physical gamepad connection by clicking on the 'Details' button to open its configuration GUI and trying out the buttons through Ozeki 10's Control Panel.
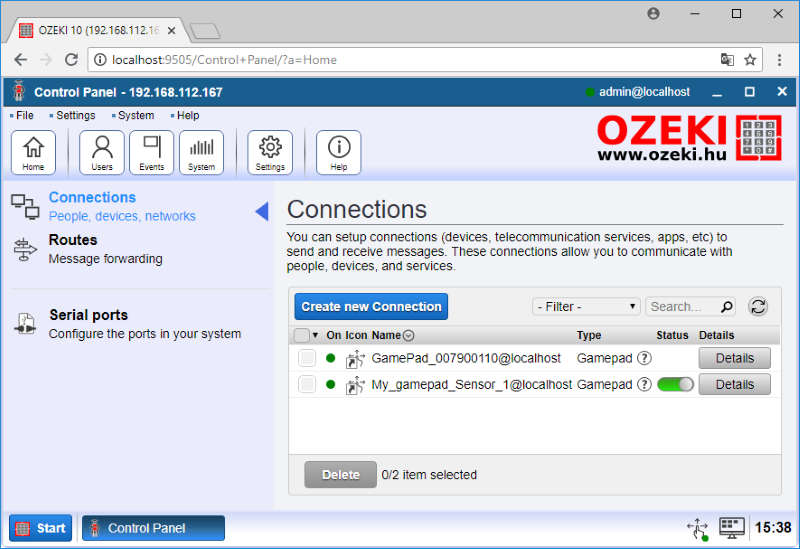
Figure 3 - Gamepad connections
Now you can test and configure the gamepad. Try to press some buttons and see how it displays (Figure 4). You will use 6 buttons: 4 buttons for moving the cursor upward, downward, right and left and 2 for changing pen state from up to down. You can choose any button. In this lecture the following buttons are used: BTN8, 9, 12, 13, 14 and 15. BTN8 and 9 for changing pen state, the rest is for moving the pen. Choose your buttons you want to use and write them down somewhere. Note that the numbers in this lecture may not be the same as your gamepad button numbers!

Figure 4 - Pressing BTN12
Write code to change the pen's state from gamepad buttons!
Let's start programming by placing a 'when green flag clicked' block. Then you should attach a 'go to x: 0 y: 0' block found in Motion to it to move the cursor to the center of the canvas. The next 'clear' block is to clear the canvas. Then please put the 'pen down' block. This is the first part of the program. The second and the third parts are almost the same. They start with 'when [condition]' blocks. They activate and execute the attached blocks to them, when their conditions become true and repeat them while the conditions are true. In this case, the condition should be a block from the Gamepad category called 'gamepad [gamepad] button [button] pressed?', where 'gamepad' is a gamepad connection you should select and the button is one of the buttons of the gamepad. You need to choose your gamepad's connection (maybe it has a different name from this tutorial's gamepad) and also need to choose a button. This block results a true value when the chosen key is pressed on the gamepad. Finally, attach the 'pen down' and a 'pen up' blocks like on Figure 5.
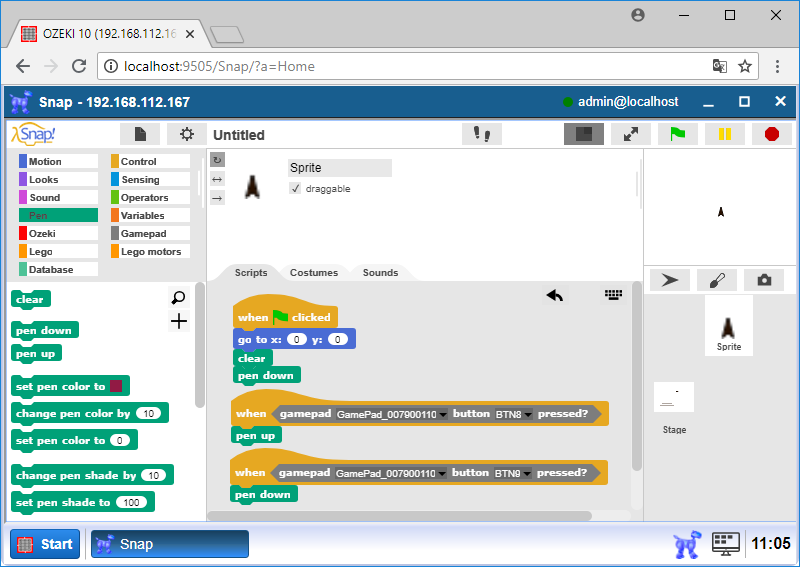
Figure 5 - The code that pulls up the pen and places it back
Build a code to move the pen with the gamepad!
In the previous task, you have made the first 3 parts. You have bound a gamepad button to put the pen down and an another one to lift it up. So if you press one of them, it activates the corresponding part and changes the pen status. You need to make other four parts for controlling the cursor to different directions. To do this, just select the buttons you have written down in Task 1 for the 'gamepad' blocks then put them into the right 'when' control blocks. Instead of attaching 'pen down' or 'pen up' blocks, you should attach a 'point in direction X', where X is a degree value to the corresponding direction (0°, 90°, 180° and 270°) and a 'move 1 steps' blocks to them like on Figure 6. So when you press these buttons the cursor turns and moves to the corresponding direction.
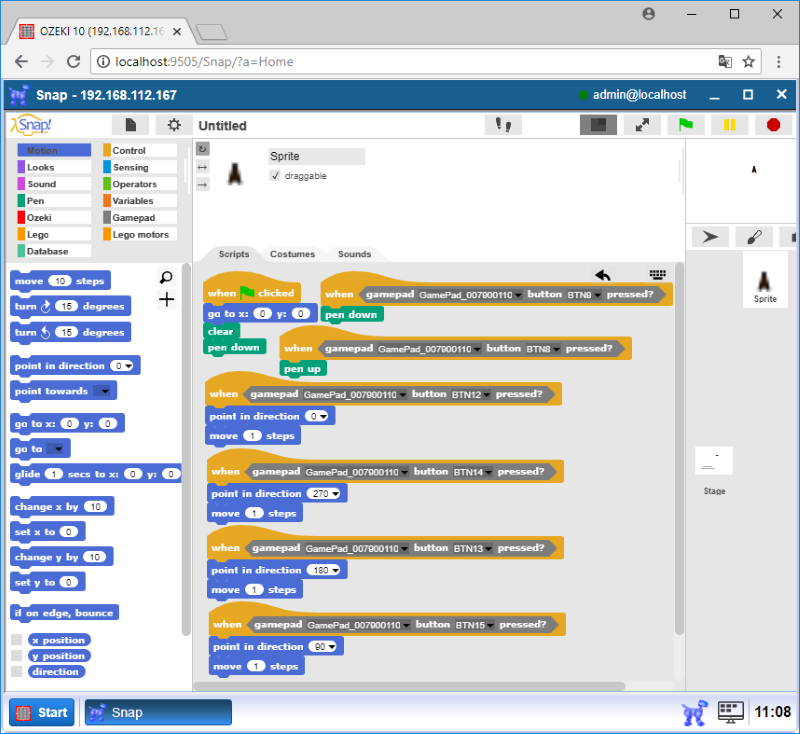
Figure 6 - The complete program that lets you control the cursor
Test the program on the canvas!
Now you are done. Let's move the cursor from the gamepad and try to draw something. Click on the green flag button to move the cursor to the center of the canvas and clear the canvas. It also puts the pen down. You can press one of the two buttons to lift it up and press another to place it down. Press your control buttons and move the cursor to each direction. Press two buttons simultaneously (e.g. upwards and right) to move the cursor diagonally (Figure 7).
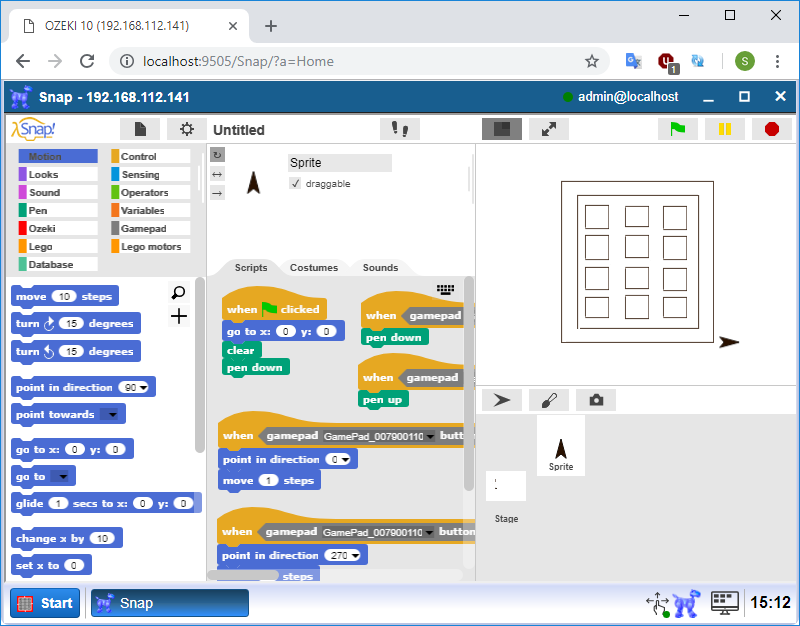
Figure 7 - Try it to draw your own pictures
Program code
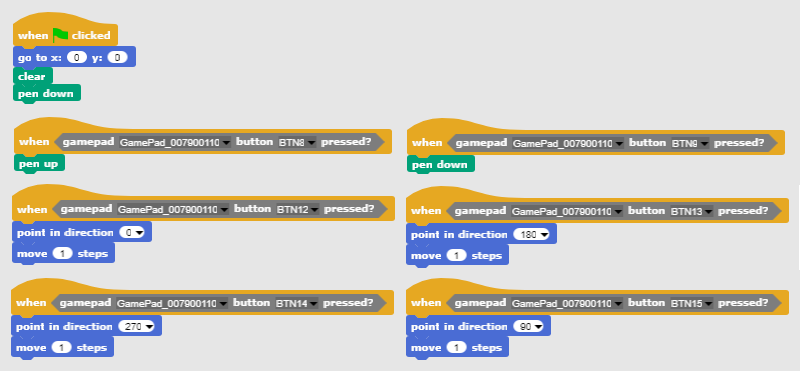
Figure 8 - Program code to draw lines and shapes from your gamepad
|
|
Download the program code The program is capable to move the cursor and draw shapes from the gamepad. It is easier to understand the steps if you have the program in front of you: Download the Ozeki SNAP program code |
More information
- Drive your robot along a square
- Learn to use keyboard events
- Move your Lego robot from the keyboard
- Learn to use the gamepad
- Use a gamepad to control your Lego robot
- Use sensor input in robot control
- Learn to use states in robot control (Build the safe)
- Robot state control and feedback, using the IR remote controller
- Synchronized motion
- Robot control based on visual input