 Sign in
Robot state control and feedback, using the IR remote controller
In this lecture you will learn, how to control your robot using an Infra Red remote controller. You will have a task to change states using the press of buttons on your IR remote. Your will also have to implement a solution, to control the speed of the car, and you also have to provide feedback to the user using the robot's LCD display and built in RGB LED. This lecture also includes information about implementing different movement patterns that can be selected using the IR remote.
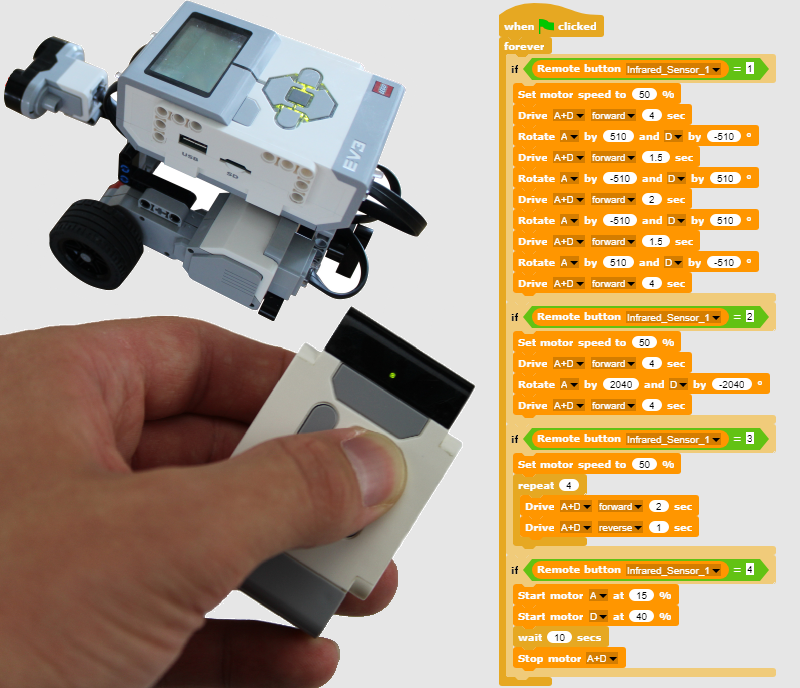
Figure 1 - You can drive your robot with the IR remote controller
Requirements
- Ozeki Sniffer: Ozeki Sniffer build instructions
- Ozeki 10 installed: Installed Ozeki 10 Robot OS
- Lego connection installed: Installed Lego bluetooth connection
- SNAP basics: Basic knowlege of the Snap programming language
- IR remote controller
Describe what the IR remote controller is!
IR remote controller - it is a Lego device that can emit infra red light, which you can measure with the IR sensor. It can be used for measuring proximity, angle (between the IR sensor and the controller) and which button is pressed.
Set the IR sensor to Remote mode
During this lecture, you should write three programs. Each of them will do something based on the pressed button on the IR remote controller. So before you start coding, you have to change the Infra Red sensor mode to 'Remote' on its configuration page to detect button presses. To do this, please open the Control Panel, select the connection of the IR sensor then go to its configuration page then set the mode to 'Remote' as you can see on Figure 2. The remote controller has 5 buttons. Button 1-4 which will send the signal while they are pressed (e.g. pressing Button 1 will signal '1' data). There is a bigger button which is enough to press once and will signal '9' data. It will send it until you press another button. If you do not press any button the controller signals '0' data. You can also select between 4 channel using the switch on the center of the device, but you will not use this function in this lecture.

Figure 2 - Setting the sensor mode to Remote
Use the IR remote controller buttons to drive the robot forward, backward, right and left!
Let's start with a 'when green flag clicked' block. Then put a 'wait until [condition]' and insert a 'not [boolean]' block into its condition field. Then insert a 'X = Y' into the 'not' block's boolean field where X should be a 'Remote button [connection]' block and Y should be constant 0. The 'Remote button' block returns a number depending on which button is pressed in the remote controller. If it returns 0 then it means that no button is pressed on the IR remote controller. Due to the previously placed blocks, the execution will wait until any button is pressed on the remote controller. Then set the motor speed to 50% using the 'Set motor speed' block. Let's continue with a 'forever' block. Put an 'if' block into it and let the condition be true if the pressed remote button is equals to 1. Insert a 'Drive [A+D] [forward]' block into the 'if'. So when you press Button 1, the robot will go forward. Do the same for the another 3 buttons as you can see on Figure 3. After the 'if' blocks, you should wait until the controller signals '0' (no button is pressed). Then stop all motors with a 'Stop motor all' block.
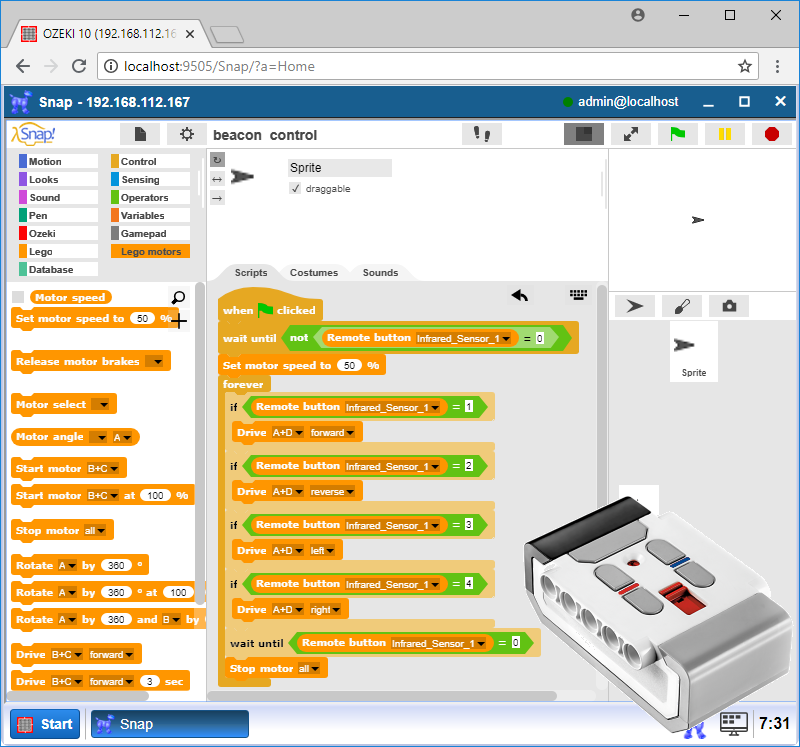
Figure 3 - The second moving pattern
Create a 'Print [text]' command block to display text on the Brick LCD using only the blocks from Ozeki category!
To create the block, select the Ozeki category then click on the plus icon. In the popup window, type 'Print' text into the textbox and select the 'Command' type then click on OK. At first, you need to create an input parameter, so click on the plus icon next to the 'Print' text, type 'text' and select 'Input name' type then click on OK. To print some text on the LCD display, you need to send command messages to the connection of the LCD display. Insert four 'To [connection], message [text]' Ozeki blocks under each other and select the LCD connection for their connection fields. The first thing you should do is to clear the current content of the display. You can do this by using the 'clear' command. So please type 'clear' into the 'text' field of the first block. Then, it is recommended to set the font size to large to display the text in larger fonts. To do this, you need to send the 'fontsize large' command. The next step is to display the text on the screen. You can use the 'draw text foregound' command for it. After the text, you should define the location of the text on X and Y axes and then specify the text to be displayed. Look at the 3rd block on Figure 4. It will display the text stored in 'text' variable on the Brick display at position X=10 and Y=55. Finally, send an 'update' command to refresh the screen to show the text.
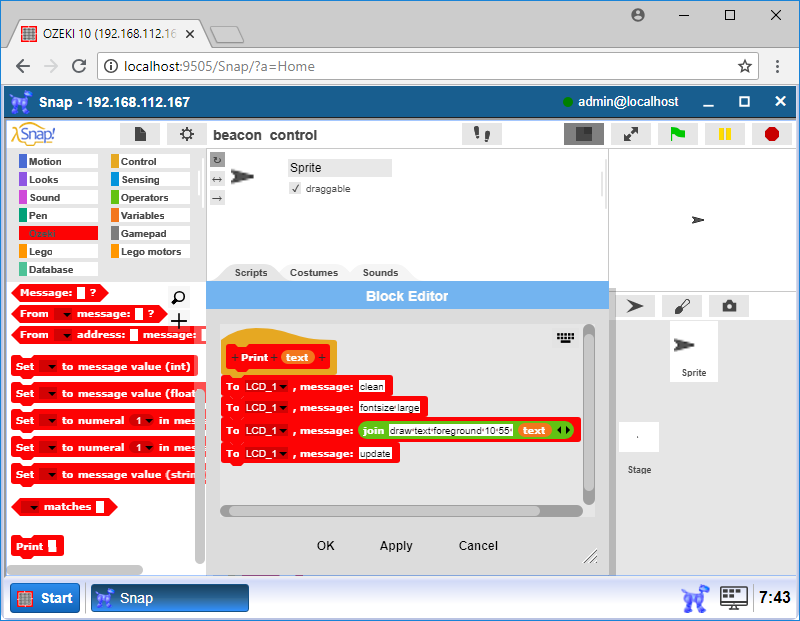
Figure 4 - The 'Print X' block
Bind the IR remote controller buttons to different speeds of the robot!
In the second program, you should drive the robot forward but on 3 different speeds: 40%, 70% and 100%. You should also print the speed on the LCD of the Brick using the previously created 'Print [text]' block and change the LED colors depending on the speed. Let's start with the 'when green flag clicked' block as the entry point, then set the LED to green using the 'Set LED' block. Now, attach a forever block to the previous one. Finally, you need to insert four 'if' blocks that verify different pressed buttons and control the robot depending on the pressed buttons as can be seen on Figure 5. The last block is a 'wait 0.5 secs' to avoid errors.
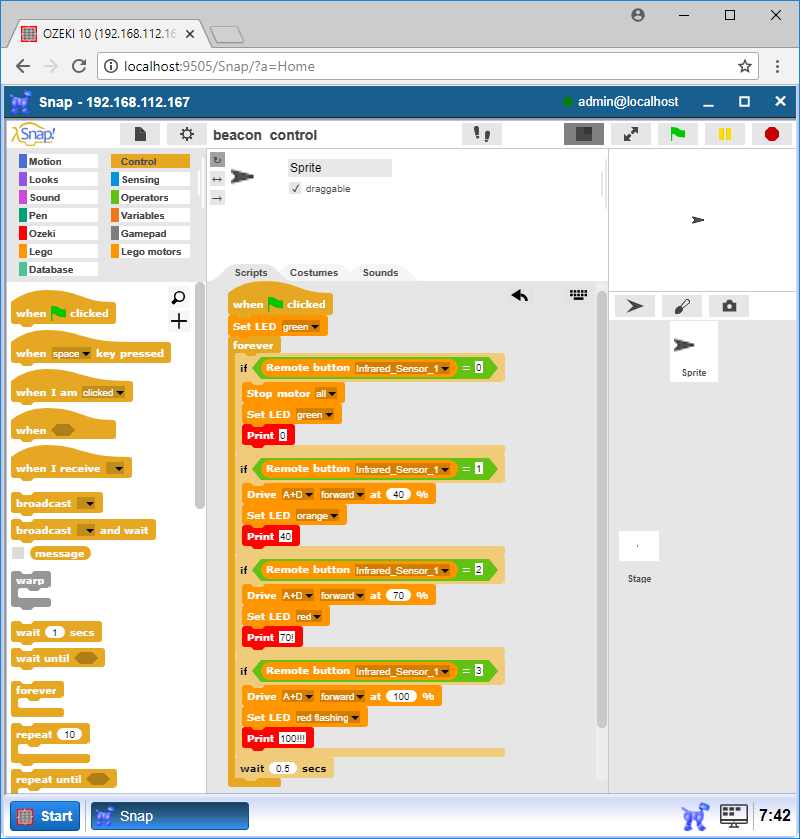
Figure 5 - Setting and displaying the speed of the robot with the IR remote controller
Bind moving patterns to the buttons of IR remote controller!
In this step, you need to create the first pattern. At first, place a 'when green flag clicked' block then attach a 'forever' block to the previous one. The first pattern is the following: go forward, then make a bypass and go forward again. To do this, insert an 'if' block into the loop core. To bind the pattern to Button 1, you need to set its condition to true if the 'Remote button' block's value is equal to 1. Then set the motor speed to 50%. Then place a 'Drive A+D forward 4 secs' block to go forward for 4 secs, after that a 'Rotate A by 510] and D by -510°' one to turn left. Then drive forward for 1.5 secs, turn right, drive forward for 2 secs, turn right, drive forward for 1.5 secs and turn left. The last block is the same as the first. Look at Figure 6 for help.
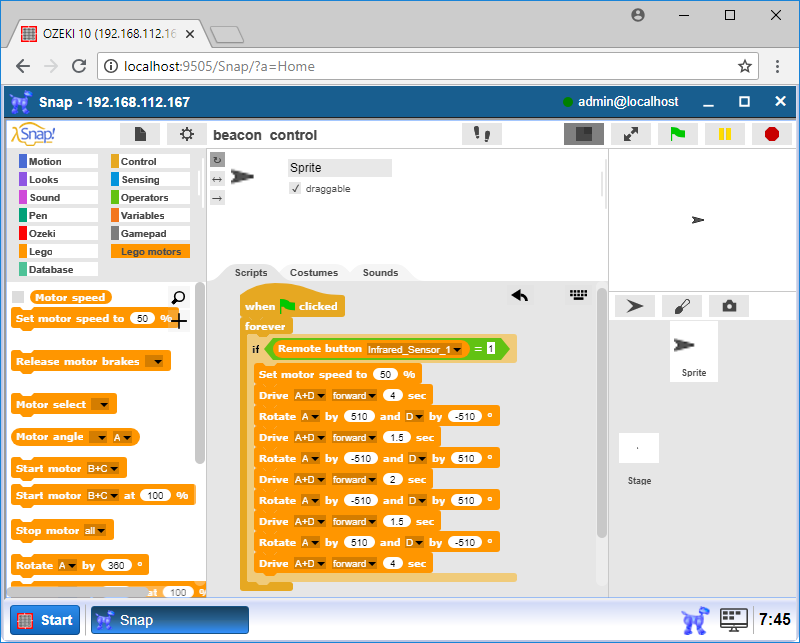
Figure 6 - The first moving pattern
This pattern will be simpler than the first one. It should drive the robot forward, then turn it by 360 degrees and drive it forward again. You should bind the pattern to Button 2 by inserting a 'Remote button [connection] = 2' block into the 'if' block's condition field. In the 'if' block, put a 'Set motor speed to 50%' block to set the motor speed to 50%. Then put a 'Drive A+D forward 4 sec' block to go forward. Finally, the rotating comes: put a 'Rotate A by 2040 and D by -2040°' block to make a 360 degrees turn with the robot. Then drive it again forward for 4 seconds. These steps are demonstrated on Figure 7.
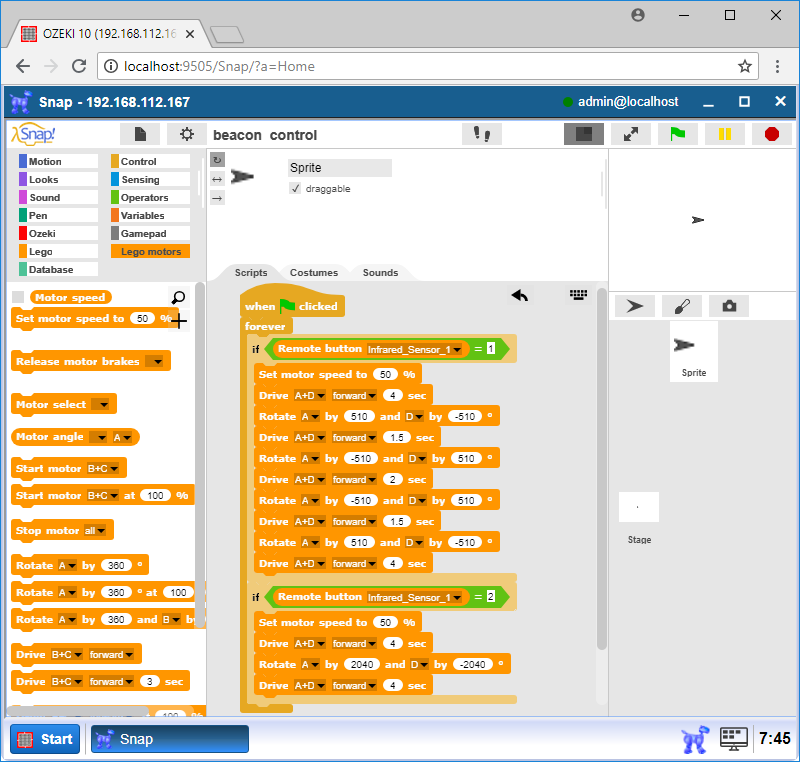
Figure 7 - The second moving pattern
In this step, the robot should go forward for 2 seconds, then backward for 1 second. This two steps should be repeated 4 times. Bind it to Button 3 by inserting a 'Remote button [sensor] = 3' block into the condition field of the 'if' statement. In the 'if' block, put a 'Set motor speed to 50%' block to set the motor speed to 50%. Then place a 'repeat 4' block to repeat the following: 'Drive A+D forward 2 sec' block to go forward, then drive the robot backward for 1 second using a 'Drive A+D reverse 1 sec' block. Look at Figure 8 for help.
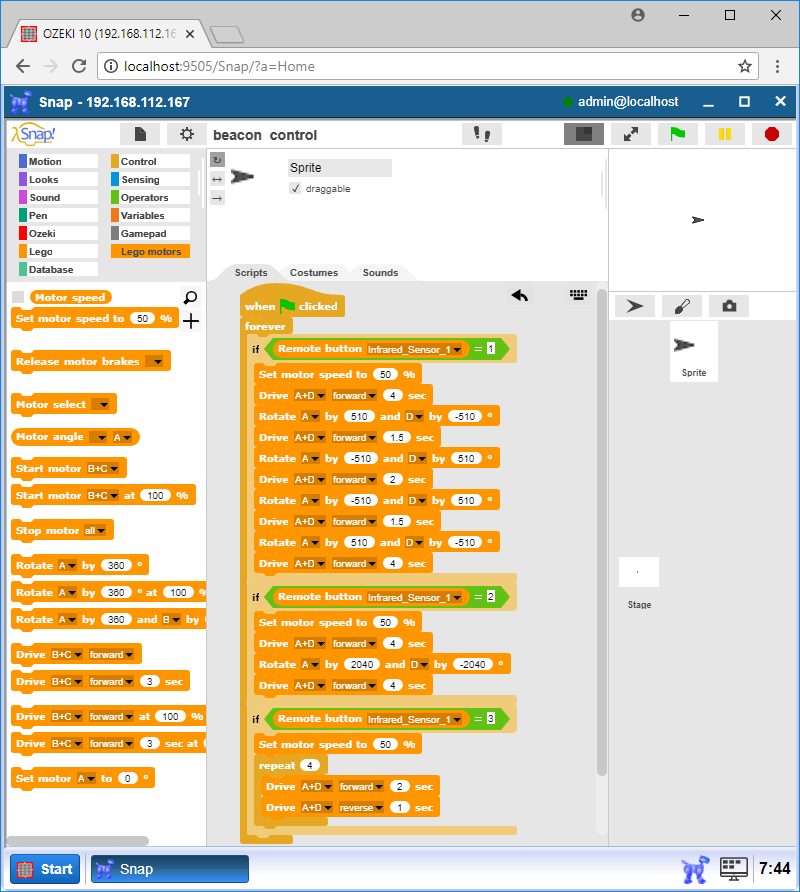
Figure 8 - The third moving pattern
In this last step, the robot should go along a circle once. Bind this pattern to Button 4 by inserting a 'Remote button [sensor] = 4' block into the condition field of the 'if' statement as you can see on Figure 9. Then start the two motors but with different speeds: 15% and 40%, so you should use 'Start motor A at 15%' and 'Start motor D at 40%' blocks. Due to these blocks, one wheel will rotate more faster than the another, so the robot will go along a circle. Then wait 10 seconds with a 'wait 10 secs' block to let the robot to go along a circle. If the 10 seconds elapsed, use a 'Stop motor A+D' block to stop the robot.
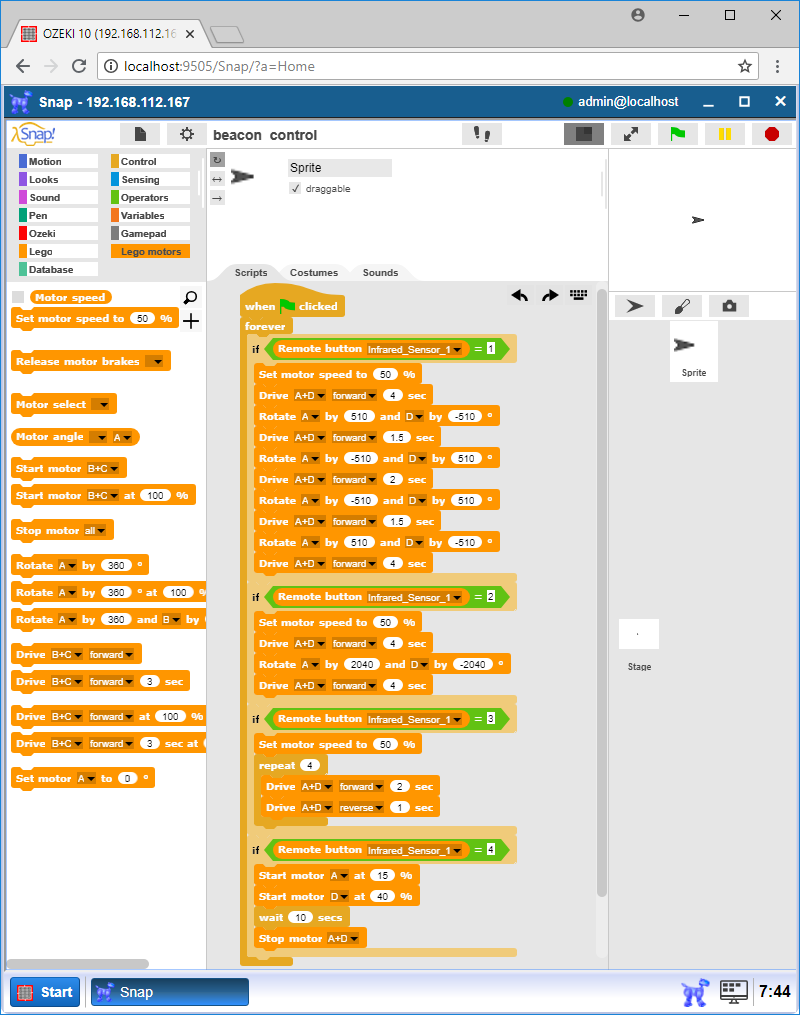
Figure 9 - The full program
Program codes
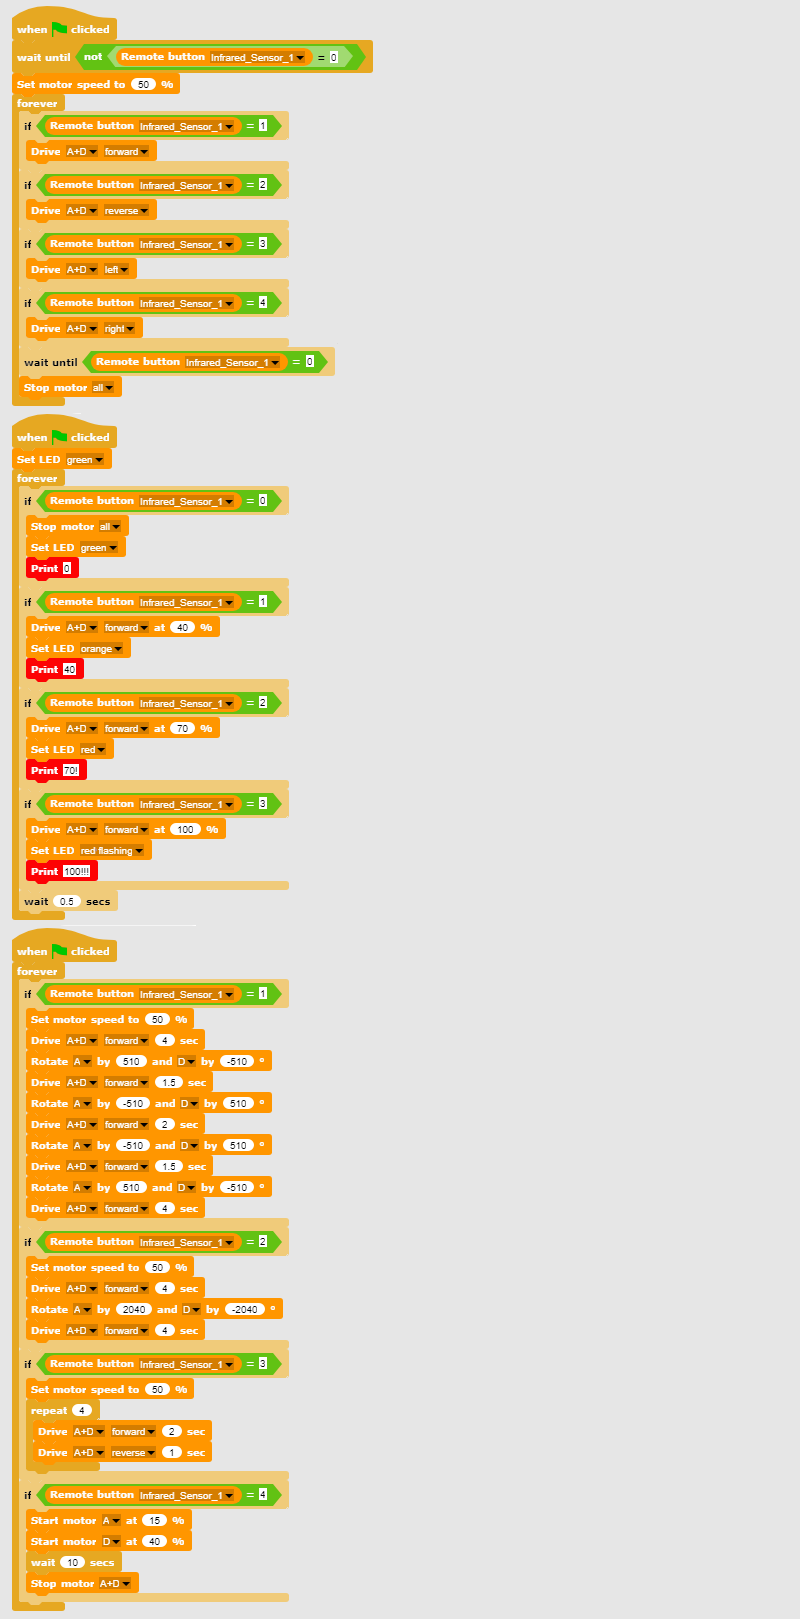
Figure 11 - Program codes that control the robot using the IR remote controller
|
|
Download the programs These programs are capable to control your robot using the IR remote controller. It is easier if you have the program in front of you: Download the program codes |
More information
- Drive your robot along a square
- Learn to use keyboard events
- Move your Lego robot from the keyboard
- Learn to use the gamepad
- Use a gamepad to control your Lego robot
- Use sensor input in robot control
- Learn to use states in robot control (Build the safe)
- Robot state control and feedback, using the IR remote controller
- Synchronized motion
- Robot control based on visual input