 Sign in
Using the LCD display
|
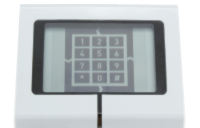
Most machines and robots are equipped with a display. The most common display type is the LCD display because it can be manufactured at a low cost. Your Lego Brick also uses an LCD display. In this lecture you will learn how to display text or images on this display. You will learn to do this efficiently, to make it easy for you to add information display capabilities to your robots. |
|
Requirements
- Lego Mindstorms EV3 Brick
- Ozeki 10 installed: http://www.ozeki.hu/index.php?owpn=6066
- Connect Brick via Bluetooth: http://www.ozeki.hu/index.php?owpn=6065
- Lego connection installed: http://www.ozeki.hu/index.php?owpn=6067
Video tutorial: 'How to use the Lego LCD display in Ozeki 10'
Open Control Panel!
First make sure that you have previously detected the Brick via Bluetooth through your operating system. Although there is no problem if you haven't done it yet, because the Bluetooth tutorial for the Brick available at http://www.ozeki.hu/index.php?owpn=6065. Then please log in Ozeki 10 and simply click on 'Control Panel' icon you can see on Figure 1 below. With the Control Panel you can access all settings and options. You can add new connections or delete available connections, message routing and you can also configure available ports in your system and watch system details. You will really enjoy that the Control Panel can easily control everything around you.
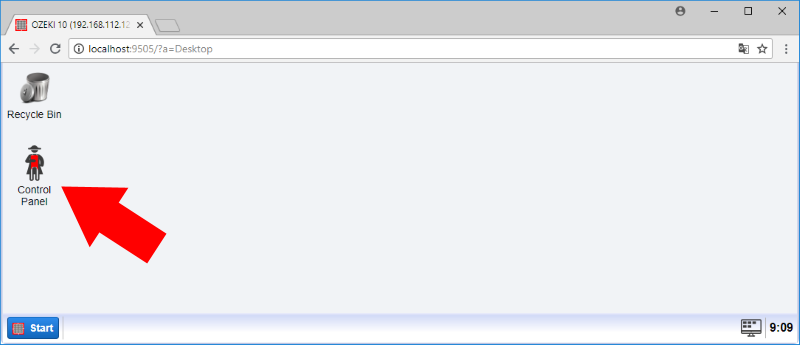
Figure 1 - Start Control Panel
Select LCD display from list!
The connection list is the best way to show all online and offline connections you have installed before. Several LEGO devices will be automatically listed for example battery, LED, LCD and speaker. If your connections list is empty do not panic just check the guide of the Installing Lego connection at http://www.ozeki.hu/index.php?owpn=6067. These connections are built into the Brick. Now you need to use the 'LCD_1' connection. Simply choose it by clicking on the connection name (Figure 2) or the blue 'Details' button next to it.
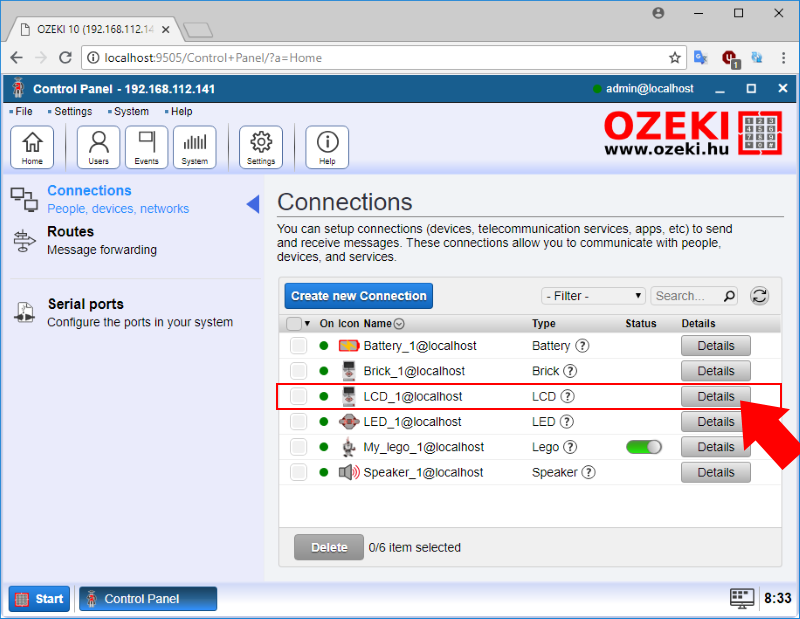
Figure 2 - Select Lego Mindstorms EV3 LCD display from the connection list
Send smiley to the Brick!
Select the smiley icon from the chatbox and hit enter (Figure 3). It will be appear on the Brick's display. You can try it with multiple emoticons and texts and see how they are displayed. It is good to know that with the 'fontsize' command you can change the text size and with the 'clean' command you can clear the display. Keep in mind to type 'update' to finalize all commands you have previously sent. To list all available commands please type 'help' to the textbox.
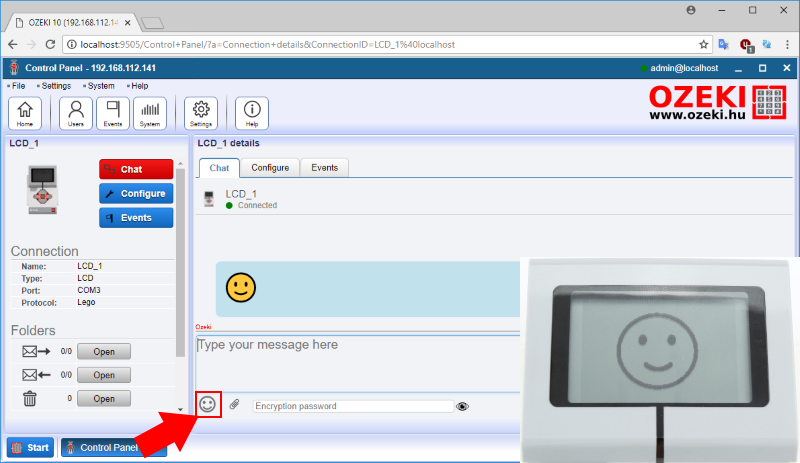
Figure 3 - Send smiley to display
Upload a picture to the Brick's Display!
You can send a bitmap image attachments through Ozeki Chat interface. If you want to upload the picture first click on file attachment icon. Now click on the appeared box 'To Add Files Click or Drag' and search the desired picture on your machine. These steps are demonstrated in Figure 4. Note that you can only send 24 bit bitmap images, because this format is supported by the EV3 Brick Display. After sending the picture from Ozeki 10, it will be displayed on the Brick's LCD.
![]()
Figure 4 - Ozeki logo bitmap image in display
Check the events of the LCD Display!
You can check the history of the LCD Display communication by navigating to the 'Event' tab page. On events tab you can see the date and time of the routed message between Ozeki 10 and the LCD Display. By using the 'Event' tab, you can access more detailed data from LCD display, which you can see on Figure 5 below. Here you will find all communication between the LEGO LCD Display and Ozeki 10, unless you have cleared the list or stopped refreshing it by clicking the green bar.
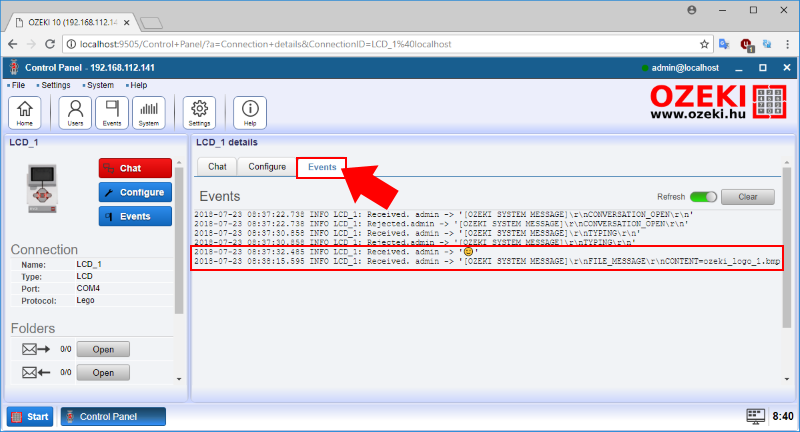
Figure 5 - 'Event' tab page of the Lego Mindstorms EV3 Brick Display
The LEGO Brick Display command set of Ozeki 10
This message example table contains a few example commands, which you can use to control your Lego Brick Display with Ozeki 10. These commands on Commands table can be sent through Ozeki 10 chat by yourself after clicking the blue 'Send' button. After using a 'draw' command you have to type 'update'. For extra information, the command set parameters in the 'Description' column is explained in the exact order of the command parameters should be provided.
| Commands | Description |
|---|---|
| clean | clean the LCD Display |
| update | update the LCD Display |
| topline 'on/off' | on/off the Brick's topline status bar |
| fontsize 'large/medium/small' | adjust the font size displayed |
| draw pixel 'background/foreground 0 0' | draw a pixel, horizontal spot, vertical spot |
| draw line 'background/foreground 0 0 10 10' | draw a line, horizontal spot, vertical spot, horizontal length and angle, vertical length and angle |
| draw rectangle 'background/foreground 70 70 20 20 filled' | draw a rectangle, horizontal spot, vertical spot, Width size, Height size |
| draw circle 'background/foreground 100 70 20 filled' | draw a circle, horizontal spot, vertical spot, circle size |
| draw text 'background/foreground 20 40 TEXT' | draw the given text, horizontal spot, vertical spot |
| draw image 'background/foreground 0 0 legopath' | draw an image on the specified coordinate, from a given location |
| draw invers rectangle '0 0 50 70' | draw inversed rectangle, horizontal spot, vertical spot, width size, height size |
| draw dotted line 'background/foreground 10 0 10 100 5' | draw a dotted line, horizontal spot, vertical spot, horizontal length and angle, vertical length and angle, a dot length, empty space between two lines |
| draw fill window 'background/foreground 0 24' | draw a fill window, where starts the filling vertical, up to down fill size |
Commands Table - Commands and description
The rest of the command set can be used on all Ozeki 10 sensors or actuators. You should always start by typing 'help'. It provides you the full command set for the actual device, which you would like to control through chat. If the device is a sensor, it is advised to subscribe to the measurements. You can use the Basic commands Table below for your own discretion.
| Basic commands | Description |
|---|---|
| help | request the command set |
| subscribe | subscribe to device messages |
| unsubscribe | unsubscribe from device messages |
| subscribers | shows the list of subscribers |
Basic commands Table - General commands for all devices
More information
- The touch sensor and sensor messaging
- Capturing infrared signals using the IR sensor
- How to measure light intensity and how to capture color information
- Using motors and rotary encoders
- Distance measurement, the ultrasonic sensor
- Orientation in space, the gyroscope sensor
- Using the LCD display
- Using indicator leds on the Lego Brick
- Power management and working with the brick battery
- Playing sounds on the Lego speaker