 Sign in
Homing to a dock using an IR beacon
Robot vacuum cleaners, robot lawnmowers and many other everyday robots are able to dock, once their job is completed or their battery level reaches a critical point. In this lecture you will learn to create a docking system. You will use an Infra Red beacon to find the dock and your robot will automatically navigate to it.
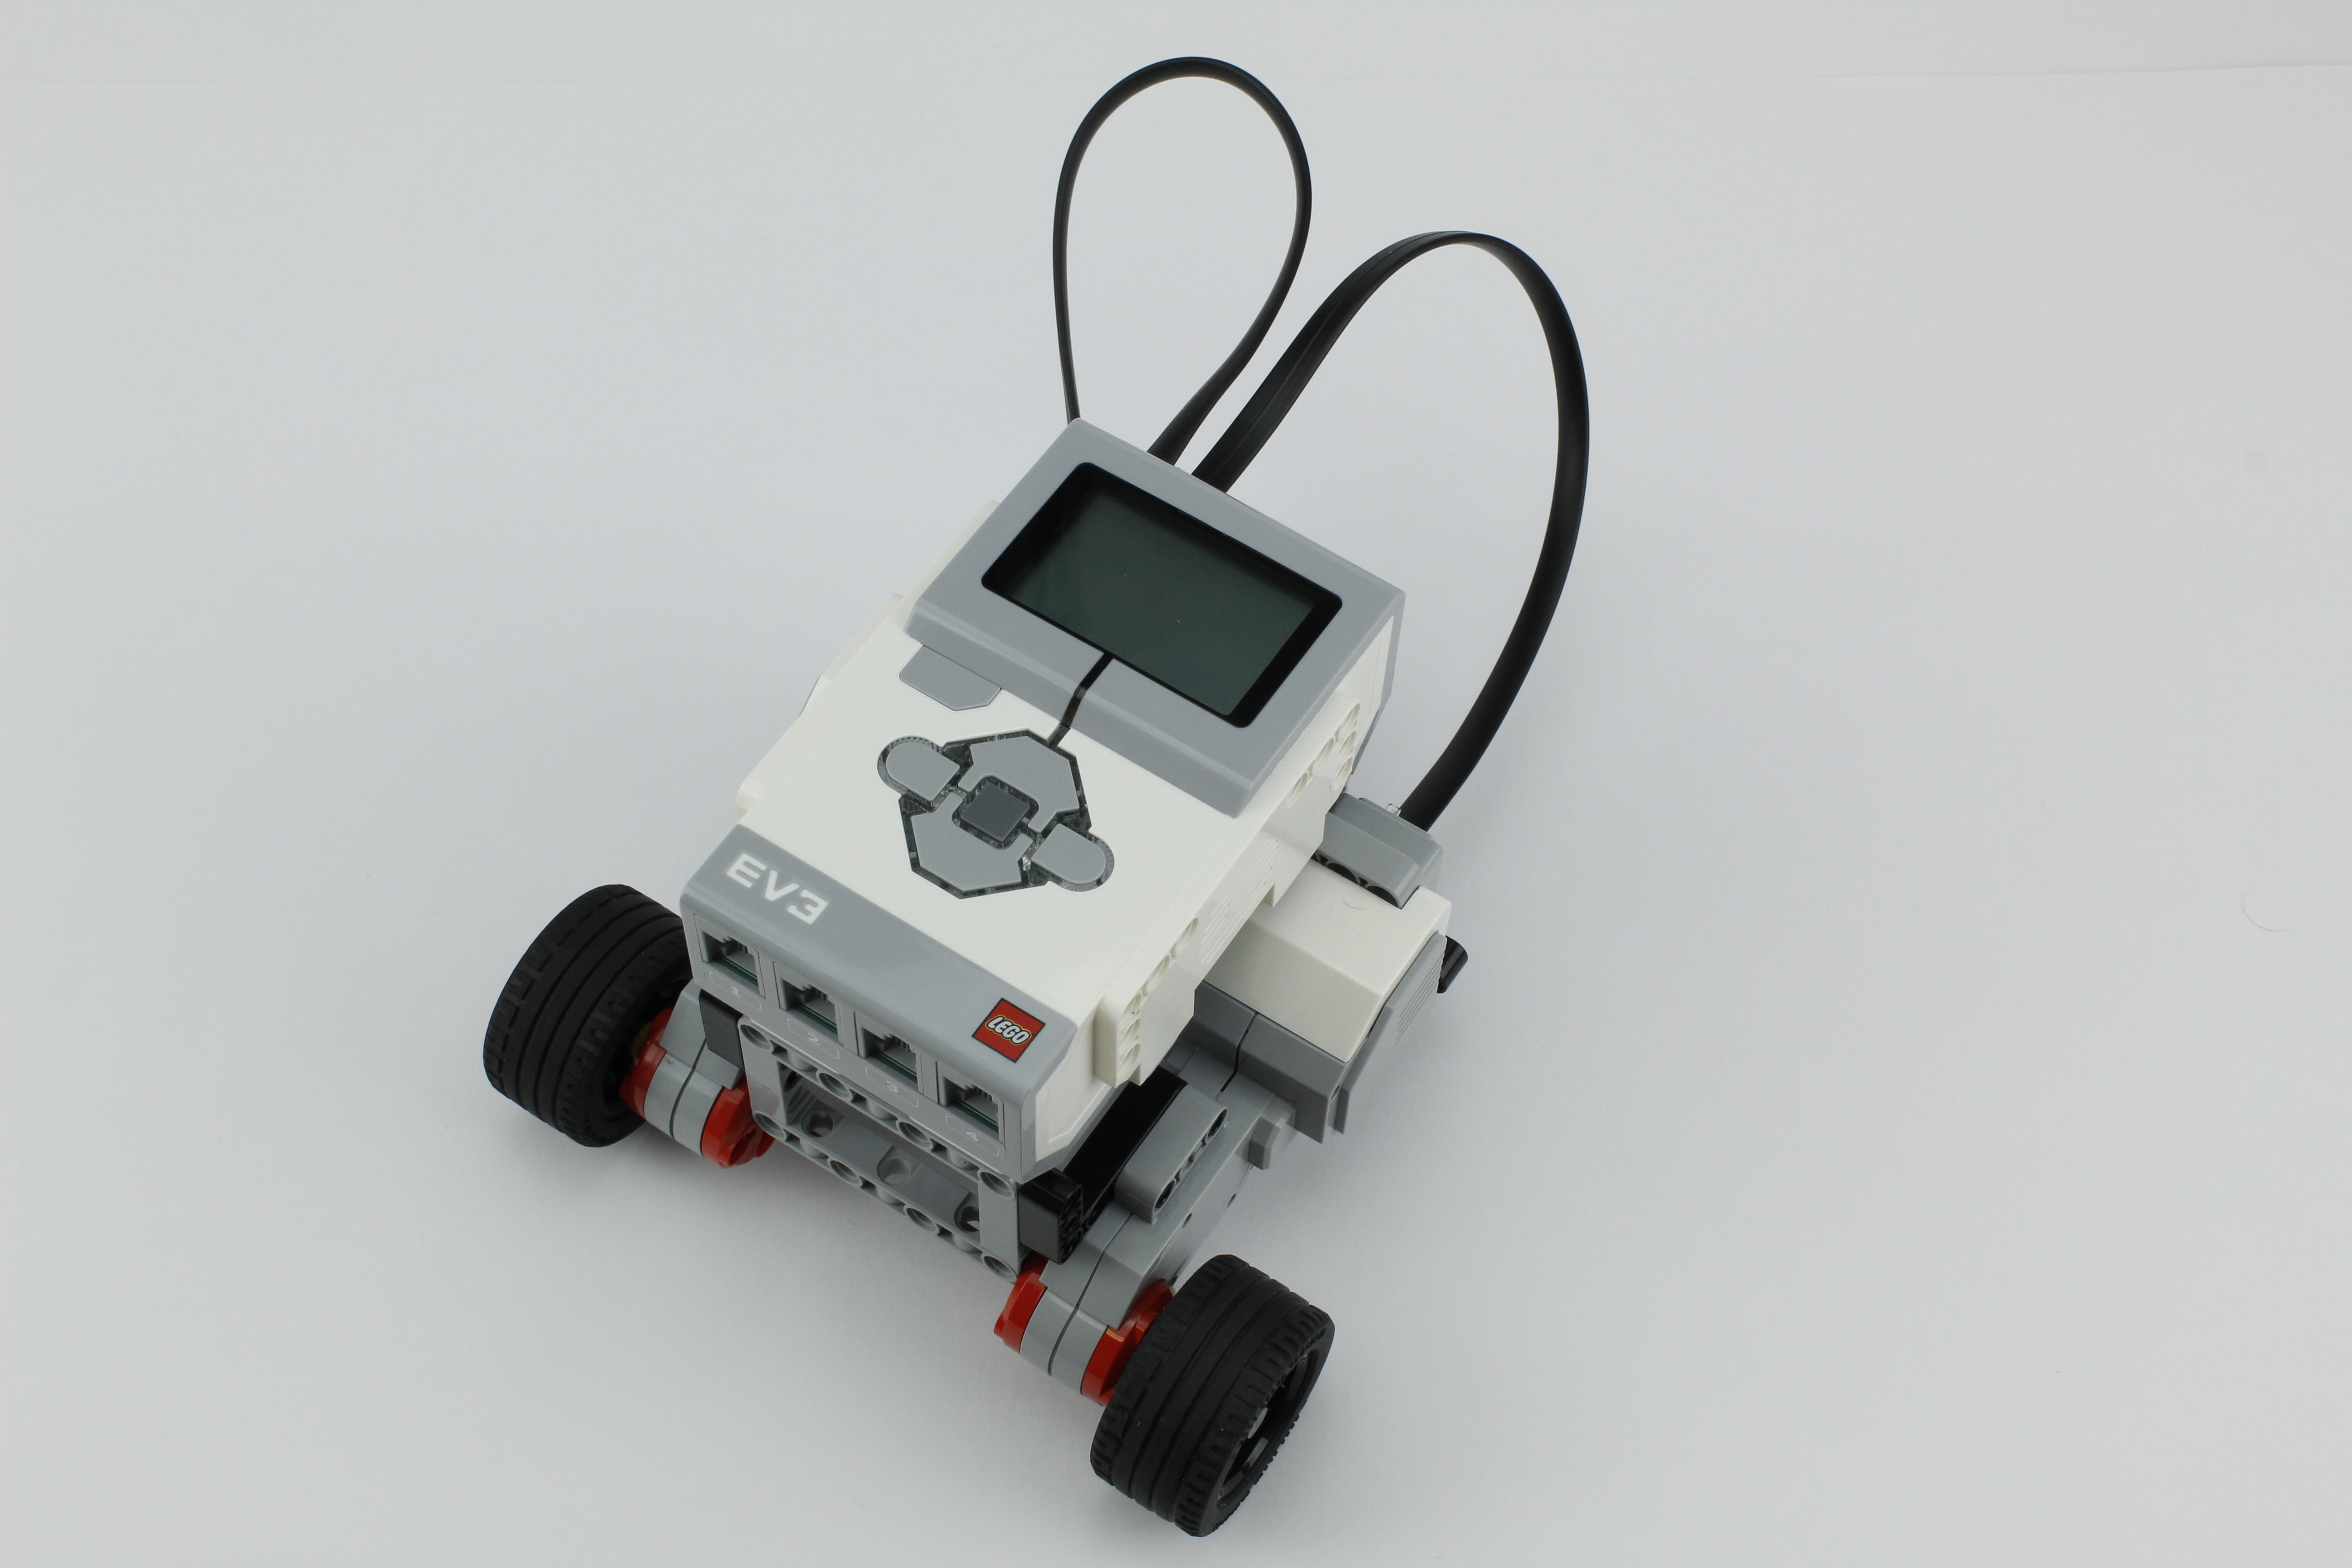
Figure 1 - Ozeki Sniffer equipped with ultrasonic and infrared sensor
Requirements
- Ozeki Sniffer: http://www.ozeki.hu/index.php?owpn=6204
- Ozeki 10 installed: http://www.ozeki.hu/index.php?owpn=6066
- Lego connection installed: http://www.ozeki.hu/index.php?owpn=6067
- Snap basics: http://www.ozeki.hu/index.php?owpn=6180
Change the mode of the IR sensor to beacon!
First of all, in this program you have to use the Infrared Sensor with 'beacon' mode. Make sure that the IR sensor is connected to the Lego brick. Please open the Control Panel, then you can see the connection list. Check if your Lego robot is properly connected. Select the Infrared Sensor from the list and click to open the chat field. After that select the 'Configure' tabpage, where you can choose from three different Infrared Sensor modes. Please select the 'beacon' mode in the 'Sensor mode' field as you can see it in Figure 2 below. The beacon mode reads an angle value between the sensor and the beacon, since the IR beacon can continuously transmit signal catched by the sensor.
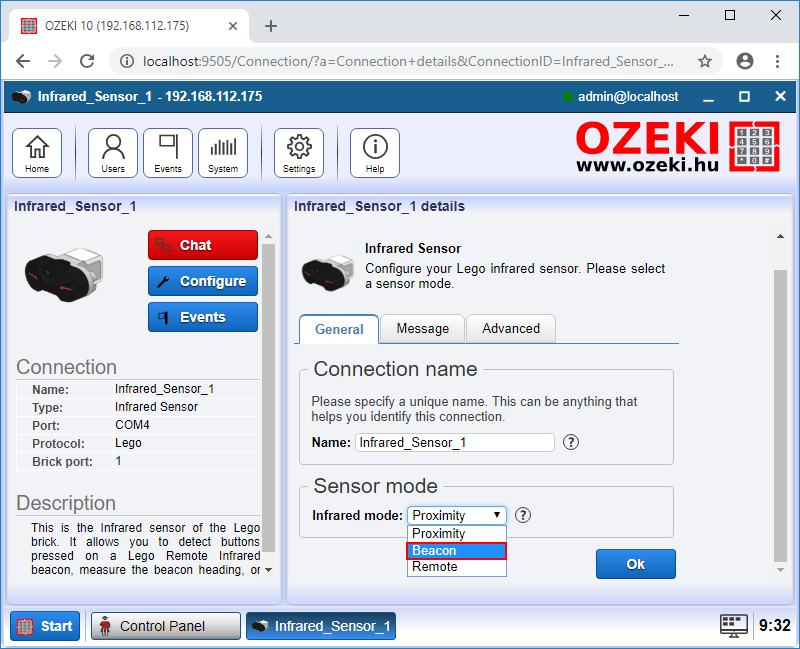
Figure 2 - How to change the IR sensor mode to 'beacon'
Write a code which rotates the motor to the right
Start the code with a 'when green flag clicked' entry point from the Control Menu, so the program can start with the green flag. After that, add the 'Drive [motors] [direction] at [speed]%' block from Lego motors, which rotates the motors. Please choose the B+C motors and select the 'right' direction, because the robot must turn right around its own axis. You can configure the motor speed from 0% to 100%, but you want the robot to turn right slowly, so set the speed to 5% (Figure 3).
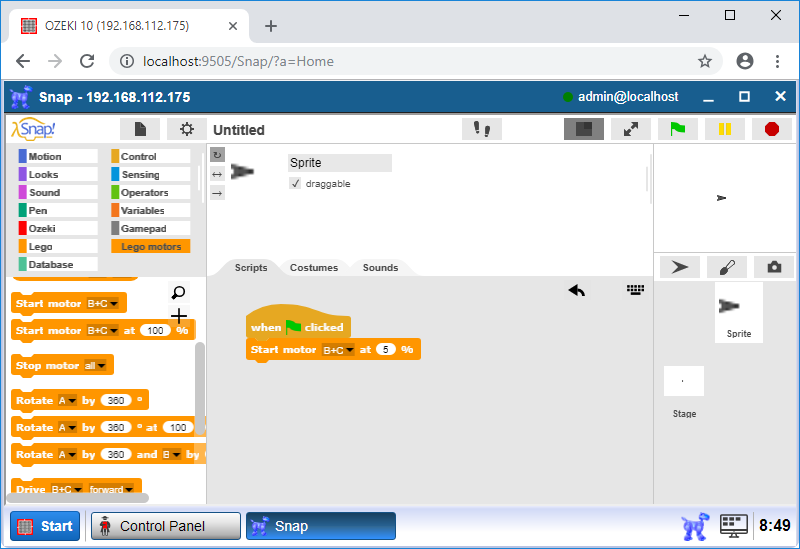
Figure 3 - The robot slowly rotates clockwise
Create a program to find the beacon
The program examines whether the beacon heading value is equal to zero or not, because if the robot is outside the spreading range of the IR beacon, then the IR's value is zero and the robot needs to rotate to be in the spreading range. If the IR's value is zero, then the robot turns right and checks if the IR's value becomes different than zero. Let's start the 'if' block from the Control menu which examines the Infared sensor's value (Figure 4). Attach the '[sensor_value] = [constant]' block from the Operators menu and check if the 'Beacon heading IR Sensor' is zero. In the 'if' block you have to add the 'wait until' block from the Control menu and attach the 'not [sensor] = [constant]' block, where [sensor] is the 'Beacon heading IR Sensor' and [constant] is zero. This block pauses the program until the condition becomes true, although the motor will rotate clockwise.
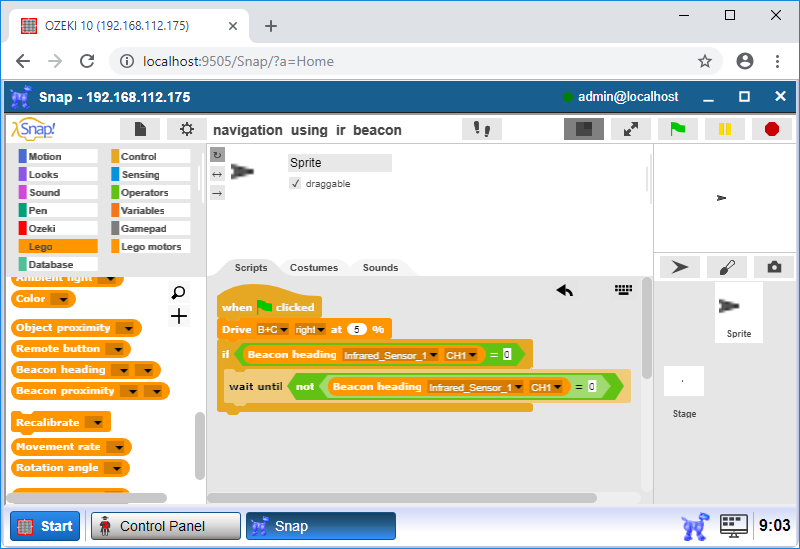
Figure 4 - Turn the robot right until the 'Beacon heading' reaches zero
Upgrade the code to drive your robot forward
Add a 'wait until' block after the 'if' block and attach an '[sensor] = [value]' operator as a 'wait until' condition. The [sensor] is the IR sensor and [value] is zero. The robot turns right until the IR's value becomes zero (Figure 5), which means the robot is facing the beacon. After that, add the 'Drive [motors] [direction] at [speed]%' block from Lego motors menu, where the motors are B+C. Choose the 'forward' direction, because the robot moves forward to the beacon. Set [speed] to 10%.
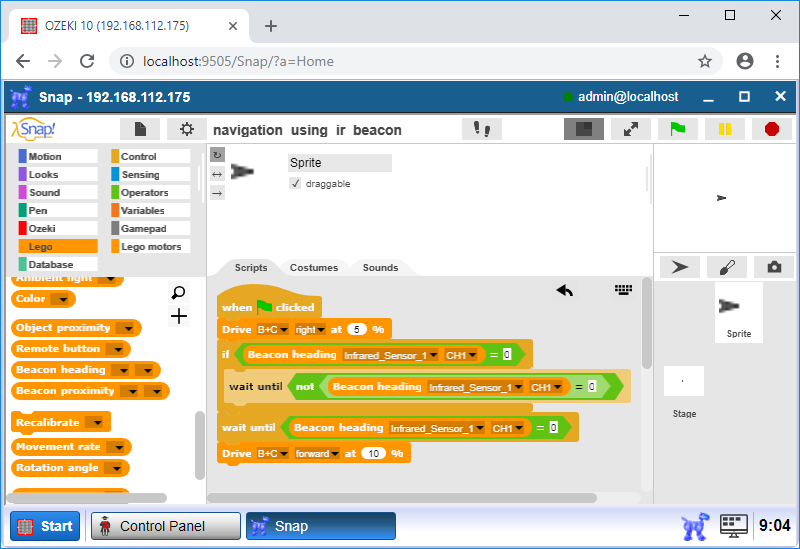
Figure 5 - The robot rotates till it detects the beacon then moves forward to park
Modify your program and measure distance to stop the robot
After this step, you can run the script, but before it, you have to add the 'wait until' block with a '[measurement]<[constant]' operator, where [measurement] is the 'Distance in cm' for the Ultrasonic Sensor, while the [constant] is 3 (Figure 6). This block compares the distance between the robot and beacon with a value. The robot moves forward as long as the distance reaches 3 cm. Finally the robot stops by using the 'Stop motor [motors]' block from the Lego motors menu. Set [motors] to B+C so the robot should stop. Your robot has finally parked by facing the beacon.

Figure 6 - The robot stops 3 cm from the beacon while facing it
Measure the direction
First of all we need to create a custom block to save the measured direction data, so click the 'Make a block' labeled grey box in the Control menu, on the left. It can be a 'Control' type block, select it from the list. You can name the block 'Measure alpha' by writing in the grey box, then click 'Ok' to create this custom block.
Now we can add already defined blocks to our custom block. Measure the wall distance with using the Ultrasonic Sensor and store to the 'wall_distance' variable. You need to attach this variable to the 'set [variable_name] to [value]' block, to the 'variable_name' place, this this block can be find in 'Variable' category. Also attach the 'Distance in cm [sensor]' block to the previous's block 'value' place, where from the 'sensor' drop down menu select 'Ultrasonic_Sensor_1'. You have to add the 'reset timer' block from the 'Sensing' category and drag the 'Drive [motors] [direction] at [speed]%' block to start turn left the robot slowly. Select B+C from 'motors', choose the left from 'direction' and set the motor 'speed' to 3. After that, the robot should need to wait 0.5 seconds, so add the 'wait [time] secs' block from 'Control' category and set it to 0.5 sec.
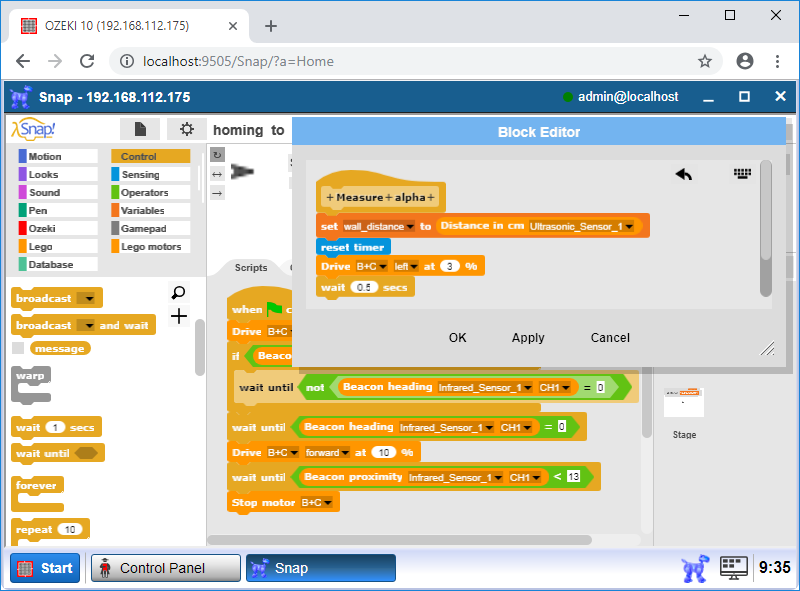
Figure 7 - Creating the first steps
The robot should go left until the wall distance is greater than then first wall distance measurement. Put the 'repeat until [condition]' block from the 'Control' category Attach the 'Distance in cm [sensor]' block to the 'condition1' place, select 'Ultrasonic_sensor_1' from the 'sensor' menu. Attach the 'wall_distance' variable to the second condition field. Add the 'wait [time] secs' block in the repeat block, change 'time' to 0.5. Add the 'Stop motor all' block from the Lego motors category after the repeat block, because if the repeat condition become true the robot should stop.
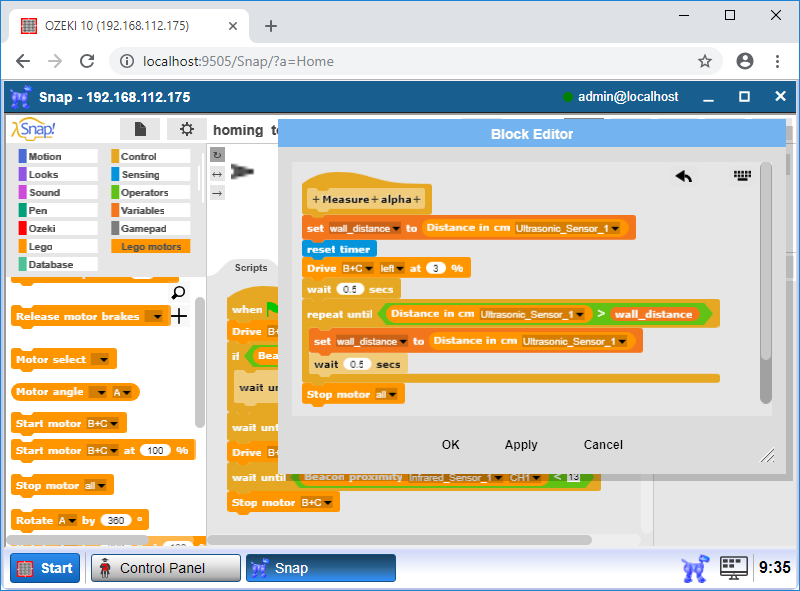
Figure 8 - Addig more blocks...
Now, you can calculate the direction with using the following formula. Add 'set [variable_name] to [value]' block from the 'Variables' category. There, you need to create an 'alpha' variable, from 'variable_name' list, choose 'alpha'. To the 'value' field, add a '[condition1] x [condition2]' block from 'Operators' category, 'condition2' should be '10.714'. Attach a '[condition3] - [condition4]' block to 'condition2' , 'condition4' should be 0.5, into the 'condition3' field attach a 'timer' block from 'Sensing' category. Then you have to turn right the robot a little bit, so add the 'Drive [motors] [direction] at [speed] %' block, where select the 'B+C motors' from 'motors' menu, choose the 'right' direction, and set the motor 'speed' to 3. Save the actual distance to the 'wall_distance' variable with the previously has already used 'set [variable_name] to [value]' block. 'Variable_name' has to be 'wall_distance' attach the 'Distance in cm [sensor]' block to 'value', 'sensor' should be 'Ultrasonic_Sensor_1'. The final block structure can be seen on Figure 9. Finally, click on 'OK' to finish creating this custom 'Measure alpha' block.
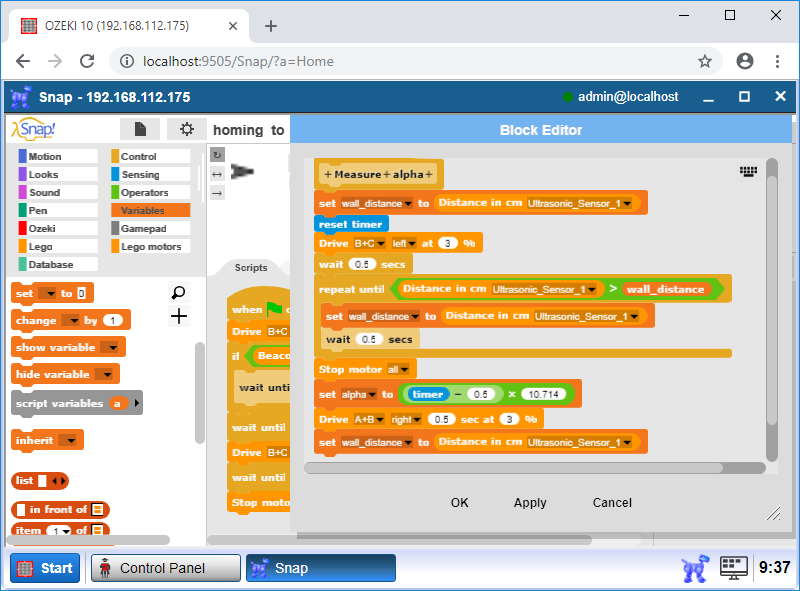
Figure 9 - Finishing
Calculate the Beta angle and the distance
Create a new block, name it 'Calculate', to calculate some important variables. The type of this block will be 'Operators'. Create some variables: 'angle_distance', 'distance'. Add 'set [variable_name] to [value]' block from the 'Variables' category, 'variable_name' is 'angle_distance', 'value' is 3. After that you need to set values to the two of the previously created variables. You need 2 more 'set' blocks, and in the 'value' fields we need some calculation in order to get the desired value. Use the following formulas to calculate the distance and the beta angle as you can see it on the Figure 10 below. You need some blocks from the 'Operators' category to finish this custom block, after you have done it, click 'OK' to finish the creation.
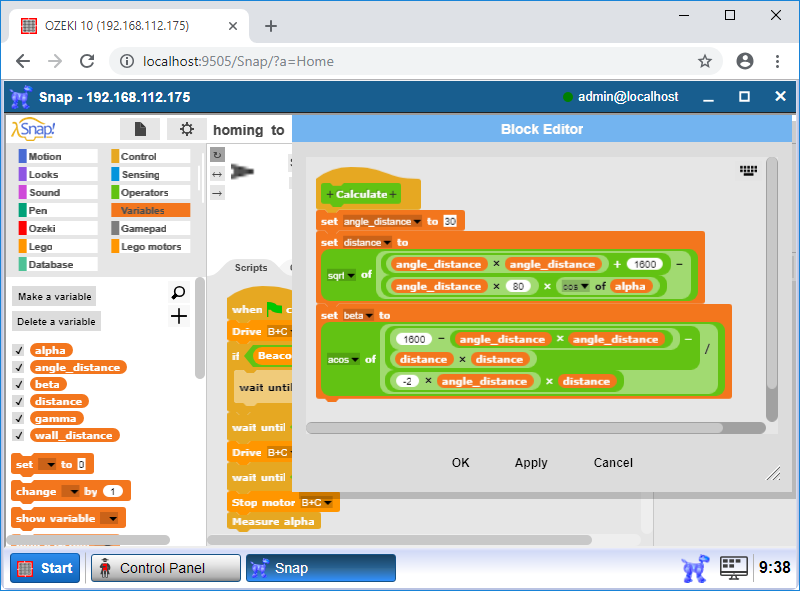
Figure 10 - 'Calculate' custom block
Move the robot to the right place
Create a new block again, name it 'Dock', type is 'Control'. First of all, set the motor speed to 20, so drag the 'set motor speed to [performance]%' block from the Lego motors category and write 20 to the 'performance'. In the following steps, you need to add some 'rotate' blocks, in order to get the robot into the right, desired position. In these blocks you need to use the previously created variables, in connection with blocks from Operators category to compare them.
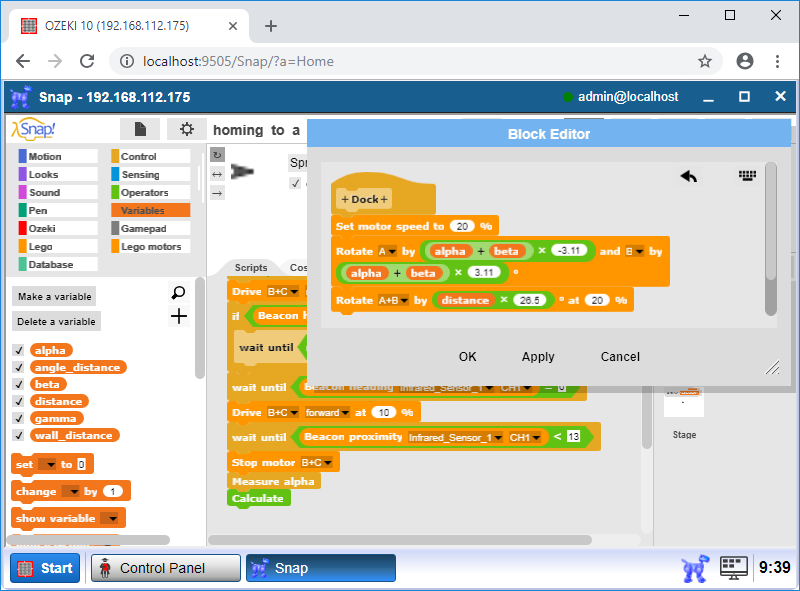
Figure 11 - Dock block part 1
Do the almost the same step as the previous steps, two changes are required. Subtract 180 by 'alpha' and 'beta' variables both of two blocks. Now, the robot is behind the wall and it should go forward 40 cm. Add the 'Drive' block and set 40 cm, because the robot need to go reserve to the dock station.
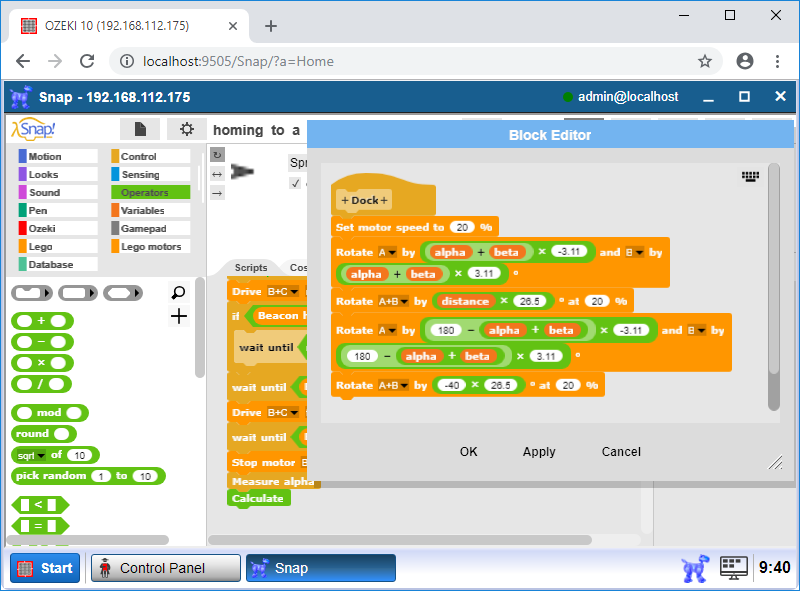
Figure 12 - Dock block part 2
Program code
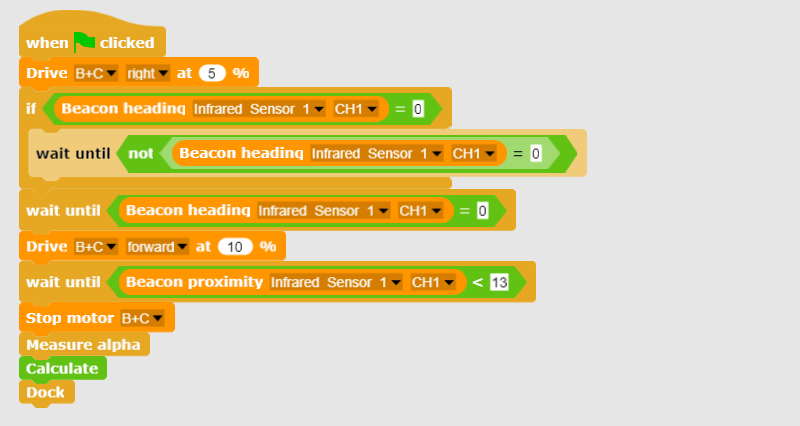
Figure 13 - The program code can detect beacon position with IR and wall
distance with ultrasonic, and can also reach home dock.
|
|
This program code helps you understand a way to navigate by using IR It is easier to navigate to the home dock, if you have the code in front of you: Download program code to reach the home dock with your robot |
More information
- Mapping and Navigation
- Going to a coordinate
- Collision detection / sensor feedback based navigation
- Surround sensing using linear distance sensor
- Create a parking assist system
- Homing to a dock using an IR beacon
- Follow me lunch bag
- Map a room's walls using ultrasonic sensor
- Mapping a room with LIDAR
- Outdoor navigation using GPS and mobile network