 Sign in
Barcode recognition / build a cash register
In this Lecture you will discover how you can build a cash register and how you can write a barcode recognition for your robot. You will see how you can install a barcode camera in Ozeki 10 and you will discover how you can create a list for the products and the prices. Then you will scan the barcodes with the Lego robot and write on the Brick's screen the sum of the prices. Final you will save the codes and the prices into an Excel document.
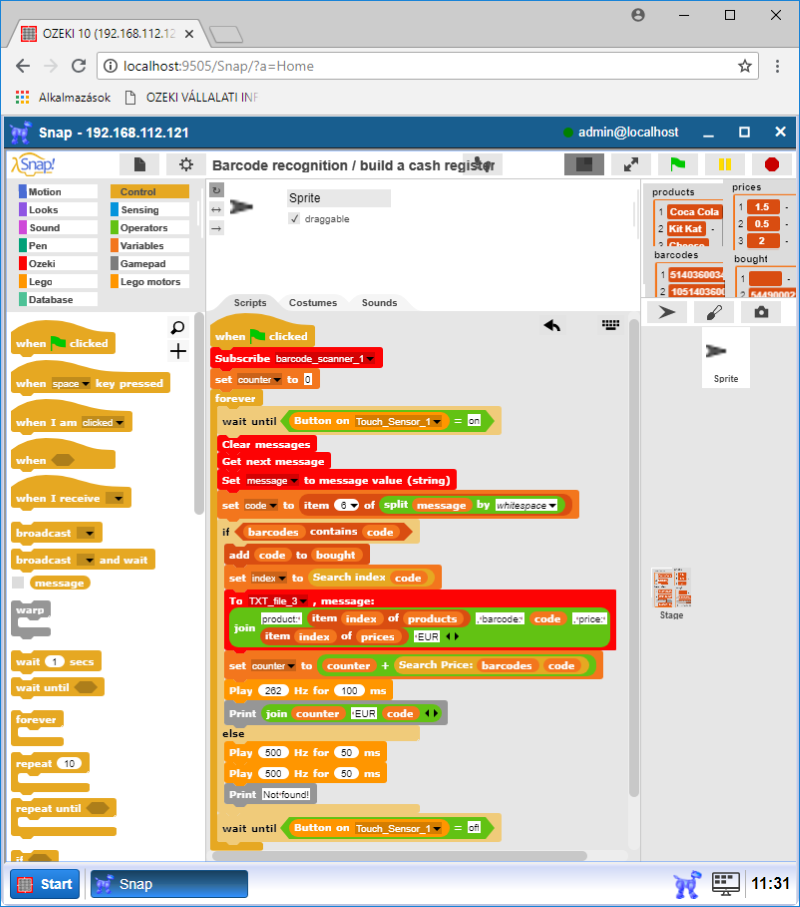
Figure 1 - Program for the barcode scanner
Requirements
- Ozeki 10 installed: http://www.ozeki.hu/index.php?owpn=6066
- Lego connection installed: http://www.ozeki.hu/index.php?owpn=6067
- Snap basics: http://www.ozeki.hu/index.php?owpn=6180
Install barcode camera in Ozeki 10
In this task you will discover how you can install your camera to your Ozeki 10. Connect your camera to the PC. Open the Ozeki 10 Control Panel and click on 'Create new Connection'. First select 'Video' then you need to choose 'Vision'. In 'Vision' click on 'Barcode' and you should set the connected camera on the 'Device' field (Figure 2). Now, your camera is ready to use it. You can find it in the list between your other connections. If you click on it you will see your camera's image.
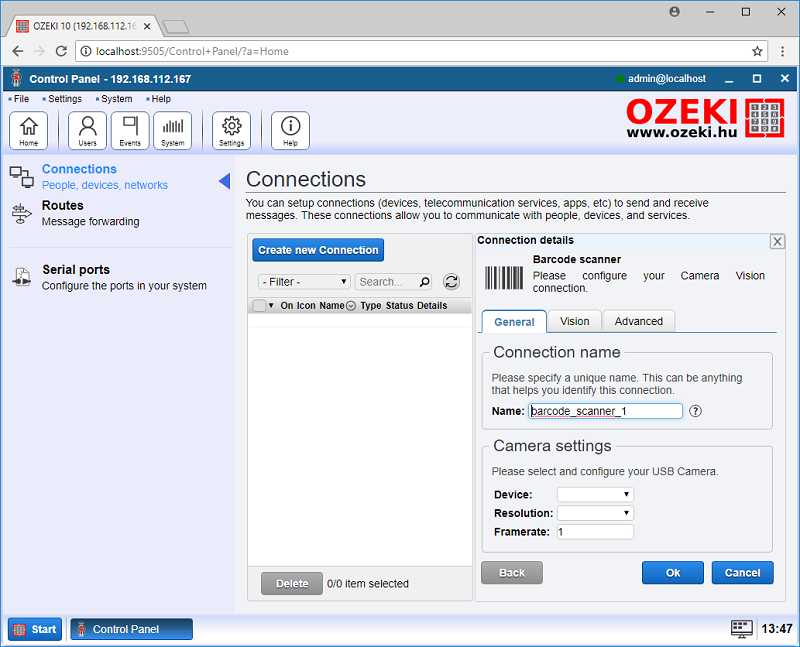
Figure 2 - Create a connection to your camera
Create a list of products with prices in Snap
If you have created the connection in the Control Panel you should create some variables and lists for the program (Figure 3). First you need to store the barcodes in a list so create one called 'barcodes' and create a variable called 'message' for the currently scanned code. If you scan the barcode it will contain more information than the barcode. The barcode always the message's sixth part. The 'code' variable store the message's sixth part, the barcode. Create a list called 'prices' that contains the prices of the products. The 'barcodes' first item's price is the 'prices' first item, and so on. Final create a 'counter' variable that store the sum of the prices. You will see it on the Brick.
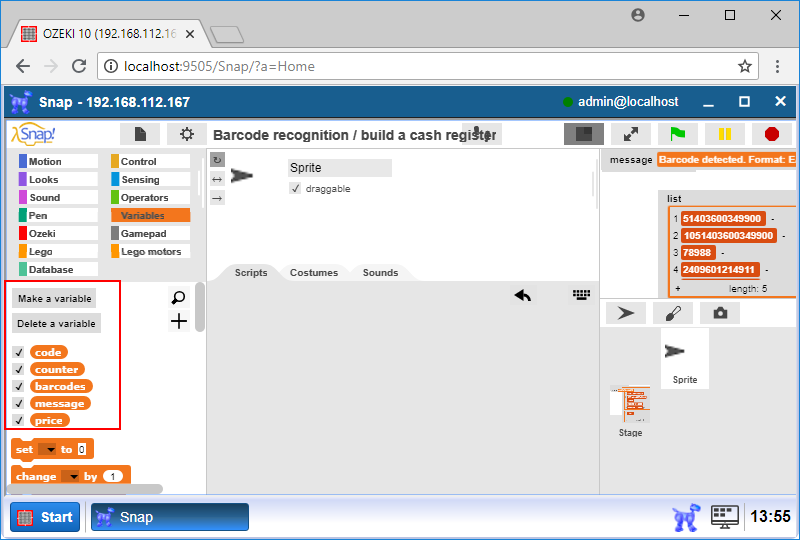
Figure 3 - Variables and lists in SNAP that you will need for the program
Scanning the barcodes
In this task you will write a program for scanning. First add the 'when green flag clicked' block for the program's starter point. You need to subscribe to the barcode scanner with the 'subscribe [connection]' block. You need to set the 'counter' to 0 to get the right sum when you scan the barcode. If you want to scan more than 1 thing you need to use a 'forever' block for that. In 'forever' you should check the button presses (Figure 4). You can see a 'Clear messages' block that ensures you to always get the scanned code because it cleans the other unnecessary scanned informations. If you press the button on the Touch sensor the camera should scan the barcode. You can do that with 'get next message' block. If you would like to get the barcode from the message save it into the 'message' variable with the 'set [variable] to message value (string)' block.
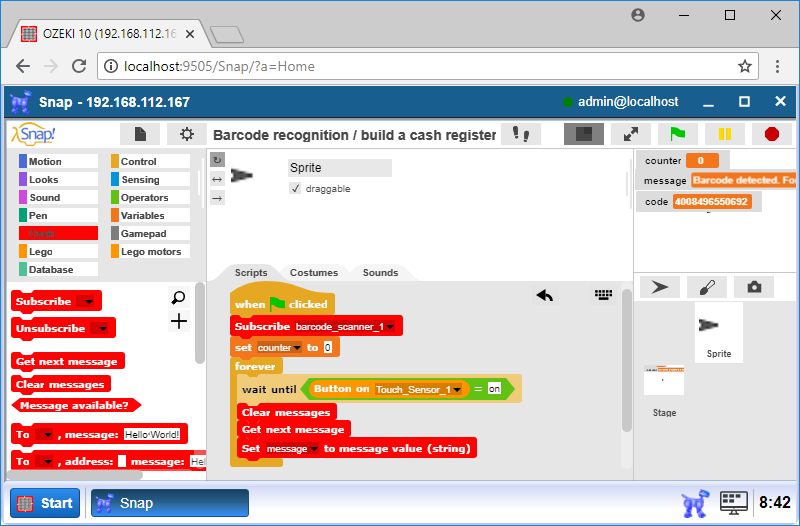
Figure 4 - Scanning the barcode when you press the Touch sensor
Expand code to create the total sum of the prices
In this task you will expand your code. You should write a program that can sum the item's prices that you have scanned with the barcode scanner. For that you need the code and the price. After you have set the message you can get the barcode if you split the message and save the sixth part of the message with the 'set', 'split' and 'item of' blocks (Figure 5). If you have the code you should check that it is in the product's list or not. If it is in the list you should increase the counter with the product's price. For that you need to search the product's price with the 'Search price: [list] [code]' block. After that you need to place a block that play a little 'beep' when you scan the code. Final you should show the sum of the prices on the Brick's screen with the 'print' block.
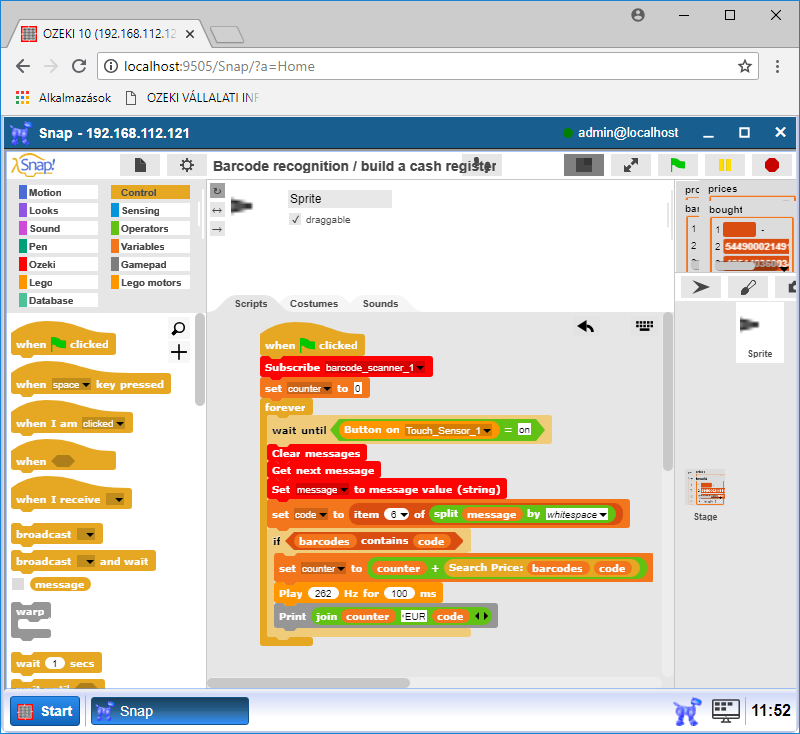
Figure 5 - Create the sum of the product's prices
Upgrade the program with a Not found!
In this task you will upgrade the previous program. In the last program the 'Barcoder' can not do anything if you scan a product that the list does not contain. Now, in this task you will write a code that can play two 'beep' and write a 'Not found!' text on the Brick's screen if you scan a wrong product. Drop an 'if-else' block under 'set [code] to' block and in 'else' you need to place two 'play [500] Hz for [50] ms' block and a 'Print [Not found!]' block (Figure 6) under each other.
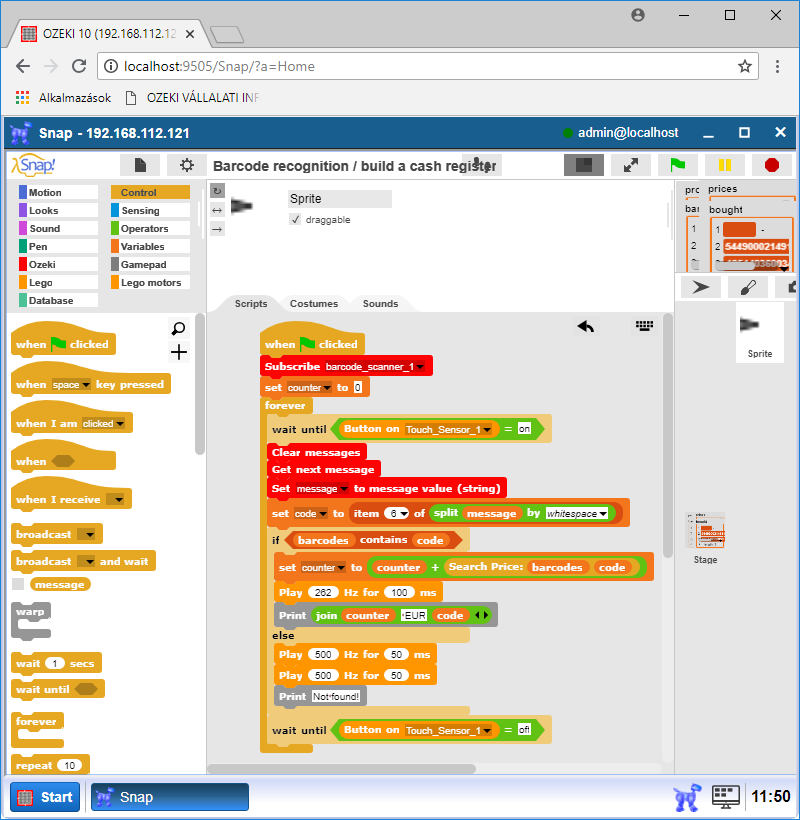
Figure 6 - A program that can show 'Not found!' if the product is not in the list
Create a list for the product's name
In this task you should create a new list called 'name' for the product's name. Click on 'Make a variable' and give 'name' for the variable's name. Set to the 'name' variable a 'list [ ]' block. Type the item's name to the 'list [ ]' field (Figure 6). Now, if you have the list of the products you can save the datas into an Excel document. Let's see the next tasks to understand how you can do that.
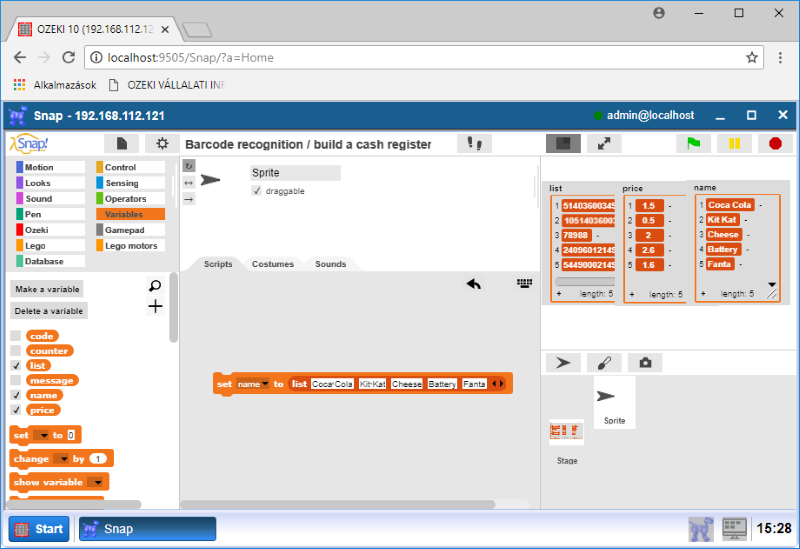
Figure 6 - Make a list for the product's name
Install the connection for saving
In this task you need to create a connection for saving the datas into an Excel document. In the Control Panel click on 'Create new Connection'. First select 'Application' (Figure 7). In 'Application' you can use the connections to send and receive messages.
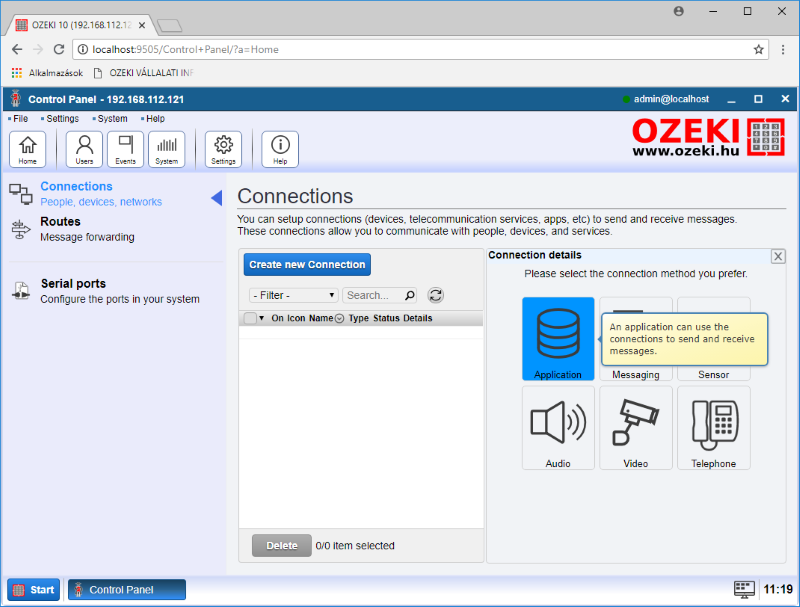
Figure 7 - Select 'Application' from 'Connection details'
After you have clicked on 'Application' you should choose the 'TXT File' (Figure 8). It ensures you to send and receive messages using text files. If a message arrives it can creates a text file in your incoming directory on your hard disk. If you would like to send a message you should place it into the outgoing directory.
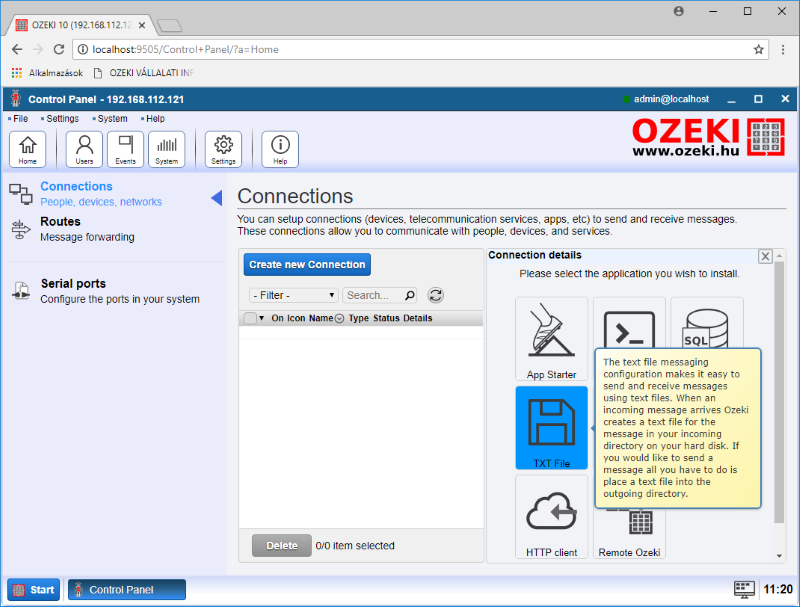
Figure 8 - Select 'TXT file' from 'Connection details'
Now, you should configure your connection. In the 'Connection name' field you can type the document's name. In the 'Settings' field you should set 'XLSX' to the 'File format' (Figure 9). In the 'Message folders' field you can set the saved Excel document's folder in 'Outbox'.
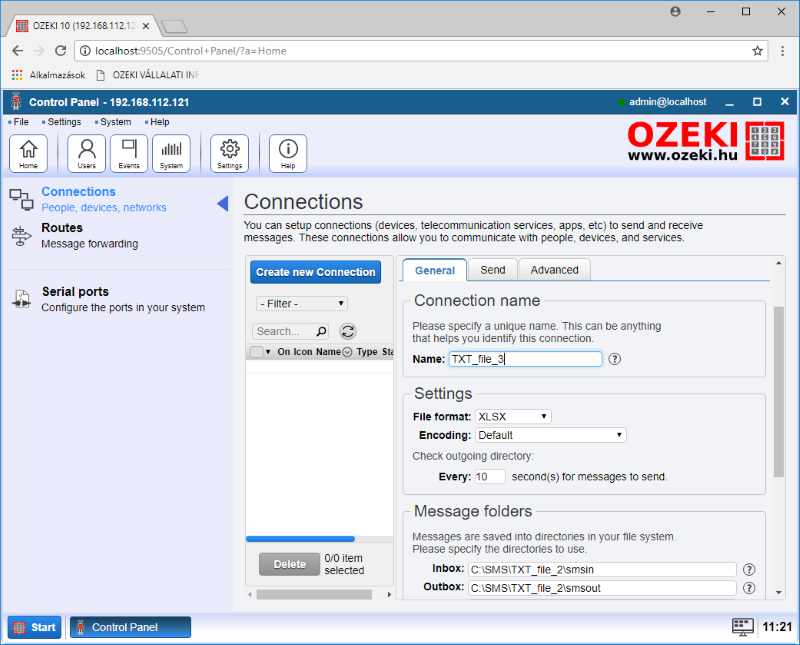
Figure 9 - Configuration settings
Create a block for search the product's index
In this task you will create a block for search the product's index in the 'barcodes' list. Please give 'Search index' to the block's name. You should give a list to the block's parameter. The 'for' loop will execute until the 'i' variable isn't more than the 'barcodes' list length. In the loop you should check the actual barcode's index in the 'barcodes' list. The block will report the index of the barcode (Figure 10). The 'index' is important when you would like to save the datas into an Excel document.
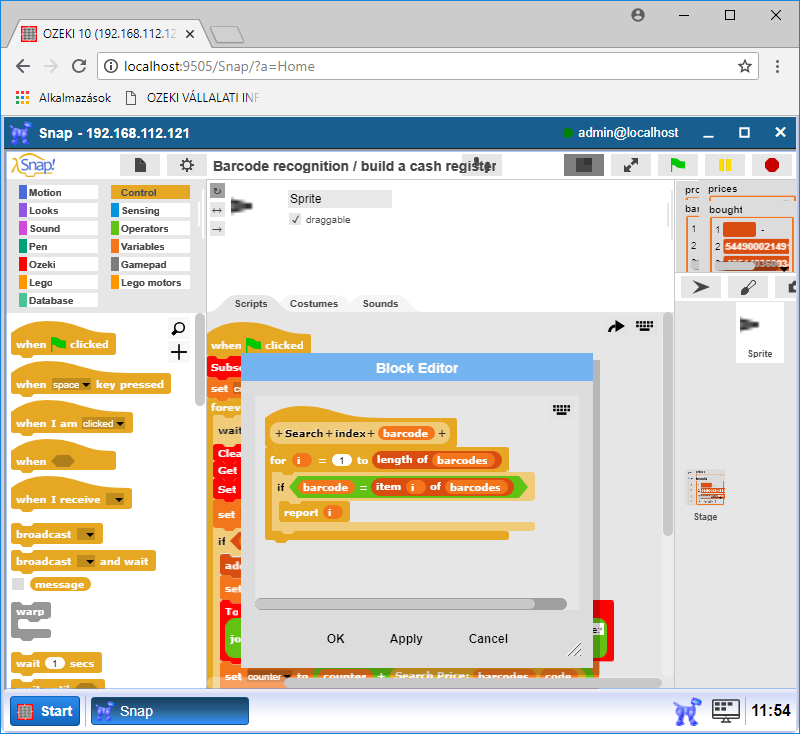
Figure 10 - Block for search the barcode's index
Save data into Excel
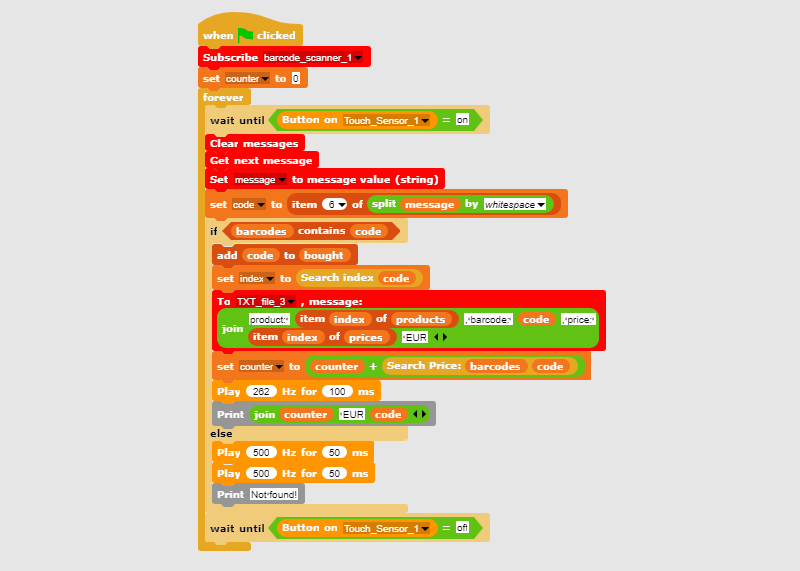
In this task you will discover how you can save the product's codes, prices and names into an Excel document. You should complete the program in 'if'. Create a list called 'bought'. Please add the scanned barcode to 'bought'. Create a variable called 'index'. Set the 'Search index' block's value to the index's value. The new block is the 'To, message: ' block (Figure 11). The block's first parameter is the name that you have set in Task 7, so the file where you would like to save your datas. The message is the product's name, the product's barcode and the product's price in EUR.
Figure 11 - A Program that can save the datas into an Excel document
|
|
Download program code to scan barcodes with your robot. It is easier to follow the guide if you have the codes in front of you: Download Ozeki Snap code |
More information
- Introduction to visual sensors
- Introduction to cameras, taking snapshots
- Face detection
- Barcode recognition / build a cash register
- Computer vision, QR code recognition
- Motion detection
- Circle detection, line detection, measurements using cameras
- Car license plate recognition
- Build a PTZ camera
- Use a VR headset to control your camera