 Sign in
Build a PTZ camera
PTZ stands for Pan, Tilt, Zoom. In this lecture you will learn how to build a PTZ camera from Lego. Actually we will cheat a little, because you will only implement pan and tilt movement control using two motors. Once you complete this course you will have a camera that can broadcast images to web browser, and that can be turned to the point of interest using keyboard commands.
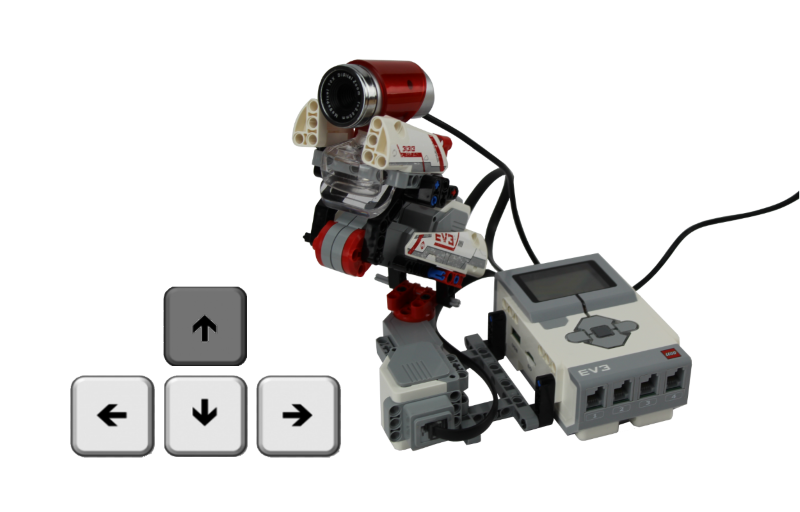
Figure 1 - Control your Spycam with the arrow keys
Requirements
- USB camera connected to your PC
- Ozeki Spycam: http://www.ozeki.hu/index.php?owpn=6271
- Ozeki 10 installed: http://www.ozeki.hu/index.php?owpn=6066
- Lego connection installed: http://www.ozeki.hu/index.php?owpn=6067
- Snap basics: http://www.ozeki.hu/index.php?owpn=6180
Setup the USB camera connection!
First, you need to create a connection for the USB camera, so you will be able to see the images of it. So, after you opened Control Panel, click on Create new Connection and select the Video method. Next, from the video connections, you have to choose the USB camera connection (Figure 2). Lastly in the connection details you can modify the setting of the connection before creating it.
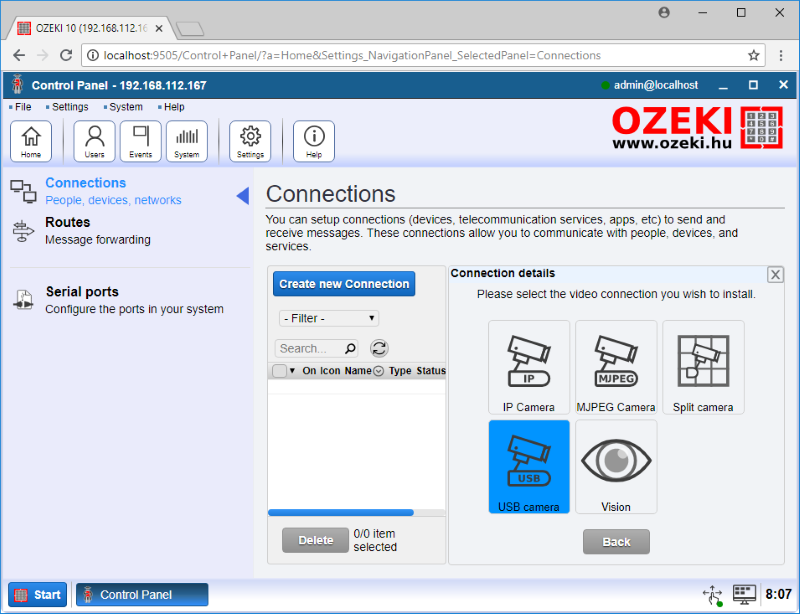
Figure 2 - Video connections in Ozeki 10
Write code to move the camera with the 'up arrow' key!
The camera is controlled by motors, so to move the camera you just need to rotate these motors. So, after you opened SNAP, first add the 'When key pressed' entry point, and select the 'up arrow'. Then to start the motor, drag the 'Start motor B at 5%' block. Next you need to stop the motor when you release the key. So, place a 'Wait until' block, and drag the 'not' operator in there. In that operator add the 'Key pressed?' block, and select 'any key' (Figure 3). So, with that your program will wait until you release the key. Lastly place the 'Stop motor' block, and select the motor B.

Figure 3 - The program waits until the key released
Upgrade code to move the camera to the other way with the 'down arrow' key!
To move the camera to the opposite way is a quite simple task, and has got almost the same code as the previous one. So, you can just right click on that one, select 'duplicate' and place that code somewhere into the field. Here, first you need to change the 'up arrow' option to 'down arrow' in the 'When key pressed' block like in Figure 4. Then, to rotate the motor to the opposite way, you need to type -5% instead of 5% in the 'Start B motor' block.
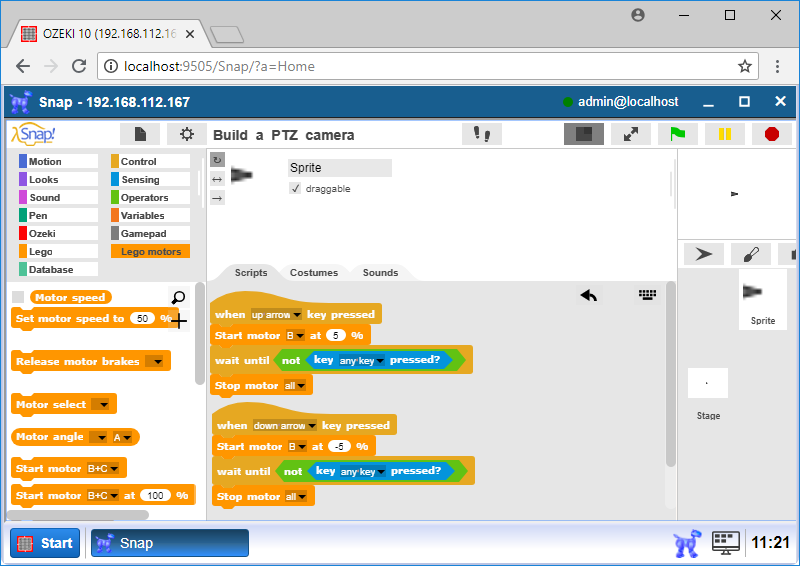
Figure 4 - The camera can look to two ways
Upgrade code to don't let the camera rotate too much!
It can be annoying if the camera coil up the cables in case you press the key too long, and the motor of the camera rotates too much. To avoid that, you need to expand the 'Wait until' block. In the 'not' operator first drag out the 'key pressed?' block, and add the 'and' operator instead (Figure 5). To the left hand side you please back the 'key presses?' block, and to the other side add the 'or' operator.
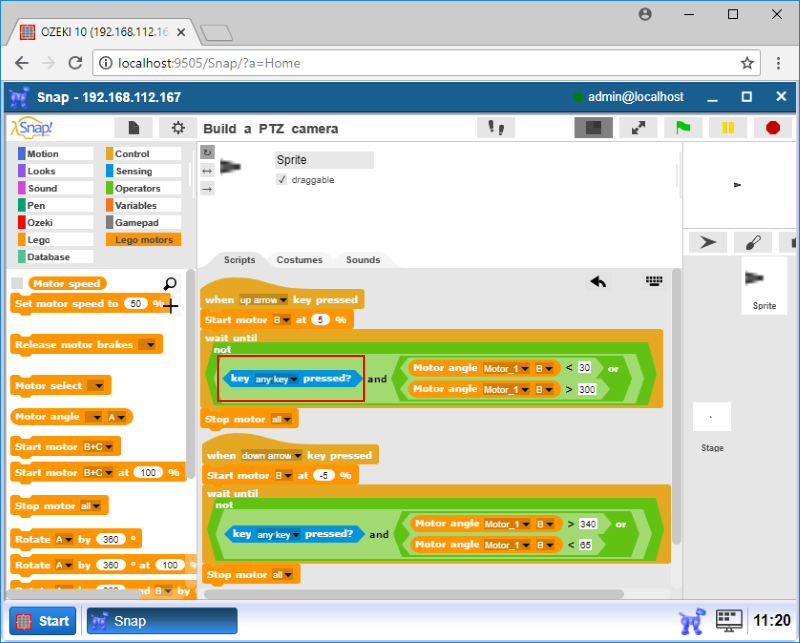
Figure 5 - Condition in 'Wait until' extended
Next, in that 'or' operator, place the condition that the angle of the B motor is smaller than 30 like in Figure 6. To the right hand side add the '>' operator, and drag the 'Motor angle 'Motor_1' 'B'' block in there, and to the other side type 300. With these modifications the motor will not rotate towards these angles and the camera won't coil up the cables around it.
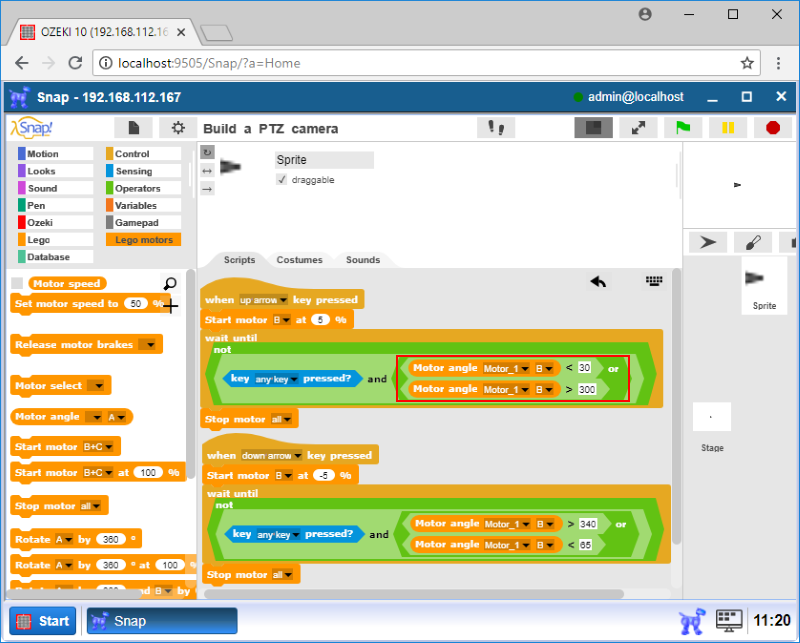
Figure 6 - Allowed angle of the motor entered
Expand code to rotate the camera to left and right!
The code you created to move the camera up and down will be your friend during the completion of the task, because you only need to modify just a few things, so you can right click one of the created blocks and create two duplications of that code like in Figure 7. To the first duplication, to rotate the camera with the 'right arrow' key, select that one in the 'When key pressed' block. In 'Start motor' and 'Stop motor' block you need to modify the letter of the motor, you choose this time the A motor. The power in 'Start motor' needs to be 5%. In the other duplication, select the 'left arrow' key in 'When key pressed' and also select the motor A in 'Start motor' and 'Stop motor' blocks. The power of the motor have to be -5% to rotate the camera to the left.
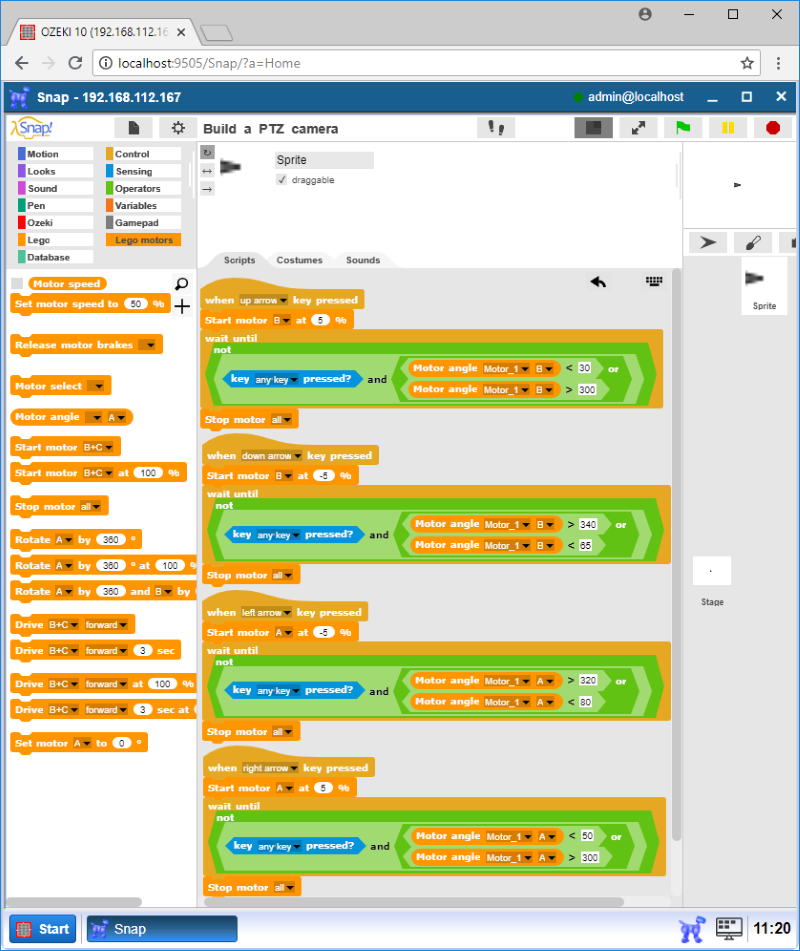
Figure 7 - The camera can look to all four directions
Check the results in your USB camera connection!
If you did the code writing well you can check how your camera controlling program works in Control Panel. If you open the Control Panel in another window and select the USB camera connection, that you created at beginning of this lecture and here choose the Test tab, you will be able to see the picture that the camera broadcasts for you as you can see in Figure 8. At this point if your SNAP program is opened you probably will be able to control the camera with the arrow keys.

Figure 8 - Picture of the camera in Ozeki 10
Program code
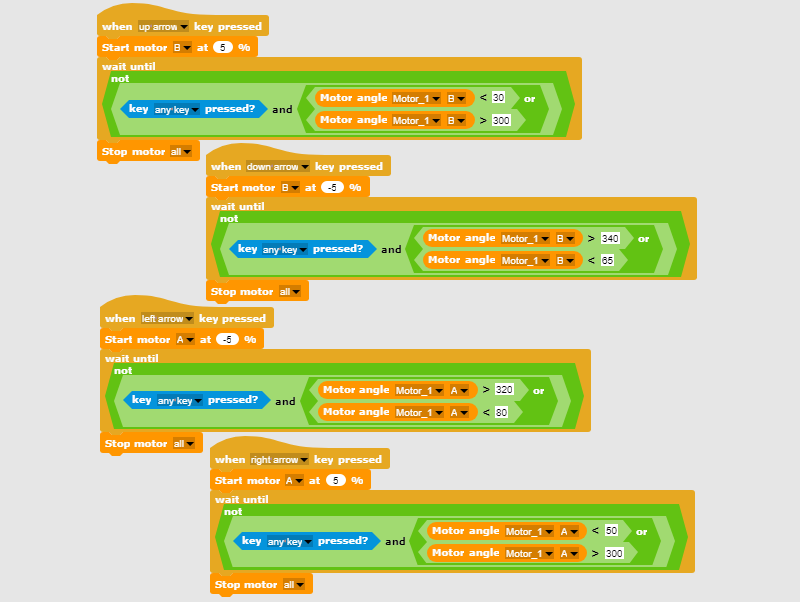
Figure 9 - Program code for controlling the robot with keyboard
|
|
Download program code to control your Spycam The code can control the camera with the arrow keys on the keyboard It is easier to follow the guide if you have the codes in front of you: Download Ozeki Snap code |
More information
- Introduction to visual sensors
- Introduction to cameras, taking snapshots
- Face detection
- Barcode recognition / build a cash register
- Computer vision, QR code recognition
- Motion detection
- Circle detection, line detection, measurements using cameras
- Car license plate recognition
- Build a PTZ camera
- Use a VR headset to control your camera