 Sign in
Collect sensor data from the Robot into SQL
In this lecture you will learn how to send data into a database table from a robot control code written in SNAP. You will use the IR remote and the IR sensor and save the IR remote button press events into a database. You will also set up different tables to store IR beacon angles in the database.
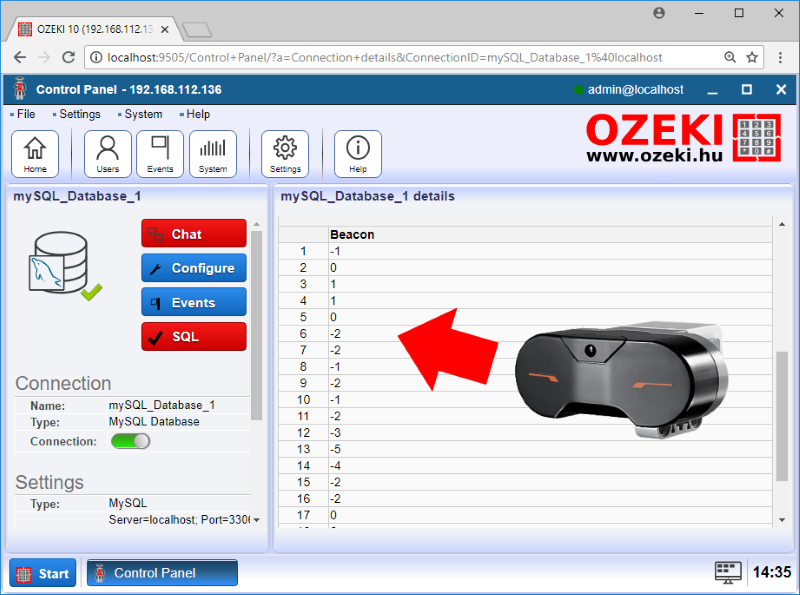
Figure 1 - Check how you can collect data from the infrared sensor to a database table
Requirements
- Ozeki 10 installed: Installed Ozeki 10 Robot OS
- Lego connection installed: Connect the Lego robot to Ozeki 10
- MySQL database server installed: http://www.ozeki.hu/index.php?owpn=6150
Create two tables in SQL Console to store data from the button presses and the Beacon's angle!
In this lecture you are going to collect data from the infrared sensor in two modes. First in Remote mode, then in Beacon mode and store data in separate modes to separate tables. The first thing that you have to do is to create these tables in Ozeki 10. For that just open up your database connection and select the SQL Console. Here you need to type the 'CREATE TABLE Remote_data (Remote_button INT (10))' command (Figure 2). That means you are going to create a table with the name 'Remote_data' which will have one column called 'Remote_button' and it can store numbers with maximum ten digits. It is good to know that the Lego remote has 4 buttons to press.
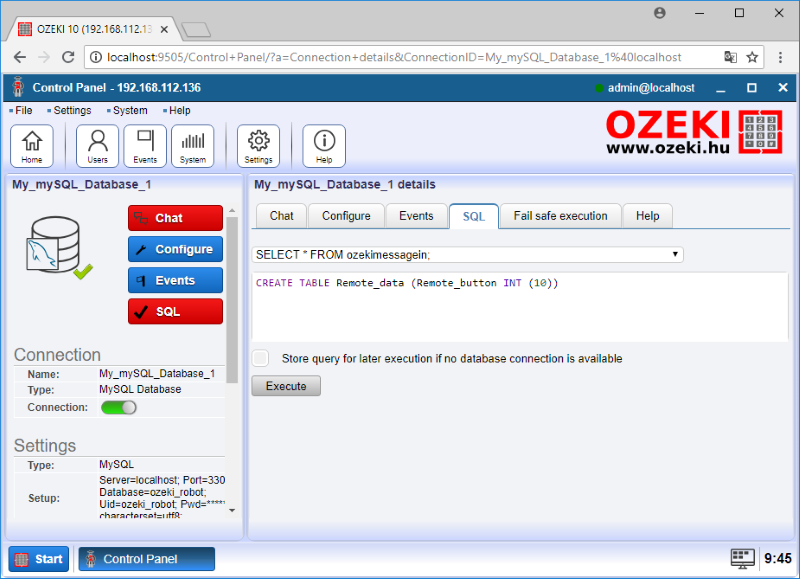
Figure 2 - CREATE TABLE for remote data
The other table that you need to create will store the data of the beacon's angle when it is changing. You will write the SNAP script later in this lecture, now you only have to create a table for it with 'CREATE TABLE Beacon_data (Beacon INT(10))' (Figure 3). This is almost completely identical to the previous table, only the names are different. So this command will create a table with the name 'Beacon_data' with one column which is called 'Beacon' and it stores number data.

Figure 3 - CREATE TABLE for beacon data
Select Remote mode on the infrared sensor!
For the next task of this lecture, where you are going to collect the key presses on the infrared beacon, that was detected by the infrared sensor, you have to set the infrared sensor to Remote mode. For that you need to open your infrared sensor connection in Control Panel and select the Configure menu (Figure 4). Here you only have to modify the Sensor mode to Remote mode and now your sensor is ready to collect remote data from the beacon.
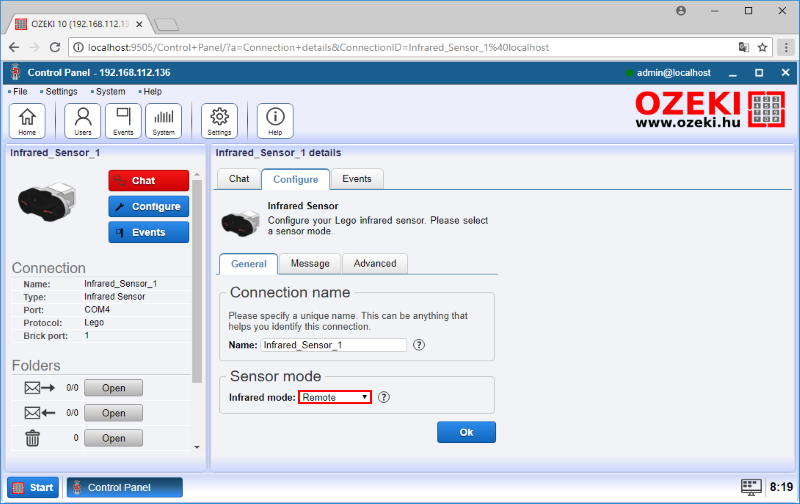
Figure 4 - Configuration menu of the infrared sensor
Write code to detect button presses and forward them to SQL Messaging connection!
The first script will be a really simple one, that collects key presses from the infrared beacon. So after you opened SNAP, first drag the 'When green flag clicked' and 'Forever' blocks. That ensures the continuous running of the program until you terminate that. In the 'Forever' block place the 'Wait until' block with the condition that the remote button of the infrared sensor is bigger than zero, which means a button is pressed on the beacon. If a key press is detected, a 'To [connection], message:[text]' block will send data to the selected messaging connection (Figure 5).
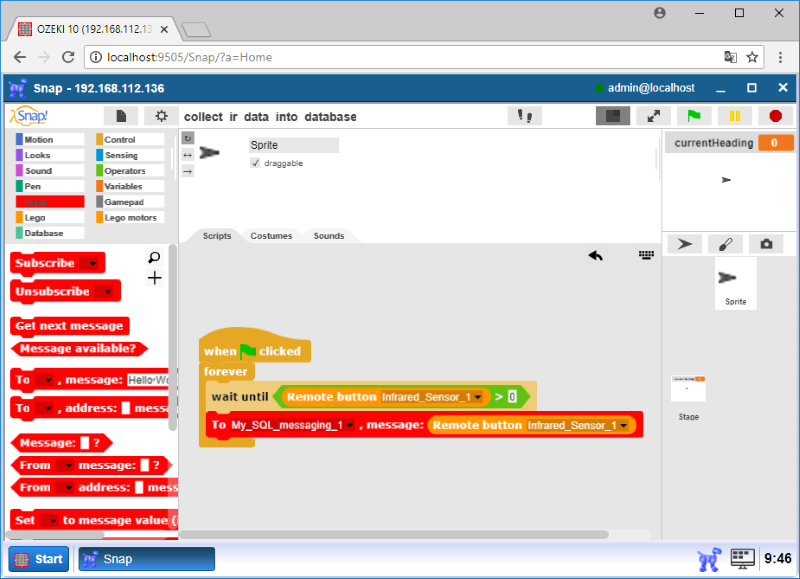
Figure 5 - The code sends the pressed buttons to the SQL Messaging connection
Open the Receive tab in the Configure menu of SQL Messaging connection and insert the '$messagedata' into the created table!
Now you have got the complete script that sends data to the database massaging connection, but you have to tell the connection what it should do with the incoming data. So open your SQL messaging connection and select the Configure menu. Here you can see four settings menu, but now you only need to do modifications on the Receive menu. In this menu you can change the default command that will be executed in case of a incoming message. This is the one that you have to modify. Just delete that command and type 'INSERT INTO Remote_data (Remote_button) VALUES ('$messagedata')' (Figure 6). With that the connection will insert data into the Remote_button column of the Remote_data table. It can be useful to know that the message sent in the '$messagedata' value in the most of the cases. At last click 'OK' to save this settings.
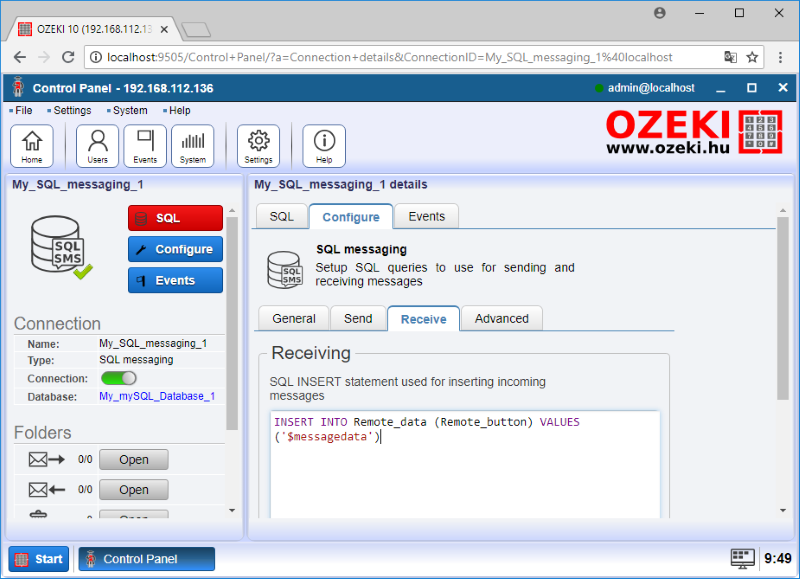
Figure 6 - This command will insert data into the table
Switch the infrared sensor to Beacon mode!
The second script of this lecture will have got the functionality of listening to the Beacon's angle and store it if it changes into the 'Beacon_data' table. To fulfill this task, the first thing that you have to do is to change the mode of the infrared sensor to Beacon, to collect the right data from the sensor. You can do that in the usual way by opening the infrared sensor connection, select the Configure menu and set the sensor mode to Beacon mode (Figure 7).
![]()
Figure 7 - Beacon mode selected for the infrared sensor
Write code to detect changes of the Beacon's angle and send them to the SQL Messaging connection!
The second SNAP script that you will use to store the Beacon's heading starts with the 'When green flag clicked' block. Then you have to store the current heading of the Beacon in a variable. So let's create a variable and name it 'currentBeacon'. You will have to use this variable as a reference, so you can check the heading of the Beacon is changed or not (Figure 8). At last add the 'Forever' block, because you need to listen for the changes continuosly and with that it's possible.
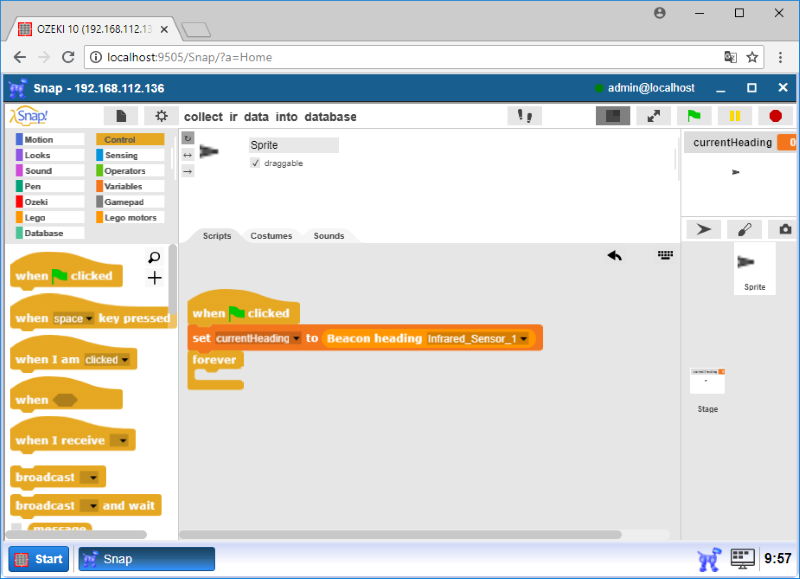
Figure 8 - The initial heading stored in 'currentHeading' variable
In the 'Forever' block first, please drag the 'Wait until' block, which will wait for the changes of the Beacon's heading. In that block place a 'not' block filled with the equality operator. In that operator add the 'currentHeading' variable and the 'Beacon heading' block and select the infrared sensor. With that the control of the program will only move towards to the next block when the beacon's heading is different from the initial heading that is stored in the variable. If that condition turns true and the 'To [connection], message: [text]' block will be executed as Figure 9 shows. Here select the SQL messaging connection and drag the 'Beacon heading' block as the message. Finally update the 'currentHeading' variable to the new heading with a 'Set'.
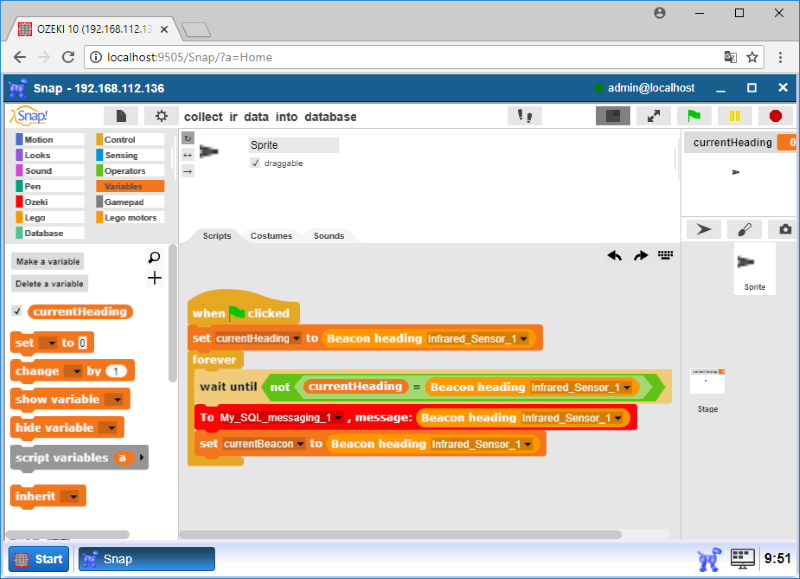
Figure 9 - The code sends the heading value to the connection when it changes
Open the SQL Messaging connection and insert the collected data into the table you created for Beacon data!
After you created the SNAP script that is capable of collect data from the infrared sensor, in the last step you only have to insert it into the Beacon table. For that you need to open up the SQL Messaging connection in Control Panel. Here select the Receive menu (Figure 10) and type the SQL command that will put the incoming data with SNAP into the Beacon_data table. That command will be 'INSERT INTO Beacon_data (Beacon) VALUES ('$messagedata')'. This will insert the data from SNAP ($messagedata) into the Beacon column of the Beacon_data table.
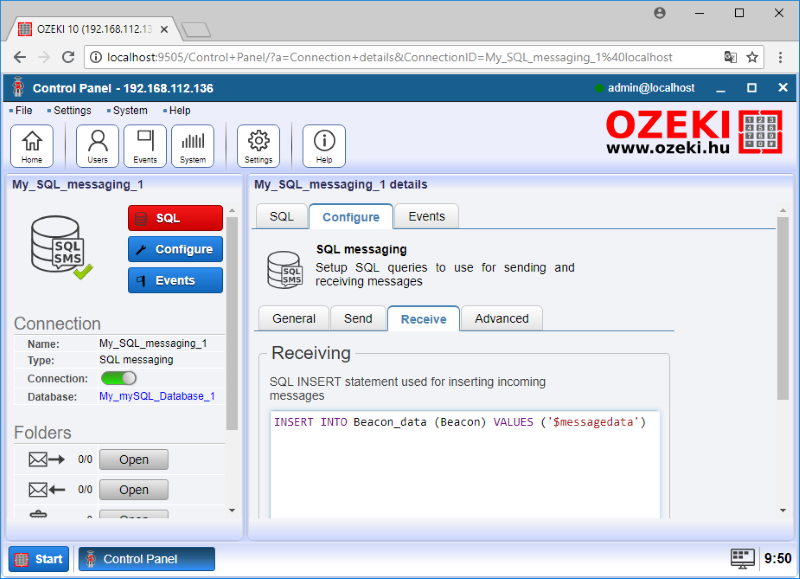
Figure 10 - SQL command that inserts data into the table
Program codes

Figure 11 - The code sends the number of the pressed button

Figure 12 - The code listens to the beacon value, which is stored if it changes
|
|
The program code stores beacon data in a database It can collect and insert data to an SQL table from the robot It is easier to follow the guide if you have the codes in front of you: Download Ozeki Snap code for collecting sensor data |
More information
- Collect sensor data into Text files
- Control the robot using Text files
- Collect sensor data into Microsoft Excel
- Install a database server
- Create database tables, introduction to SQL
- Collect sensor data from the Robot into SQL
- Collect sensor data into SQL using Robot events
- Collect sensor data with timestamps
- Control your robot from a database
- Use aggregated SQL data to make robot control decision