 Sign in
Use sensor input in robot control
In this lecture you will learn how to give feedback to the person controlling the robot using sensor data. For example, if the robot gets to close to an obstacle, it will play a sound. You will also learn how to overwrite commands coming from a human operator if a better alternative comes up based on sensor information. For example the robot operator will tell the robot to go forward, and the robot will automatically avoid an obstacle. This is a great lecture to complete.
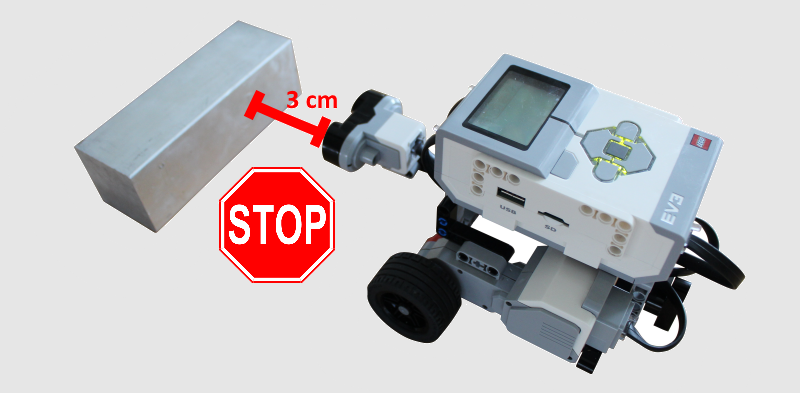
Figure 1 - Stopping the robot because an obstacle is near to it
Requirements
- Ozeki Sniffer robot: Lego Sniffer robot build instructions
- Ozeki 10 installed: Installed Ozeki 10 Robot OS
- Lego connection installed: Installed Lego bluetooth connection
- SNAP basics: Basic knowlege of the Snap programming language
Describe what the Lego ultrasonic sensor is!
Ultrasonic sensor - it is a Lego device which can measure distance like the IR sensor in proximity mode. It does it by emitting ultrasonic sound waves. It can measure the distance in centimeters and inches too.
Create four entry points to start the robot to different directions!
You should to start the Sniffer forward, backward, left and right using four entry points. To implement these, you need to use 'when [key] key pressed' control blocks and select the right keys for these blocks (e.g. the arrow keys on your keyboard). Finally, you just need to attach 'Drive' blocks found in Lego category to the previously placed 'when' control blocks to be able to start the robot to different directions. These steps are demonstrated in Figure 3. To recap, when you press an arrow key, the corresponding part of the program will execute and the robot will start at 25% speed to the requested direction.
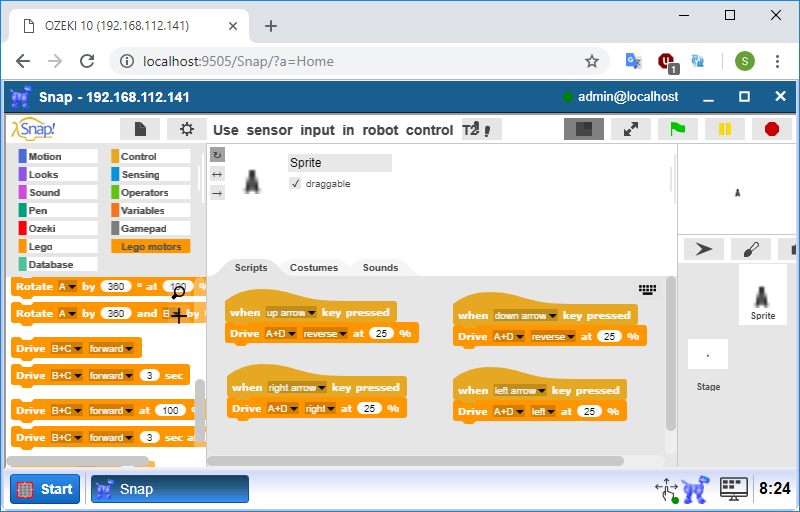
Figure 2 - The program code to start the robot to different directions
Create a block that returns true if the distance mesaured by ultrasonic sensor is larger than 3 centimeters!
To overwrite command coming from a human operator, the first step is to find out if the road is free in front of the robot. In order to implement this, you need to create a predicate type of block that returns true if the road is free. So please select the Lego category and click on the 'Make a block' button. Type 'is the road is free?' text into the textbox, select the 'Predicate' type then click on OK to create. Now you should see an empty 'report' block. It provides the return value of the whole command block you creating that should be true if the distance is larger than 3 centimeters. So first, place a '[value] > [value]' block found in Operators into the 'report' block. This block returns true if the value on the left side is larger then the value on the right side. So you just need to put the 'Distance in cm' block to the block's left side and type constant 3 to the right side as you can see on Figure 3. Finally, click on OK to create the 'is the road free?' block.
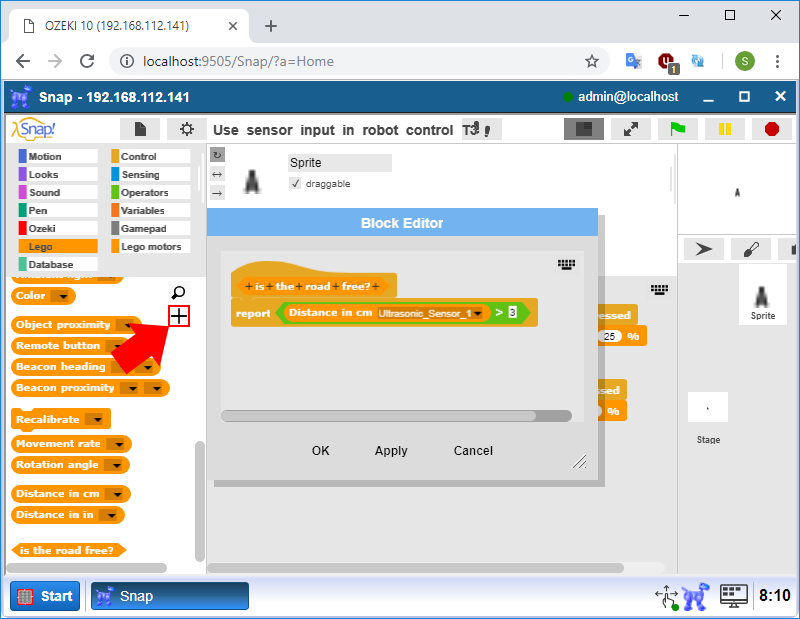
Figure 3 - Creating a predicate type of block for road checking
Upgrade the program to start the robot only if the road is free!
To solve this task, you need to use the 'is the road free?' block you created in the previous task. You should find this block in bottom of the Lego category. Since it is a predicate type of block, you can use it in the condition field of the 'if [condition]' block. Now it is so easy to upgrade the code to start the Siffer only if the road is free. If you look at Figure 4, you can see that the second part of the program is not upgraded. The reason is very simple. The ultrasonic sensor is mounted on the front of the robot, so it measures the distance between the front of the robot and the obstacle in front of the robot. But if you could drive your robot forward, it is most likely the road behind it is free.
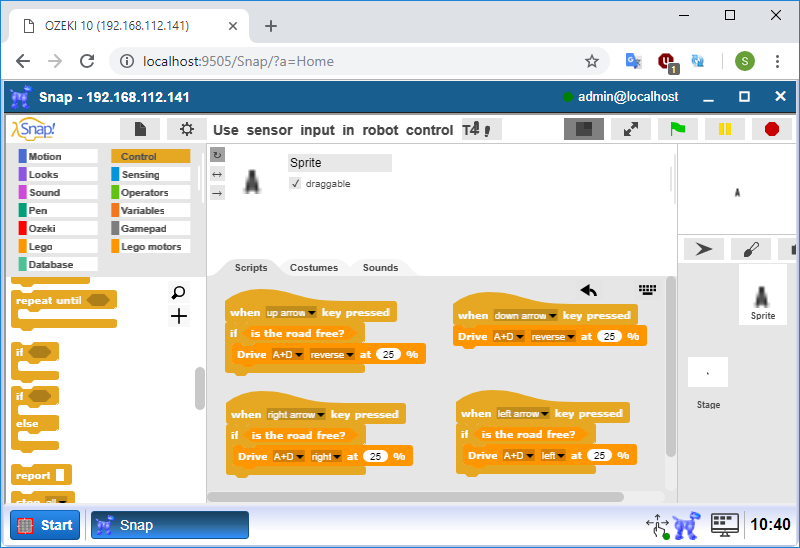
Figure 4 - Start the robot if the road is free
Create a block that stops the robot's motors, plays a tune on the Brick and sets its LED color to red for 2 seconds!
You need to create a control type of block to solve this task. Please create this block in the Lego category because it will contain Lego blocks mostly, so it is more logical to create it here. To do this, select the Lego category then click on the 'Make a new block' button. Type 'Stop the robot and alarm' text into the textbox, select the 'Command' type then click on OK. Finally, place the blocks as you can see on Figure 5. You can also use 'Play note' block instead of 'Play [Hz] Hz' block.
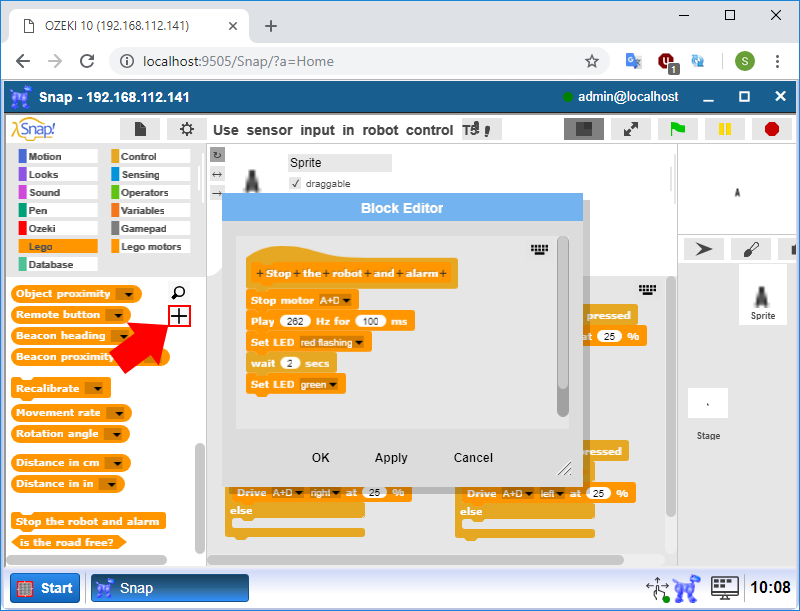
Figure 5 - Creating a command type of block for robot stopping
Upgrade the code to alarm if the robot can not go forward, left or right due to an obstacle!
At this point, your robot will not move forward, right of left if there is an obstacle in front of it. So your task is only to code that the robot is going to alarm in this case. To do this, please replace the 'if' blocks with 'if else' and place 'Stop the robot and alarm' blocks into their 'else' branches as can be seen on Figure 6. Now the program is capable to alarm you if the Sniffer can not move forward, right or left due to an obstacle at the time you press one of the arrow keys.
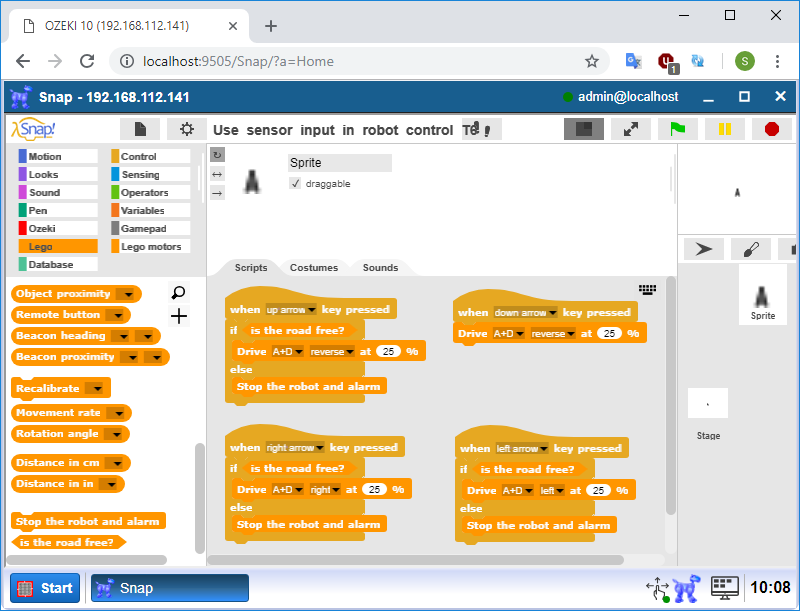
Figure 6 - Stop the robot if the road is not free and do alarm
Check the road when the robot is moving and stop it if there is an obstacle in front of the Sniffer or the key is released!
To solve this task simply, you need to implement it using broadcast event. So at first, please place a 'when I receive [message]' control block and create a new message called 'verify_road' for it. So the task is to check the road and verify if all the key is released to stop the robot. The easiest way to implement this is to wait until one of these occurs. So you need to use a 'wait until [condition]' control block and place a '[condition] or [condition]' block into the 'wait until' block's condition field. In this case, the 'wait until' block will wait until one of the condition of the 'or' block returns true. You just need to fill these two condition fields with the right blocks. So the program needs to wait until if any key is not pressed or if the road is not free. Look at the 'wait until' block and the blocks inside it on Figure 7 for help. The last step is to decide whether the robot should be stopped because the key has released or because the robot has blocked due to an obstacle then stop it depending on these informations. Just verify if the road is free. If yes, stop the robot by using the 'Stop motor' block. If not, stop the robot and do alarm by using the 'Stop the robot and alarm' block. Finally, you need to put 'broadcast [message] and wait' blocks into the other parts of the program, under their 'Drive' blocks and select 'verify_road' for the message field. Now your program will stop the robot if you relese the arrow key or if there is an obstacle in front of the robot while it is moving.
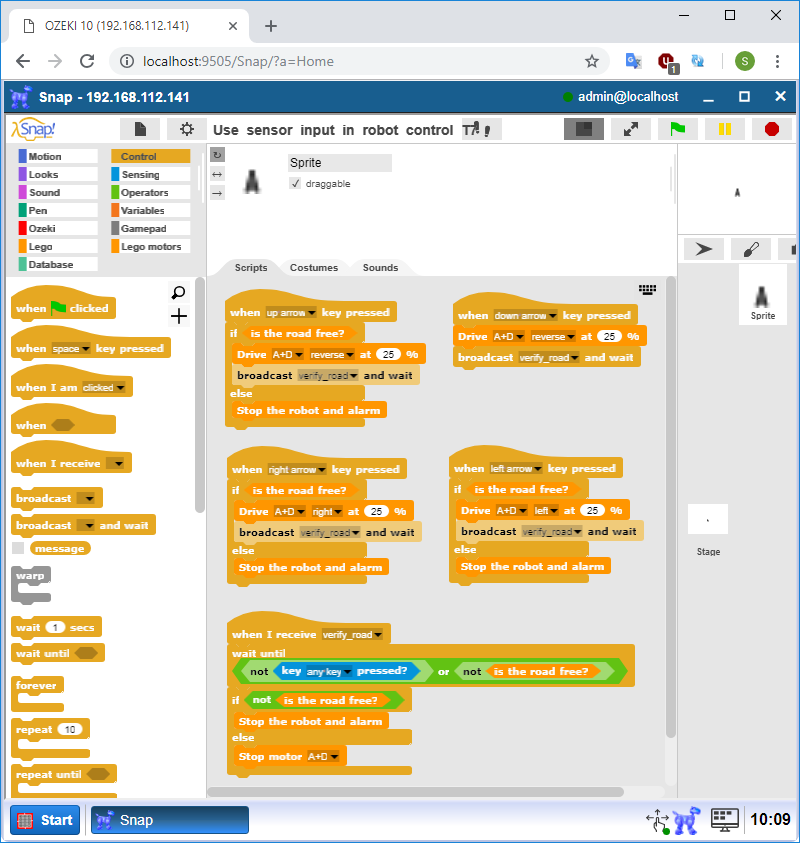
Figure 7 - The program overwrites the command if
there is a better alternative
Program code
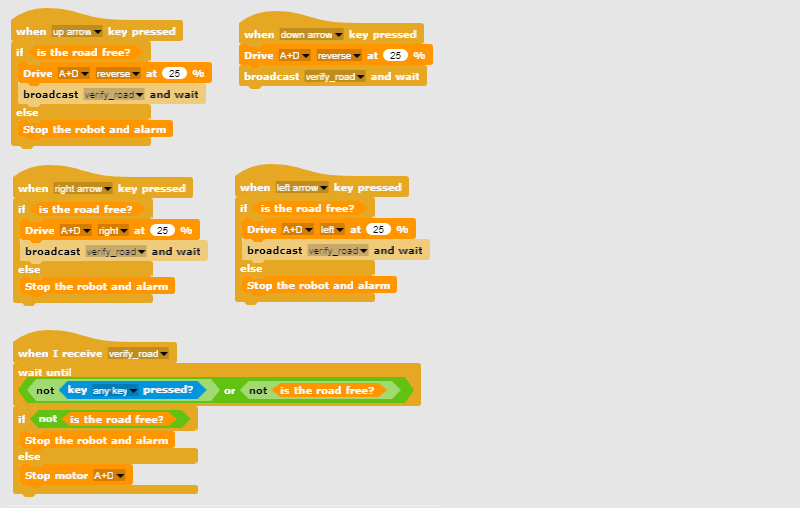
Figure 8 - Program code that can overwrite human commands
|
|
Download the SNAP program The program is capable to stop the moving robot if there is an obstacle in front of the robot. It does not allow the robot to start until the obstacle has not been removed. It is easier to do the steps if you have the program in front of you: Download the SNAP program code |
More information
- Drive your robot along a square
- Learn to use keyboard events
- Move your Lego robot from the keyboard
- Learn to use the gamepad
- Use a gamepad to control your Lego robot
- Use sensor input in robot control
- Learn to use states in robot control (Build the safe)
- Robot state control and feedback, using the IR remote controller
- Synchronized motion
- Robot control based on visual input