 Sign in
Connect the Lego robot to Ozeki 10
This lecture is about connecting Ozeki 10 to your Lego robot. This is an essential skill if you want to program your Lego robot efficiently. Ozeki 10 enables you to program your robot in SNAP, which is any easy to use drag and drop programming language. You may also use C#.Net and other programming languages to write your code. This lecture focuses on getting you started, which means you will see how you can setup the Lego robot connection with Bluetooth pairing and basic Ozeki 10 skills. This lecture is very easy to do.
Requirements
- Ozeki 10 installed: http://www.ozeki.hu/index.php?owpn=6066
- EV3 Brick connected to your PC with its sensors and actuators
Instruction video
Lecture video - Installing the Lego Mindstorms EV3 connection in Ozeki 10
Log in to Ozeki 10 with your user credentials!
Type your Ozeki 10's address in any browser and hit enter. The address is the combination of an IP address and port number separated with a colon. If Ozeki 10 is installed on your computer, you can navigate to http://localhost:9505 (Figure 1). At the login panel type your Ozeki 10 username (it is usually 'admin') and the password you have provided during the installation. Then click 'OK' to login.
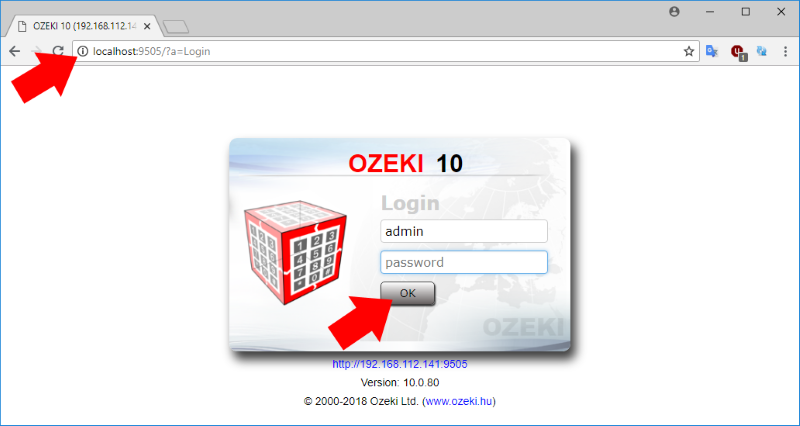
Figure 1 - The login screen
Open Control Panel from Ozeki 10's user interface!
Click the Control Panel icon on Ozeki 10's Desktop (Figure 2). It is designed for you, so you can control Ozeki 10 and all of it's connections. You can set up various type of new connections, for example a Lego Brick connection. You can also define messaging routes between each connection. You will see how to check the Event logs of your Ozeki 10 to check the communication flow.
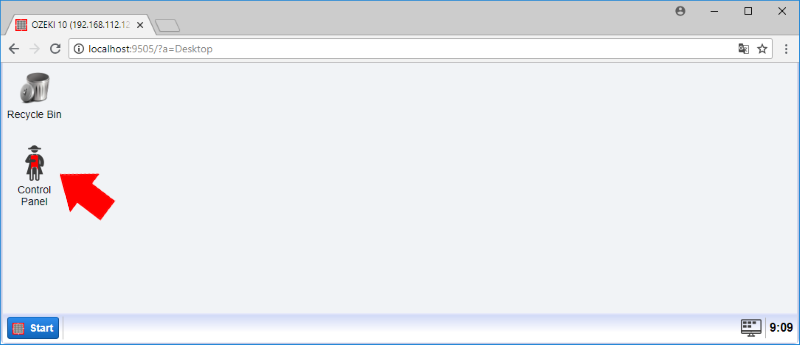
Figure 2 - Click the Control Panel icon
Create a Lego Brick connection in Ozeki 10!
Now you are seeing your connections in the Control Panel. To add your EV3 Brick and its parts to the list, click on the wide blue 'Create new Connection' button. A 'Connection details' panel on the right side will appear, where you can choose from many options. Please select the 'Sensor' icon to continue and select the 'Lego' icon as you can see it on Figure 3. Finally you have to select the COM port you have noted in the beginning of this lecture. This will be explained in STEP 2.
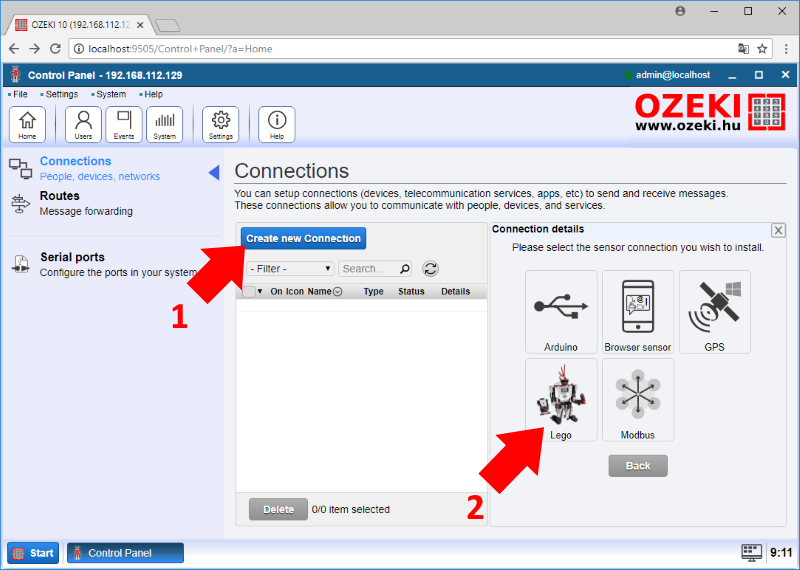
Figure 3 - Creating a new Lego connection
You can select the device name to identify the connection and select the COM port of your Lego Mindstorms EV3 Bluetooth connection (Figure 4). You have already took a note of the port number on the beginning of this lecture. Click 'Ok' to create the Brick connection and find it on the connection list. Usually there are two COM ports belonging to the EV3 Bluetooth connection, but only the outgoing EV3 serial port works. If you have selected the correct COM port, all sensors and actuators connected to the Brick will suddenly appear on the connection list (step 5, Figure 5).
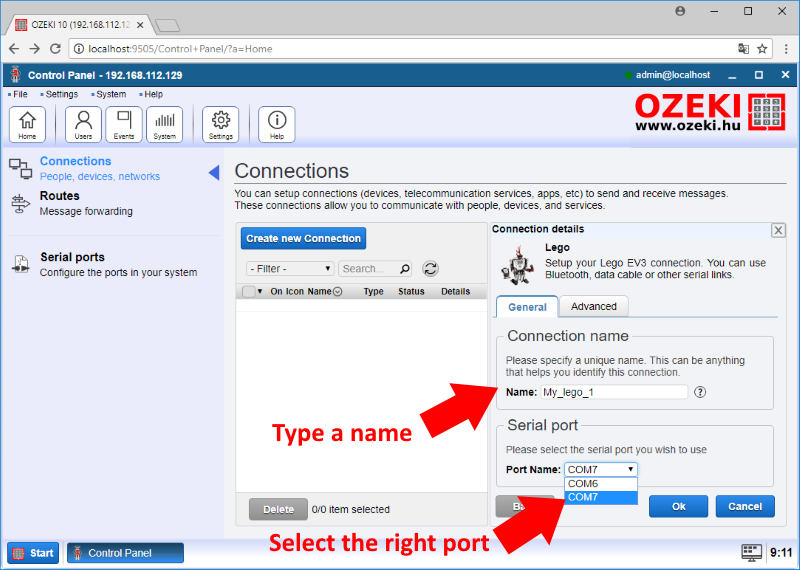
Figure 4 - Select the COM port for your Lego Mindstorms EV3 connection
Open Brick details to find all Lego device connection events!
Now you can see the EV3 Brick and its components, like the battery, speaker, LED, LCD display and all devices that are currently wired to the Brick (Figure 5). There is a 'Details' button right to each device. If you click on one of them, you can get more information about the selected device and you can also configure or check the event list of each of them as you can see under the next step.
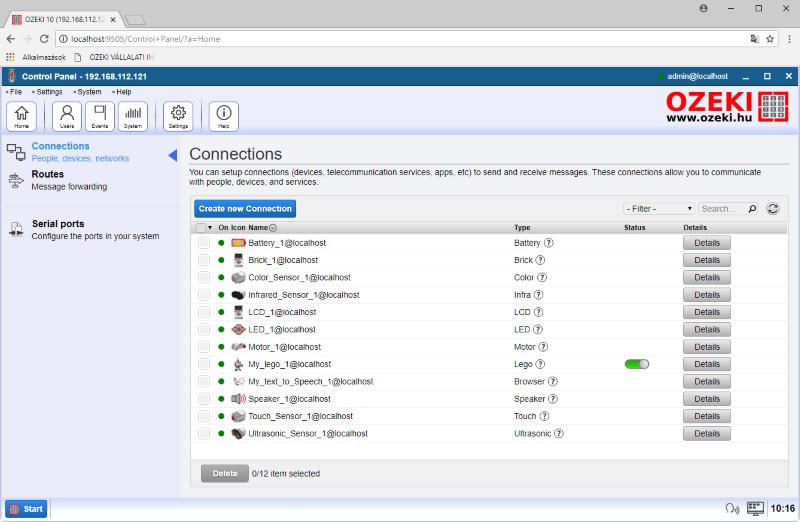
Figure 5 - Find the EV3 Brick in the connection list and all of it's parts
Click on 'My_Lego_1' and open the 'Events' tab page. Now you can see the communication event logs. On Figure 6 you can see that all devices of your Lego Midnstorms EV3 set has been detected. If you are seeing an empty log, you have probably selected the wrong COM port. In this case you should try to create a new Lego connection to the other COM port belonging to your Bluetooth.
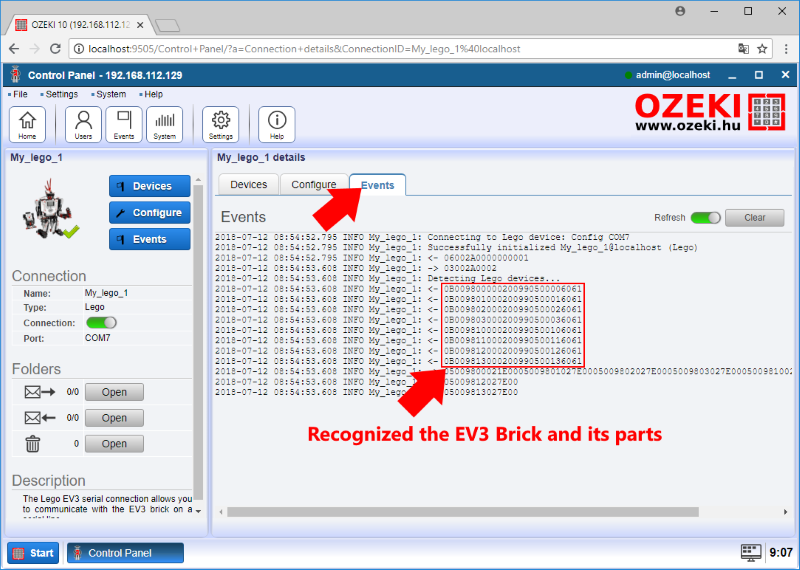
Figure 6 - The event log of the detected Lego Mindstorms devices
More information
- Collect the parts
- Build the frame
- Connect the motors to Lego Brick
- Connect the Lego Brick to your Windows PC
- Install Ozeki Robot Developer
- Connect the Lego robot to Ozeki 10
- Test the Lego Motors individually
- Start SNAP and write your first program
- Use Lego blocks in SNAP to control Lego Motors
- Drive your Robot around obstacles