Course 1:

Build your first robot

Learn to build a Lego robot! Start from the basics and go all the way to creating a PC controlled robot that can drive around an obstacle course with fun and ease.

Beginner level
Category: Robotics 💬 English

What Will I Learn?

  • Learn the basic terms and definitions in robotics.
  • Understand the components of a robot.
  • Learn to create a Lego Mindstorms robot frame.
  • Learn to connect motors and sensors to the Lego brick.
  • Learn to install Ozeki 10 robot operating system to the robot controll PC.
  • Learn to test each robot sensor and actuator (motor) individually.
  • Create a simple robot control program.
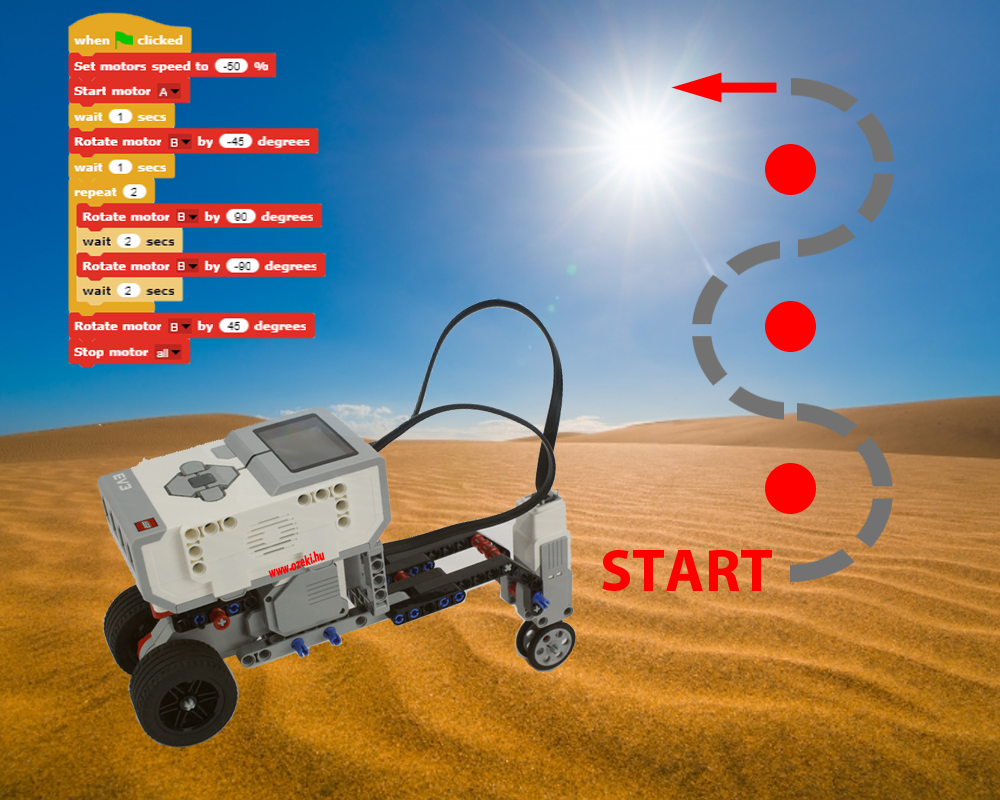
  • Understand how to write code to move the robot around an obstacle course.

Video

Start this course

Curriculum For This Course

In this lecture you will learn the names of the sensors, the actuators and robot building blocks found in your Lego Mindstorms robot building set. You will learn what each sensor can measure and how you can connect them together. The most important part of the Lego Mindstorms robot kit is the Brick. You will also learn about the sensors built into the brick, such as the LCD display, the buttons and the speaker.
The fun part starts with building your first Lego robot the Chopper. This is a simple motorcycle of a large motor used for driving the motorcycle forward and a medium motor for steering the motorcycle. In this lecture you will learn about the structural elements, and you will see the building steps to build this robot.
This lecture details what each part in your first Lego robot does. The focus is on connecting the parts together. You will learn about the ports of the Lego brick, and you will find out where and how motors and sensors can be connected.
In order to write programs to control your Lego robot, you need a personal computer. We recommend you to use a Windows 10 machine with a Bluetooth connection. This lecture details the steps that are needed to connect your Lego robot to your PC. It starts with Bluetooth, and also gives you all the neccessary information to set up a USB or a Wifi connection. You will also learn which connection should be used under various circumstances.
Ozeki 10 is the best robot operating system out there. It can be used to program Lego robots, Arduino driven robots and industrial robots, such as CNC milling machines, laser cutters and industrial robot arms. It is also a great software for buliding sensor networks and to do home automation. In this lecture you will learn how to setup Ozeki 10 on your Windows 10 PC.
This lecture is about connecting Ozeki 10 to your Lego robot. This is an essential skill if you want to program your Lego robot efficiently. Ozeki 10 enables you to program your robot in SNAP, which is any easy to use drag and drop programming language. You may also use C#.Net and other programming languages to write your code. This lecture focuses on getting you started, which means, you will see how you can setup the Lego robot connection. You will find it very easy.
In a modern robot you have many sensors, motors and smart components you wish to communicate with. Communication is always handled by sending messages. For example to read the value of a sensor you can send the "read" message to it and it will return the value read as a number or text. To turn a motor, you can send a message "turn 360" to the motor connection, which will turn the motor around by 360 degrees. In this lecture you will learn about how to control your sensors and motors using messages.
In this lecture you will learn about SNAP. SNAP is the best tool to learn program programming. SNAP is a visual programming language developed at Berkeley university. Ozeki 10 extends SNAP with building blocks for robotics. SNAP was chosen, becuase it is a great first step to learn the logic of programming. It is very easy to convert the knowledge acquired in SNAP to more advanced programming languages, such as C#.Net.
In this lecture you will learn about the SNAP programming blocks developed by Ozeki to control Lego Mindstorms EV3 robot motors. You will find out how to start the motors, how to stop the motors, how to turn them by a given angle, and you will learn how to used these blocks in a program you write. If you have not controlled robots from a programming language before, this is the best place to learn the neccessary information.
In the final lecture of this course, you will learn how to drive your Chopper robot around obstacles. You will write a simple program, that turns the motor responsible for steering the robot and drives the other motor to go forward or backward. You will enjoy this lecture, as it finaly gives you a real feel of what robotics is about.
Start this course

Requirements

  • This course is designed to suit users of either the EV3 home edition or the EV3 education edition.
  • Users are required to have a Windows 10 PC with Bluetooth. (Most Windows 10 laptops have built in bluetooth support)
  • Users will need to download Ozeki 10 from www.ozeki.hu

Description

Ozeki 10 (robot operating system) gives you access to robot sensors, motors, actuators and microcontrollers the same way Microsoft Windows gives you access to your hardware devices in your PC. It makes it very easy to create and build robots, and to program them to do the task you prefer.

This course is designed to get you started with robotics. It shows you how to create a simple robot and how to control it with instructions. You will learn how to communicate with and how to test the individual parts of the robot, and you will see how these parts can work together, so your robot can complete the desired tasks.

The lectures in the course provdie easy to follow step by step instructions, and a quiz. Enjoy the course!

Who is the target audience?

This course is designed for learners who are intersted in building and programming robots. It is an entry level course that allows students to learn the basics and it enables them to get started.

Start this course

Next

Copyright © 2000- |Ozeki Ltd | info@ozekirobot.com |
Page: 6042 | 79.99.42.43 | Login