 Sign in
Control robot using chat
In this course you will learn about Internet chat control of robots. You will learn how to write a code that allows your robot to communicate with people or other robots using text messages sent and received through the Internet.
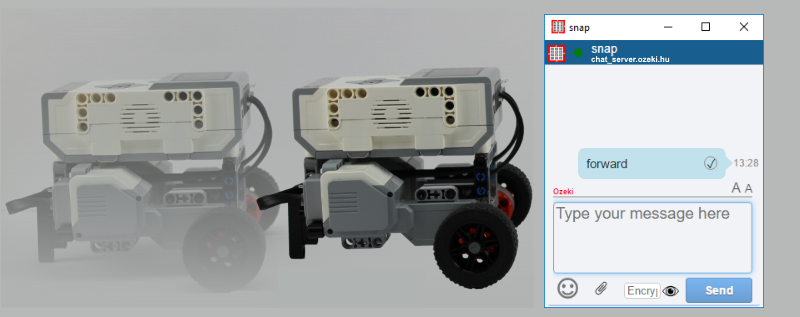
Figure 1 - Take a look how robots can be controlled via chat
Requirements
- Ozeki Sniffer: Sniffer robot build instructions
- Ozeki 10 installed on 3 PCs: Installed Ozeki 10 Robot OS
- Lego connection installed: Installed Lego Bluetooth connection
- SNAP basics: Basic knowlege of the Snap programming language
- Ozeki Sniffer equipped with Button Sensor
Draw a diagram about how you can imagine how this system will work!
You are going to learn how to control the Sniffer connected to the PC of User B via Bluetooth from the PC of User A and also learn how to notify User A if the Button Sensor on the robot is pressed. Look at Figure 2 for the system diagram. You can see an example on it how this system will work if you want to drive the robot forward. You just need to type 'forward' in the Ozeki Chat window on the PC of User A and this message will forwarded to the PC of User B through the Chat Server. The Snap application running as a part of Ozeki 10 Robot OS on the PC of User B will interpret this message and due to this, it will drive the connected robot forward. But what will happen if you press the Button Sensor on the connected Robot? The Ozeki 10 running on the PC of User B will detect it and it will notify User A about this event. So it will send a message (e.g. button is pressed) to User A. This message is received by the Chat Server at first and it will forward the message to the PC of User A. Finally, the message 'button is pressed' will show up in the Ozeki Chat window of User A.
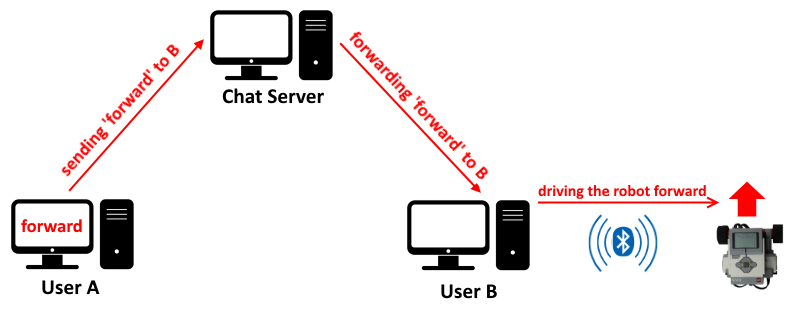
Figure 2 - System diagram
Setup a chat server!
To be able to control the Sniffer robot connected to the PC of User B via Bluetooth from the PC of User A, you need to setup a chat server. It will responsible for forwarding the messages between the set up users. That can be a hard task to do, but in Ozeki 10, it takes just a few clicks. So first login into Ozeki 10 on the Chat Server PC and open the Chat Server application from the Start menu of Ozeki 10 by following the route Programs - Messaging - Chat Server as can be seen on Figure 3.
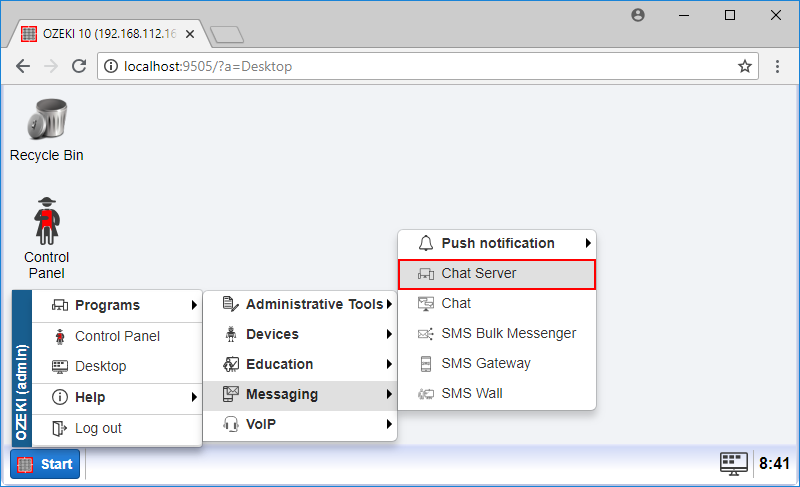
Figure 3 - Chat Server application is reached through Start menu
After you opened the Chat Server application, you need to select the Domain tab. This is where you are going to create the chat server if you click on Create new Chat domain. The only thing that you have to do before finalizing the chat server to enter a domain name for it as you can see in Figure 4. That will be the domain name for the users that you are going to add to this server. By clicking OK, you have just created your own chat server and now you just need to add some users to it.
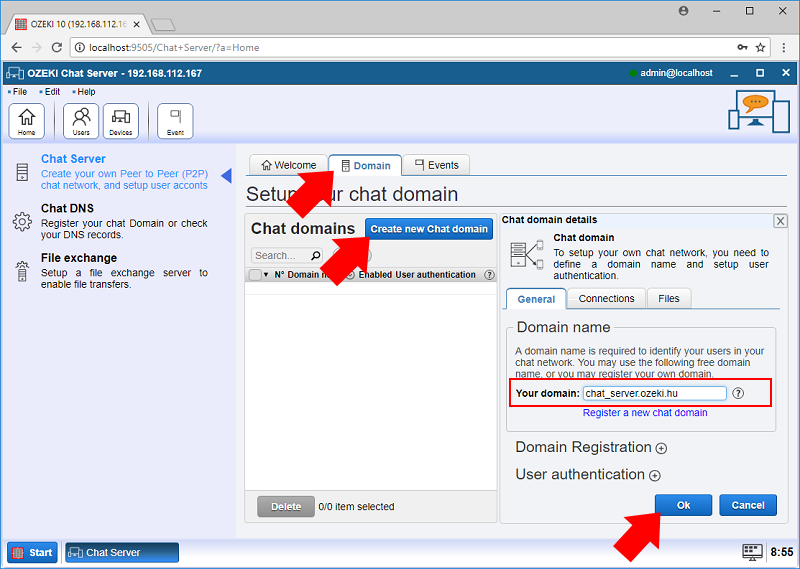
Figure 4 - Setup the chat domain
Create two user accounts called 'user_A' and 'user_B'!
In this task, you are going to create two chat user accounts. To do this, open Control Panel and select the Users icon on the top bar. In this page, you can add user accounts to the chat server by clicking on the blue Create new User account button. As Figure 5 demonstrates, you need to add a username followed by a @ sign and a domain name for the chat server that you created in the previous task. Before finalizing, you need to select the groups the user belongs to. Finally, you need to type a password for the account to be created then click on OK. Here you can create as many user accounts as you want. But to complete this lecture, you only need two accounts.
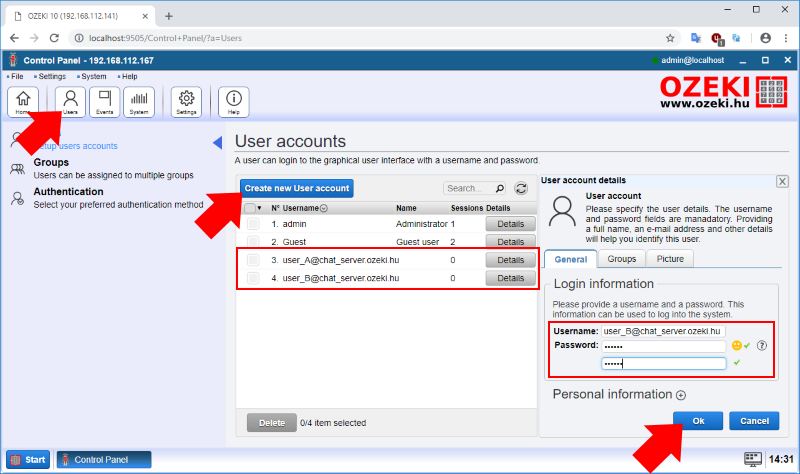
Figure 5 - Username and password are required to create the user account
Open the details page of the SNAP application on User B's PC!
The next task that you have to fulfill is to share the SNAP application to handle it as a char user. But for that you have to open the details page of the SNAP connection in Control Panel. By default the App connections are not visible in the list of connections. To list all available applications, you have to click on the Filter and check the App option. After that, you can just open the SNAP connection by clicking on it as can bee seen on Figure 6.
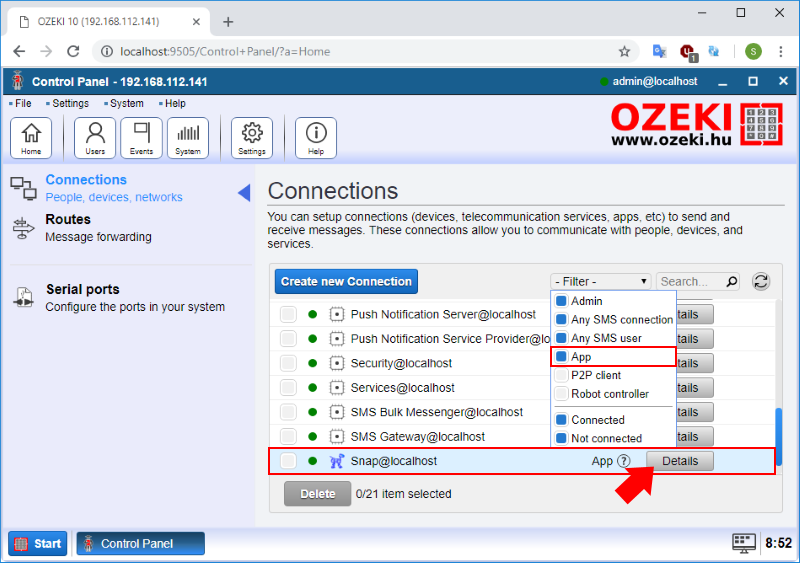
Figure 6 - App filter checked in Control Panel
Share the SNAP App on the chat domain!
After you opened the details page of the SNAP app, to share it on the domain, first navigate to the Sharing tab and click on Create new Shared connection as Figure 7 demonstrates. Here you need to type a name for the shared connection that the other users will see in the chat. In the 'Domain login' and 'Domain password' fields, you have to enter the details of the user account that you created for User B. Finally, click on OK to share the SNAP applicaton on the provided domain.
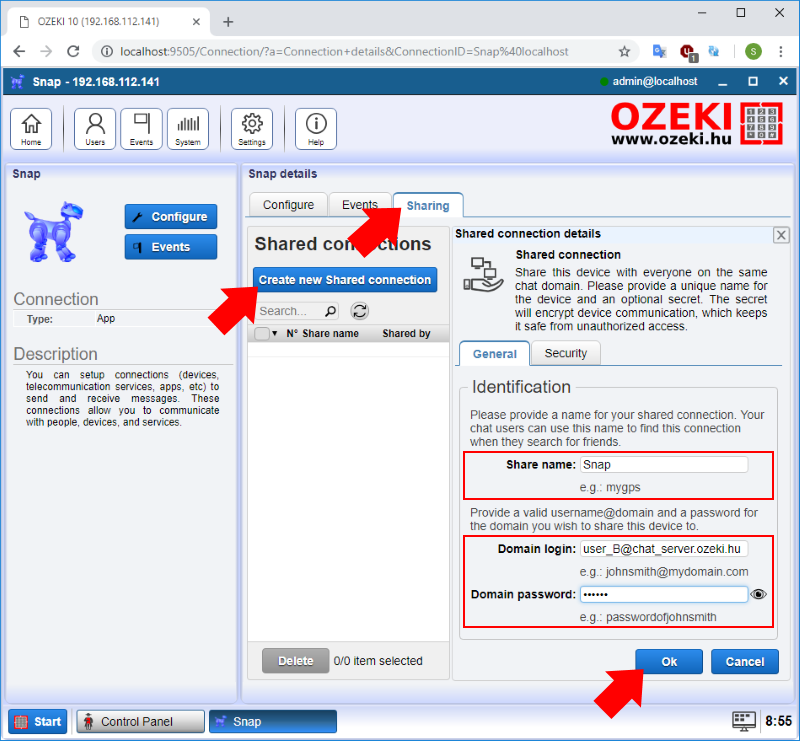
Figure 7 - Sharing the SNAP application
Add Snap as a friend of User A in the chat client!
To add the Snap connection you shared to the friendlist of User A, you need to login to Ozeki Chat on the PC of User A with its credentials details. So, after you opened the Ozeki Chat and typed the username and password of the user account you should click on OK to login. Then you need to click on Add and type the text 'Snap' into the search box. By clicking on Search after a few seconds, the shared Snap connection will appear and you can add it as a friend by clicking on the Add button. If you click on Back to friendlist, you will see the Snap as a friend of User A like Figure 8 shows.

Figure 8 - Adding Snap to friendlist
Write a code in the SNAP of User B to receive messages from the Snap connection you shared!
After you did all the configuration for creating a chat conversation with the Snap app, you just need to write a program that can receive the messages coming from Ozeki Chat of User A. You can reach these messages using the blocks from Ozeki category. To detect if there is an incoming message, you need to use the block called 'Message available?'. You can use it for creating the entry point by inserting it into a 'when [condition]' control block. Due to this, this part will be activated when there is an incoming message. The last step is to store this incoming message into a variable. To do this, you need to get this message using a 'Get next message' block then set its content as a value of the 'message' variable using the 'Set [variable] to message value (string)' block as you can see on Figure 9.
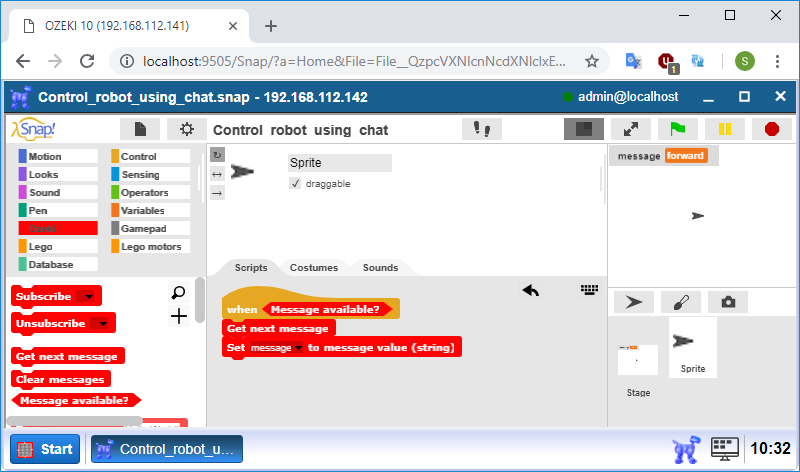
Figure 9 - Incoming messages stored into the 'message' variable
Upgrade the program to compare the message with directions like 'forward' or 'backward'!
To control the robot with the messages, you need to examine what these messages contain, and if the message is a direction, drive the robot to that way. But first, you need to compare the message with these directions. So, for that add two 'if' blocks below all the previously added blocks. To both of them insert a 'matches' block and select the 'message' variable. Lastly, type the word 'forward' in the first 'if' then 'backward' in the second 'if' block as you can see on Figure 10.

Figure 10 - Received messages compared with directions
Extend the code to move the robot to the matched direction!
If the message text matches with one of the directions, your next task is to move the robot to that way. And for that, you only have to add one block in each 'if' blocks. That block will be 'Drive [motors] [direction] [time] sec' block. In both of these blocks, you should select the A and B motors and type number 5 like 5 seconds. The only difference will be the direction. If the message is matched with 'forward', select the 'forward' direction, and if it is matched with the word 'backward', select the 'reverse' option.

Figure 11 - The robot moves to the matched direction
Upgrade the program to send a 'button pressed' message if the Touch Sensor is pressed!
You can also notify User A if the Touch Sensor is pressed on the Sniffer. To implement this, you need to create another part which detects the button presses. You can use the 'Button on' predicate type of block inserting it to a 'when' control block. So this is the entry point of the part. Then you just need to send a message that will appear in the Ozeki Chat of User A. To do that, add the 'To [connection], address: [adress] message [text]' block, and select the shared Snap connection for its connection field. As the address, you should enter the address of the chat user you want to notify. And lastly, you should write a message to be sended. To send this message only once per button presses, drag the 'wait until' block and add a condition that returns true if the Touch Sensor is not pressed! Look at Figure 12 for help.
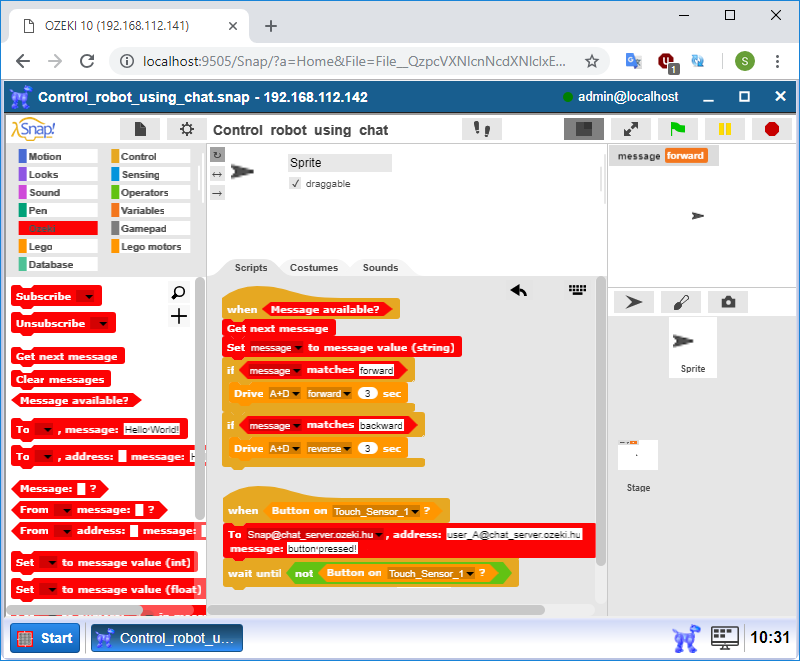
Figure 12 - In case of button press, the robot sends one chat message
Program code

Figure 13 - This program code can receive and send chat messages
|
|
Download the Snap code to learn how to chat with your robot With this code you can send and receive chat messages from your robot. It is easier to follow the guide if you have the codes in front of you: Download the SNAP code |
More information
- Displaying emotions, playing sounds
- Control robot using chat
- Error alert using e-mail
- Robot status updates on a website using FTP
- Robot control using voice commands
- Robot error alert using text to speech
- Robot control using SMS
- Error alert using SMS
- Write messages in Morse code
- Robot error alert using Telephone call (voice)